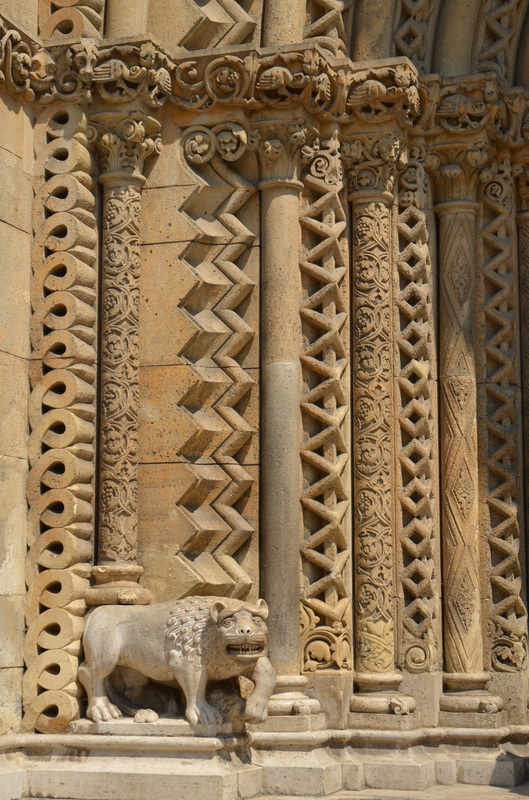
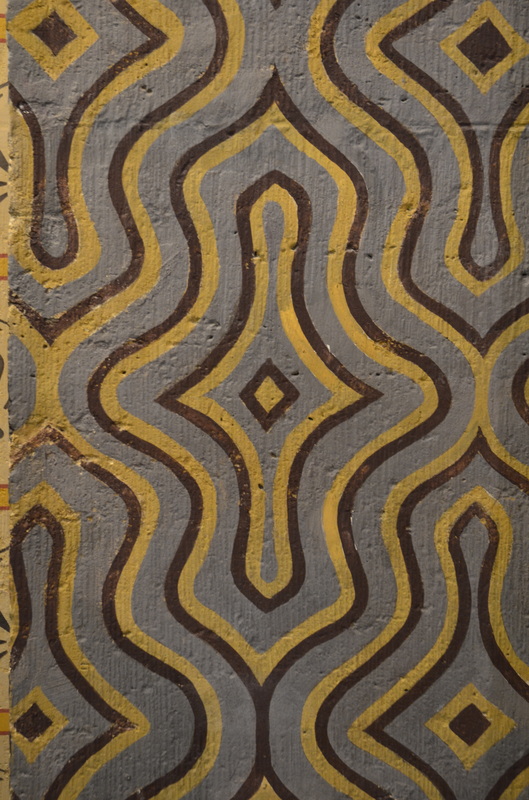
In Budapest, I spotted many inspirations for quilt designs. As we strolled through the streets on the Pest side of the Danube, I noticed these stone carvings (above) on a church. Of course they made me think of quilt borders, as did these (below) in the archway of the same church. 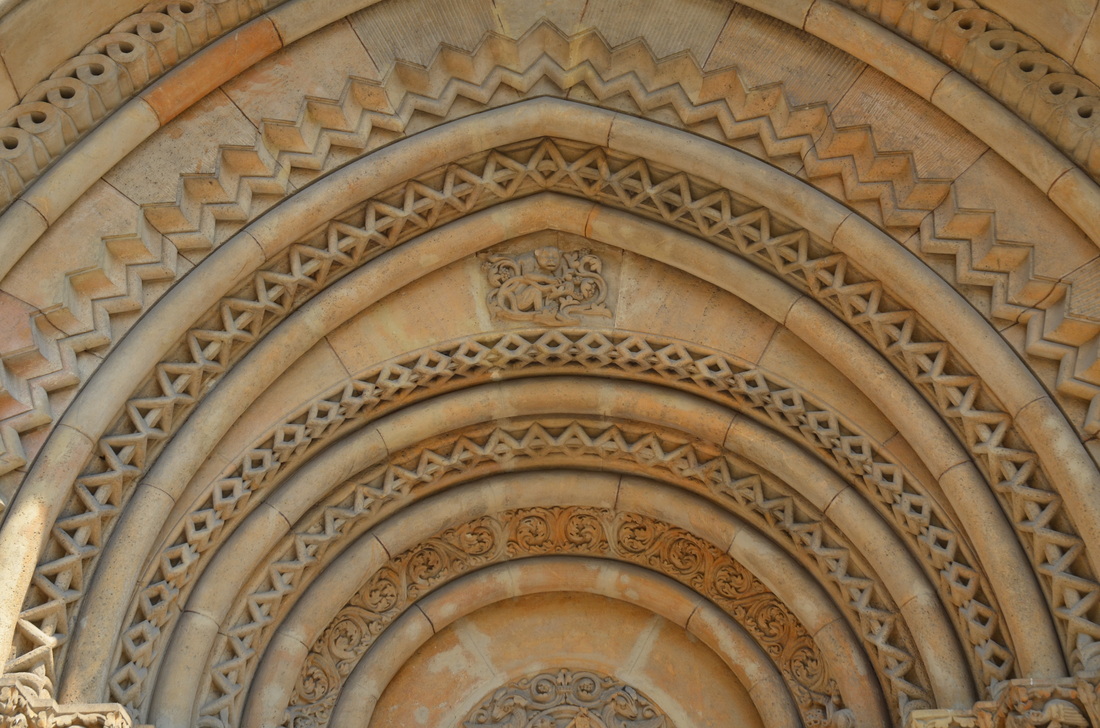
Across the Danube on the Buda side, we spent some time in the 700-year old Matthias Church, the scene of several coronations, including that of Charles IV in 1916, the last Habsburg king. It is one of the most beautiful churches I've ever seen. 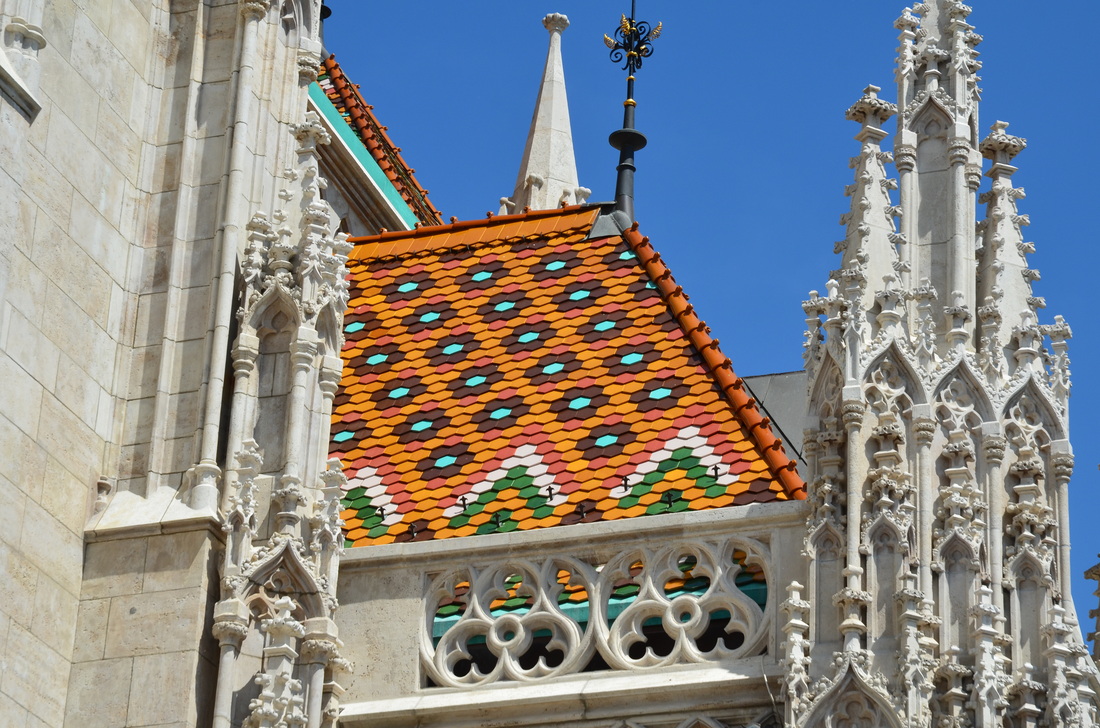
The tiled roof was especially appealing. 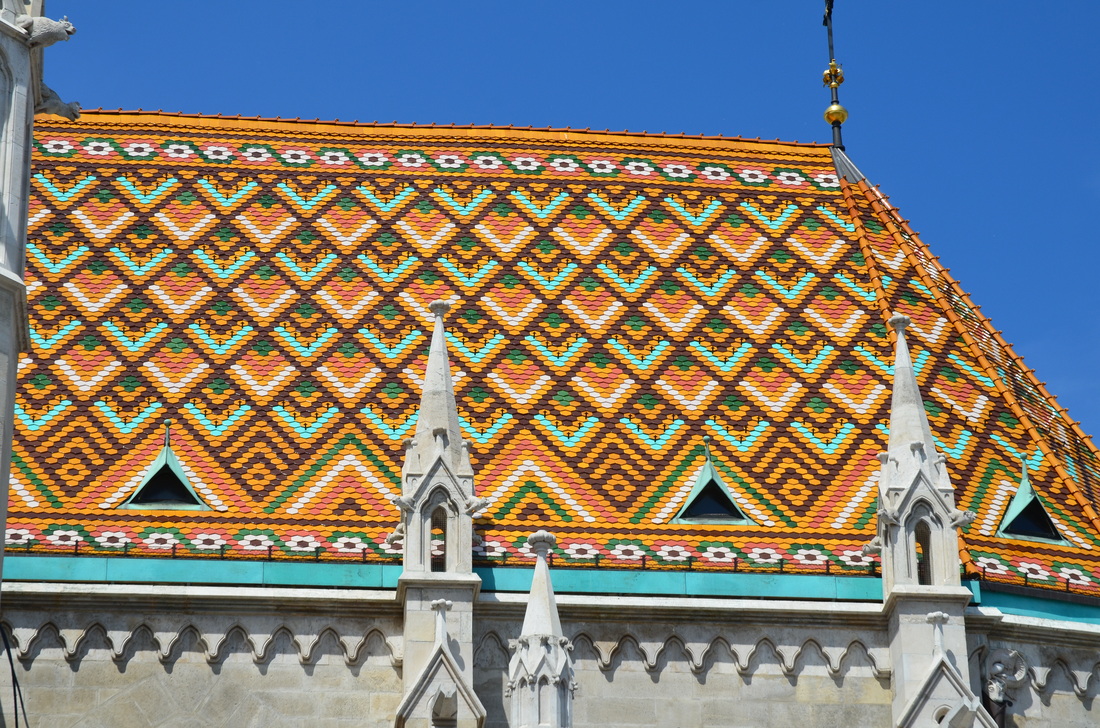
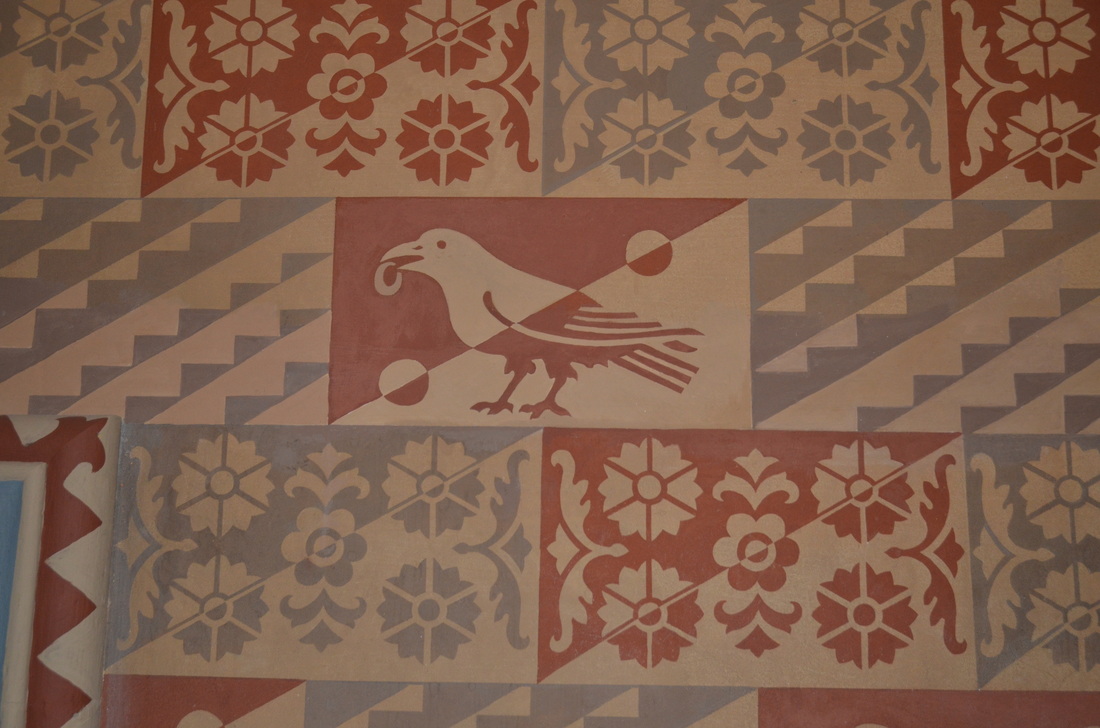
And the interior of the church was covered in colorful stencils. Here are just a few examples: 

On our last morning we went to the Museum of Ethnography. 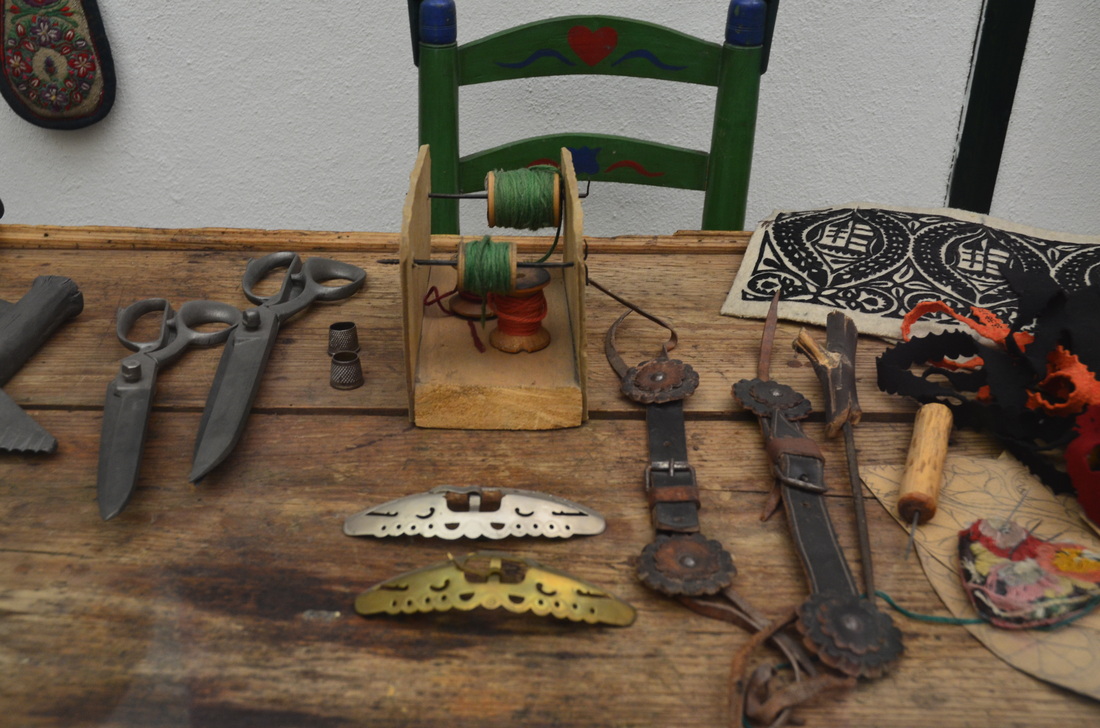
I spent a lot of time in the needlework areas. Above are some of the original tools they used. How about this chair (below) for storing threads? 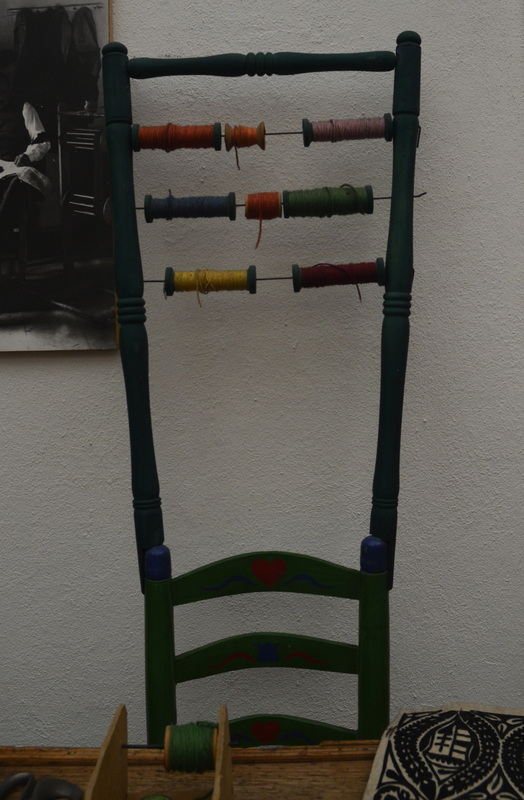
I loved these embroidered turkeys. 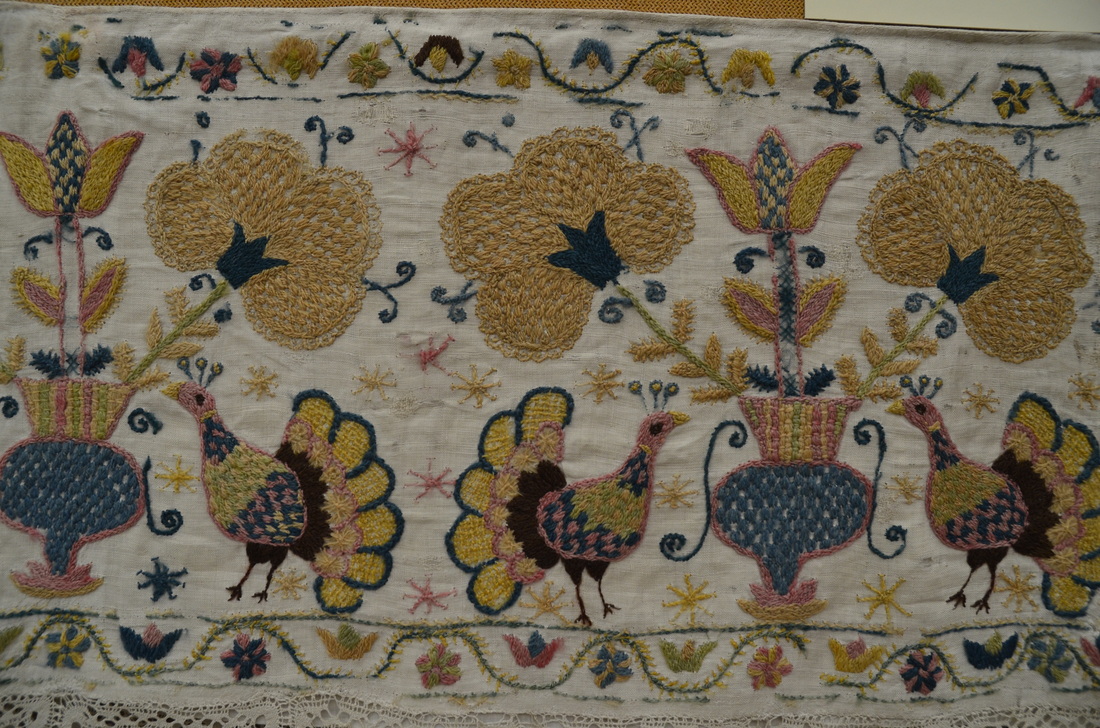
And I thought I was the only one who went overboard when embellishing! 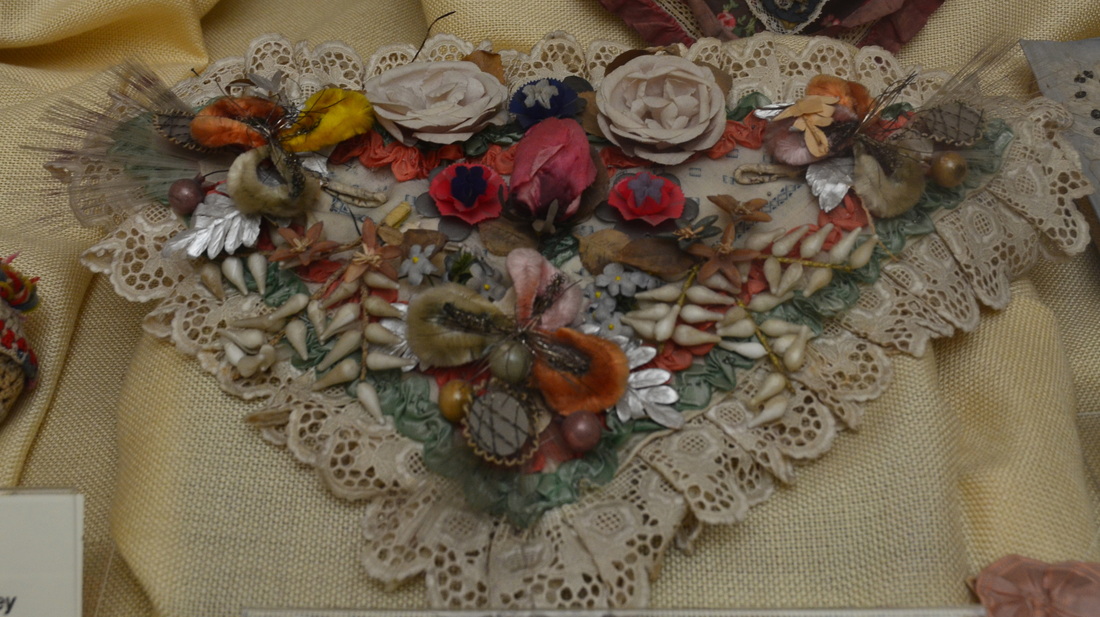
The photos in the museum were fascinating. I'll end with two that really struck me. The first one reminds me of making pastry for strudel with my mother and Hungarian grandmother - this is exactly how we did it, and how my mother is teaching my daughters to do it! 
And I'm including this one because I love it - what better reason do I need? 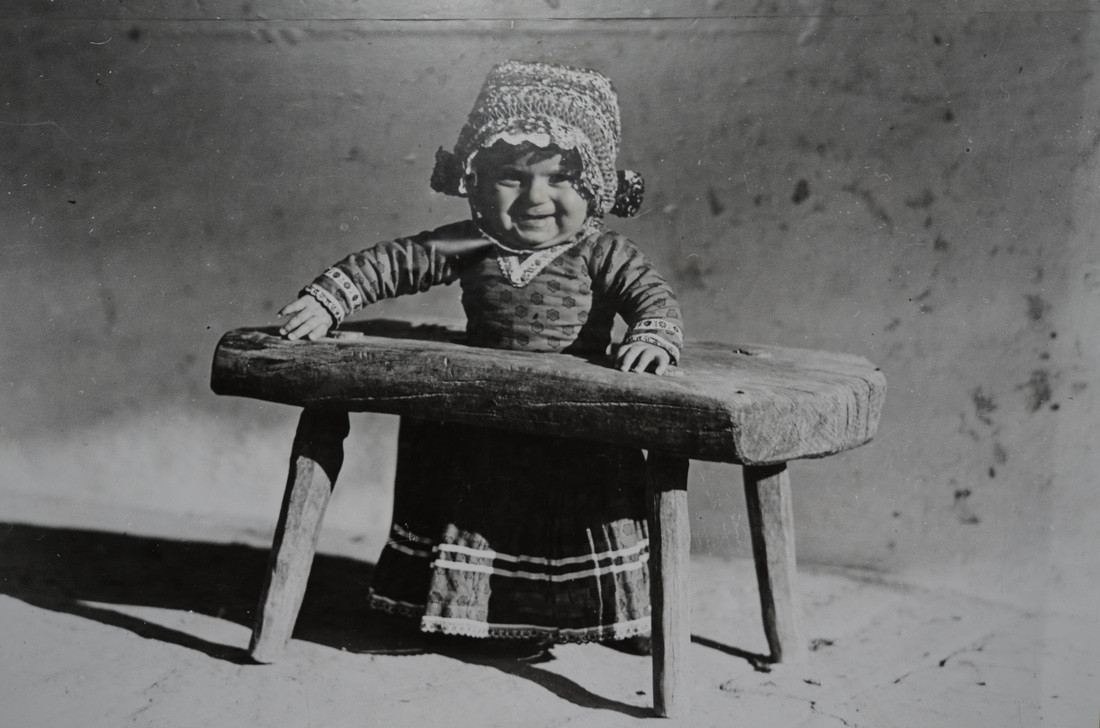
Back to work on the book after a rejuvenating and inspirational holiday!
2 Comments
 My daughter and I went to Budapest last week for our annual May trip. We did all the touristy things, ate wonderful food seasoned with paprika, and especially enjoyed the Szechenyi thermal baths! 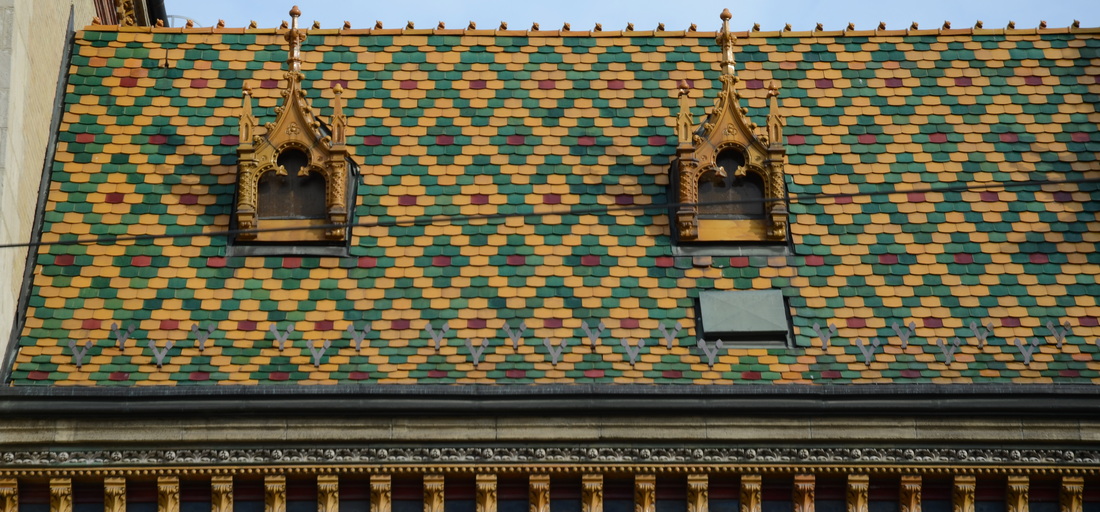 Everywhere we walked there were inspirations for making quilts. Above is the roof of the Market Hall. 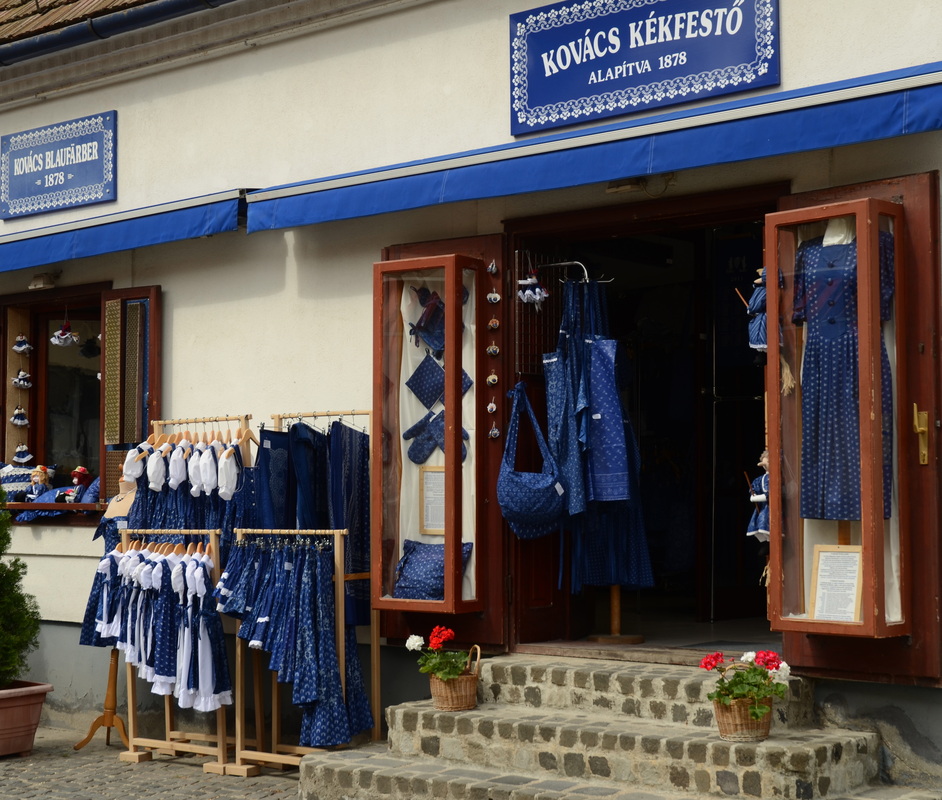 We went to a local village call Szentendre one morning, that specializes in Hungarian folk art. I was drawn to this shop called Kovacs kekfesto (www.kekfestokovacs.hu), Bogdanyi St. 36. It sells typical Hungarian fabrics in blue prints, dyed by the family that has owned the shop since 1878. There were clothes, tablecloths and accessories for sale, and more importantly, yardage for quilting! 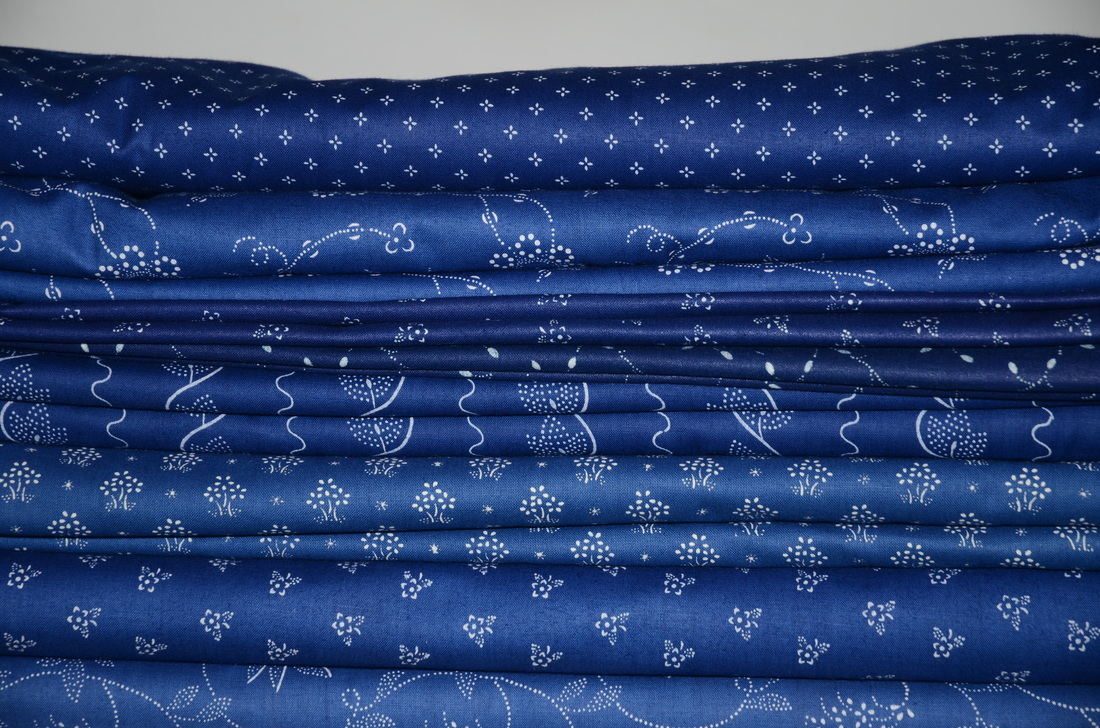 They had a small "museum" area with old fabrics and the blocks that were used to make the prints. 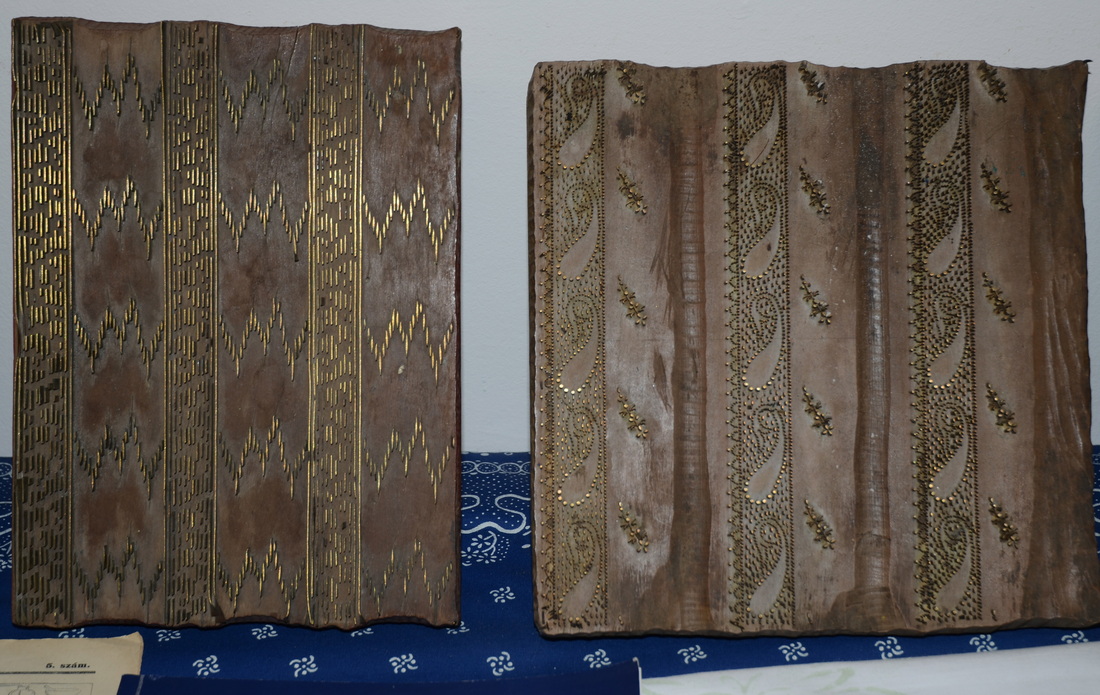 The owner posed with the quilting fabrics dyed by her family. 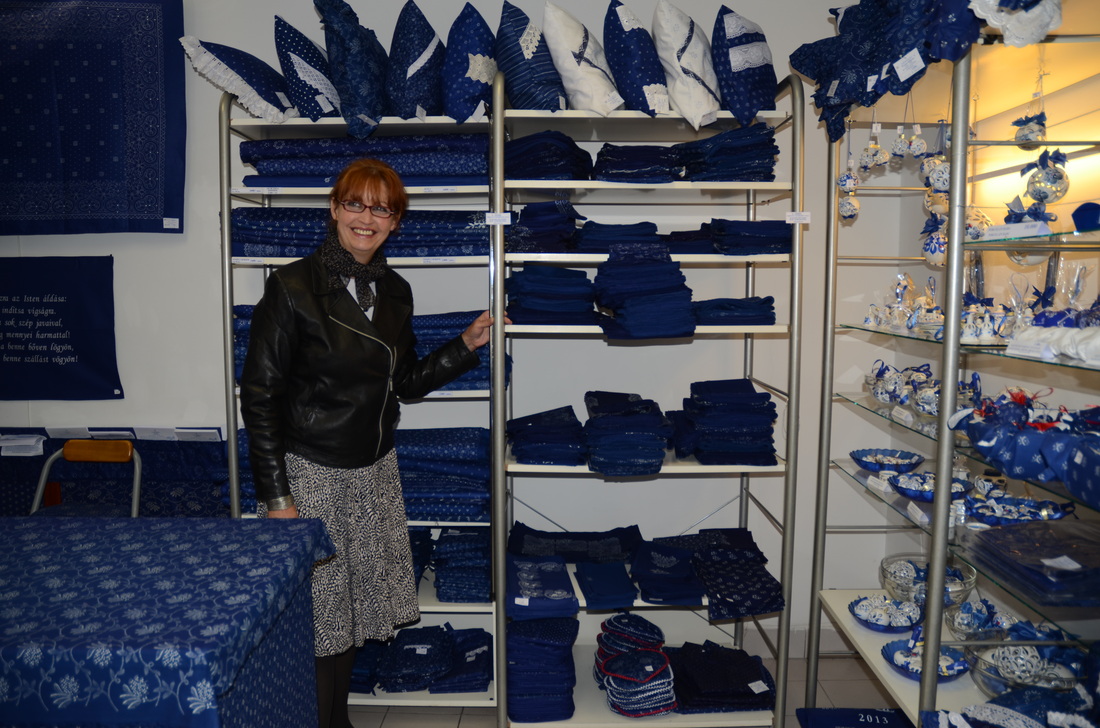 All over Szentendre and Budapest there were ceramics, embroideries and crocheted items for sale, often by the women who actually made them. 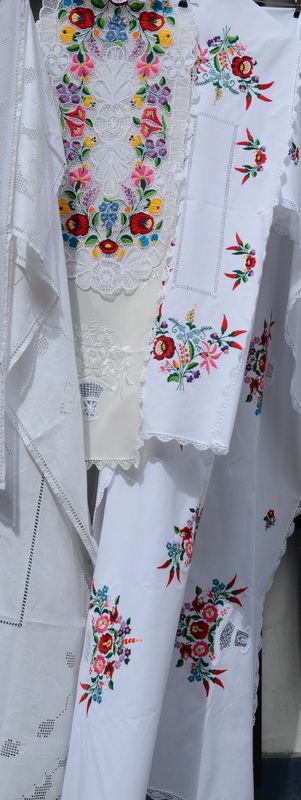 Believe it or not, this was created using six kilos of marzipan. It took Angela Berecz 56 hours to make, and it really does look like needlepoint. It's in the Marzipan Museum in Szentendre. Even the frame is marzipan. 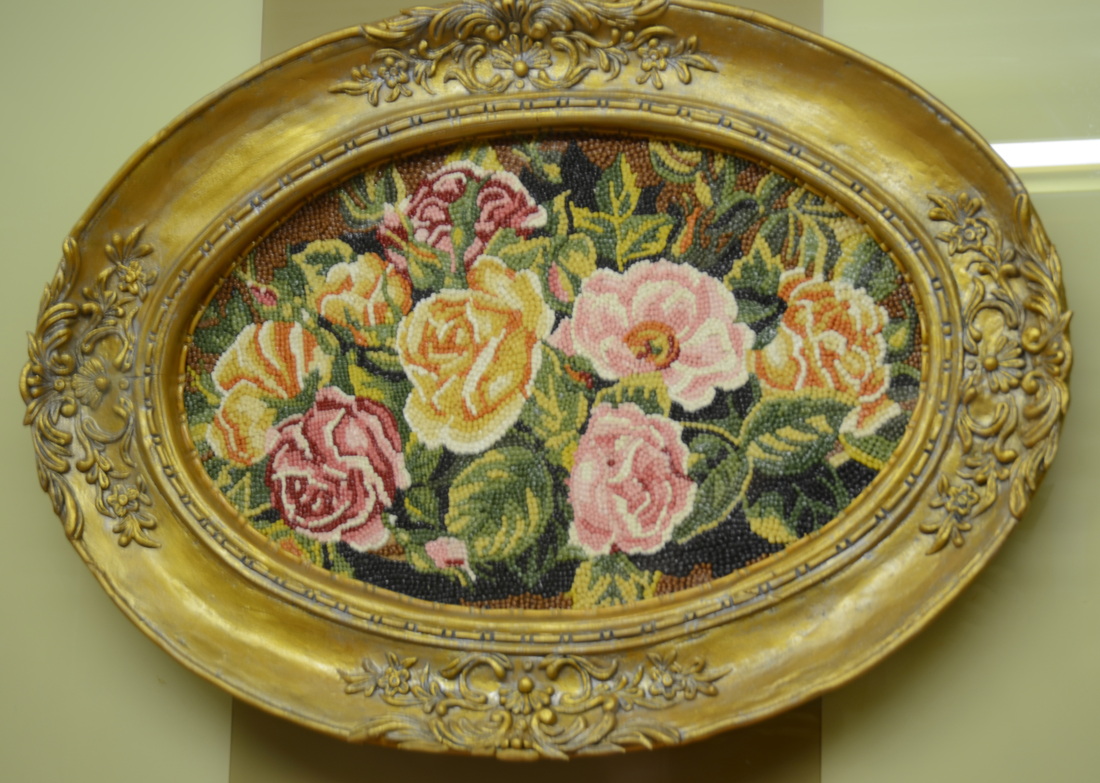 Saw this from a boat ride on the Danube. Gorgeous building inspired by patchwork! 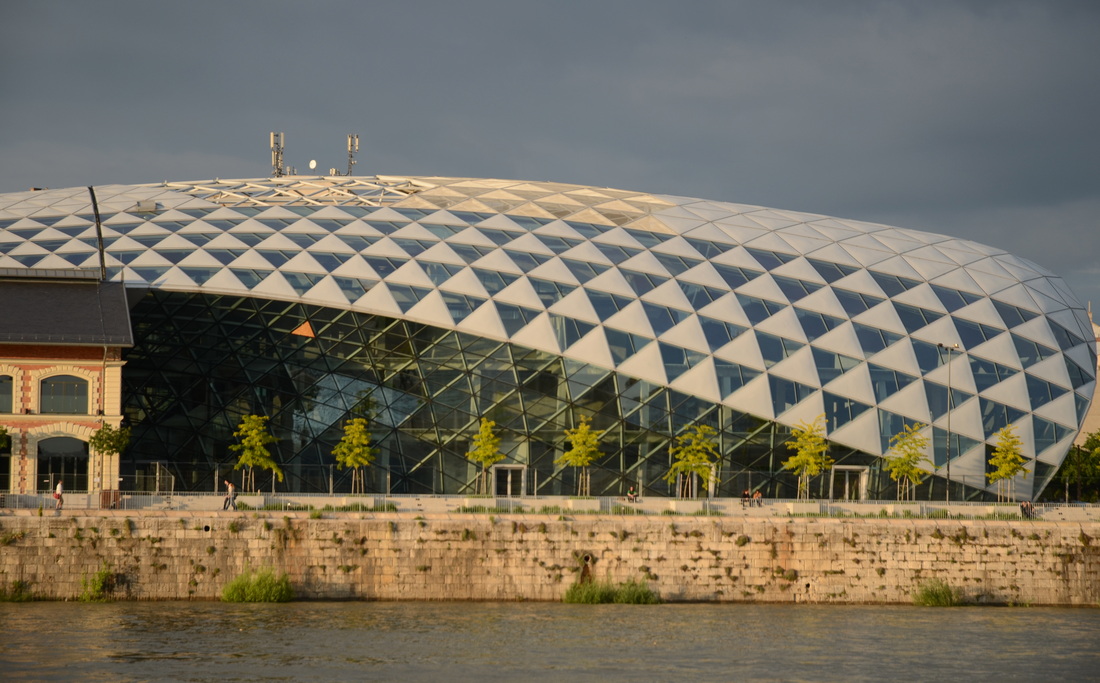 Decorative designs made of tiles could be found all over the city--this was taken from the top of a bus. 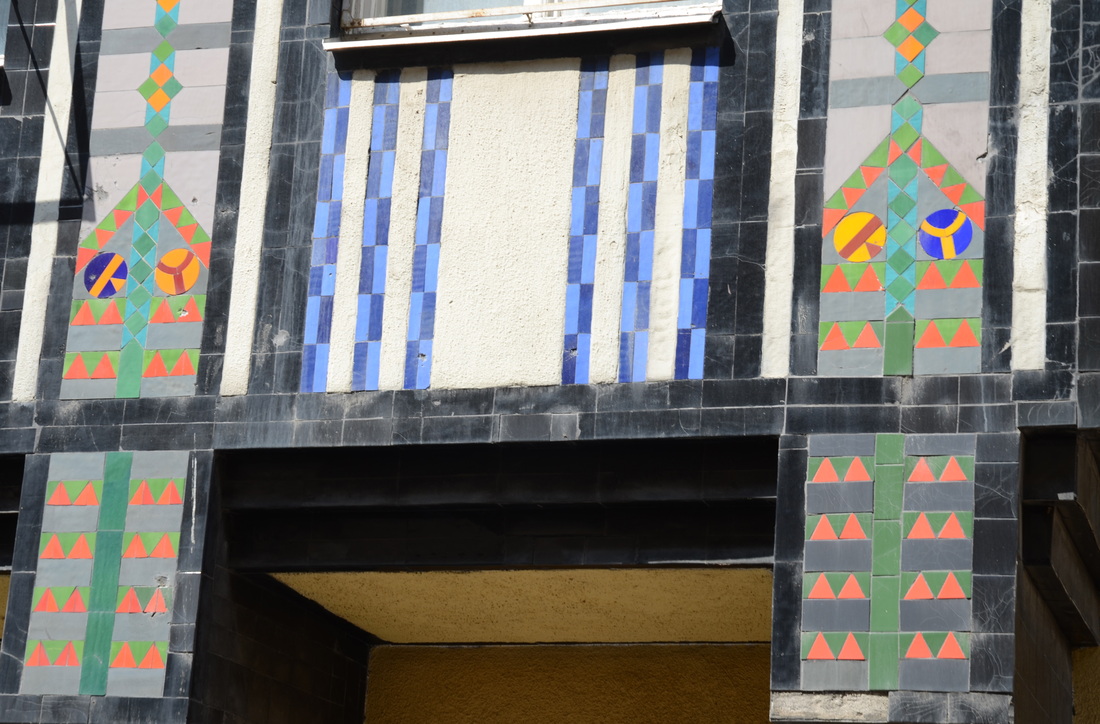 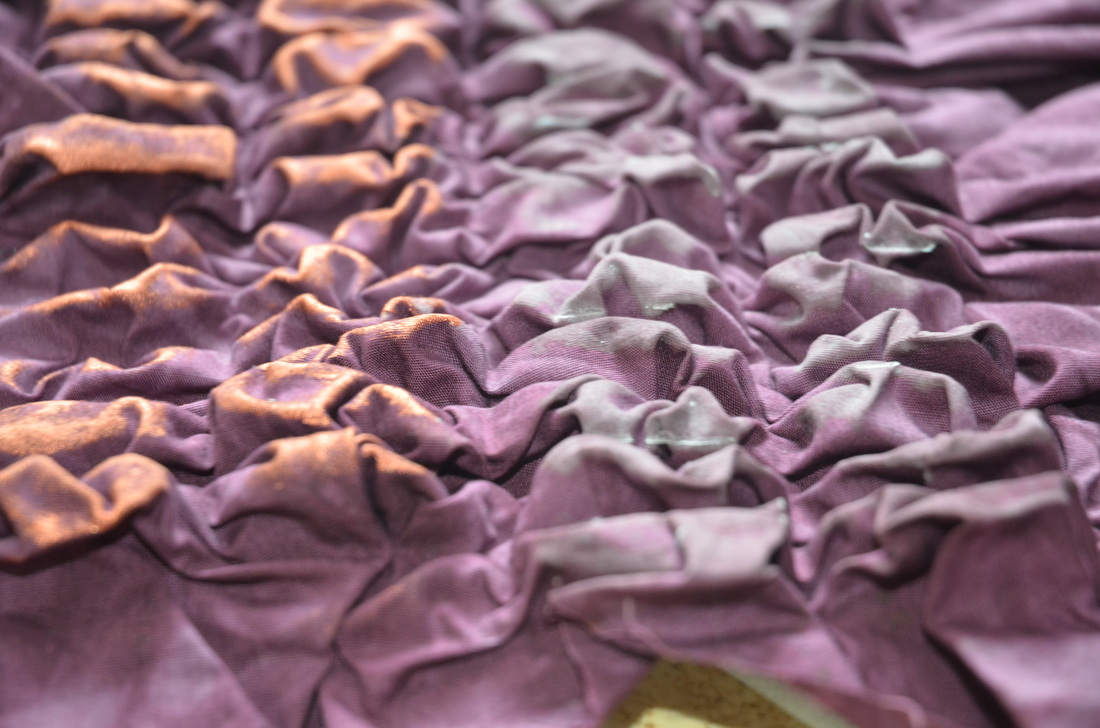
Following on from my last texture experiment, this time I am puff texturing, using hand-dyed fabric and a metal grill from my oven. To start, I wet the fabric thoroughly, then wrung it out so it was still damp. I placed the fabric on the grill, and using the eraser end of a pencil, began to poke the fabric in between the wires. 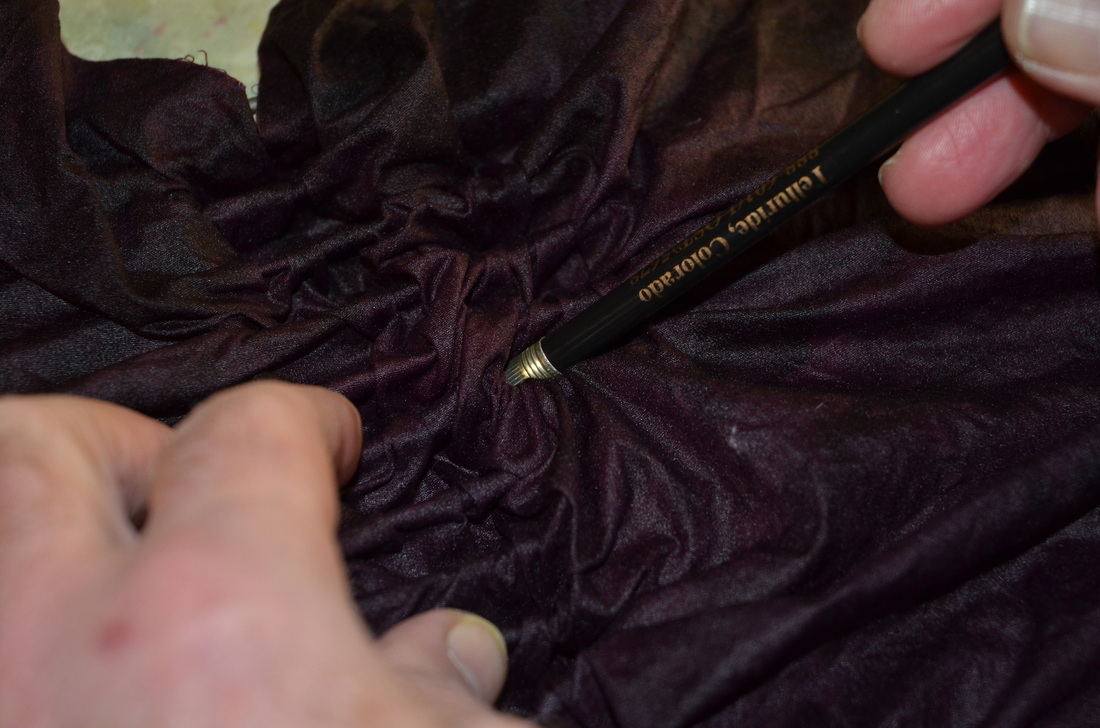
It's important to hold the fabric in place as you do this so you don't pull up the bits that you pushed down previously - you have to practice with this as it can be frustrating! This is what it looks like when all the bits have been pushed through the wires. 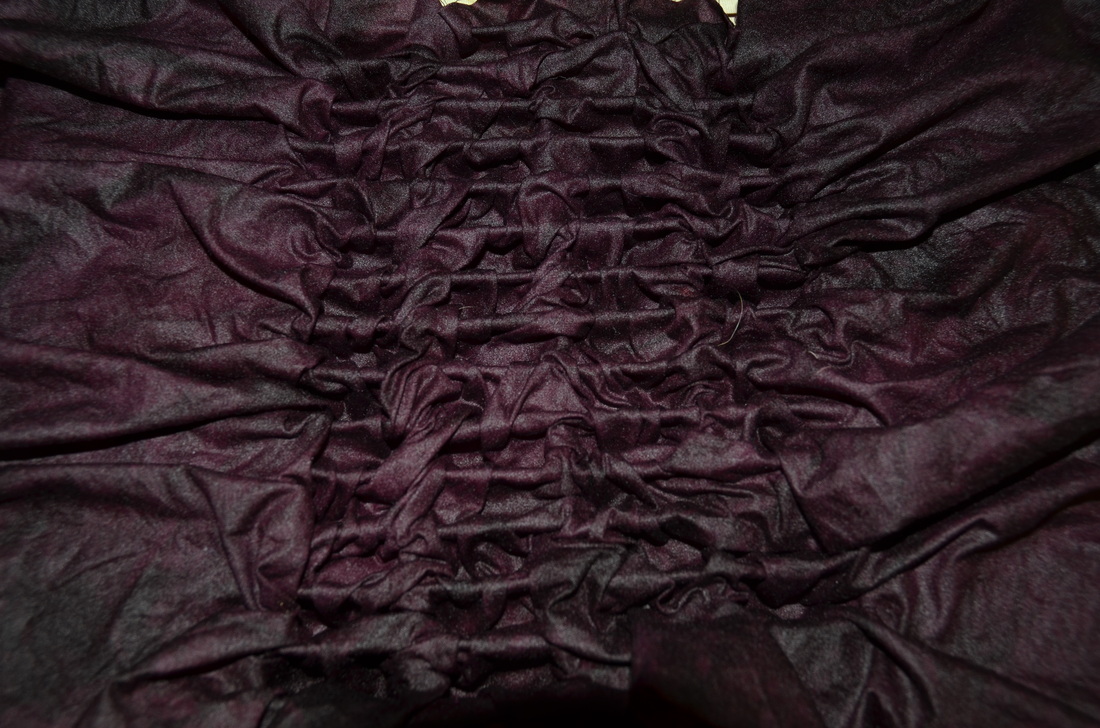
Next, cut a piece of lightweight fusible interfacing and press it on the fabric which is still tucked into the metal grill. (By the way, I'm wearing a bandage on my left hand as I had recently had a carpal tunnel operation - you don't have to wear gloves for this process!) 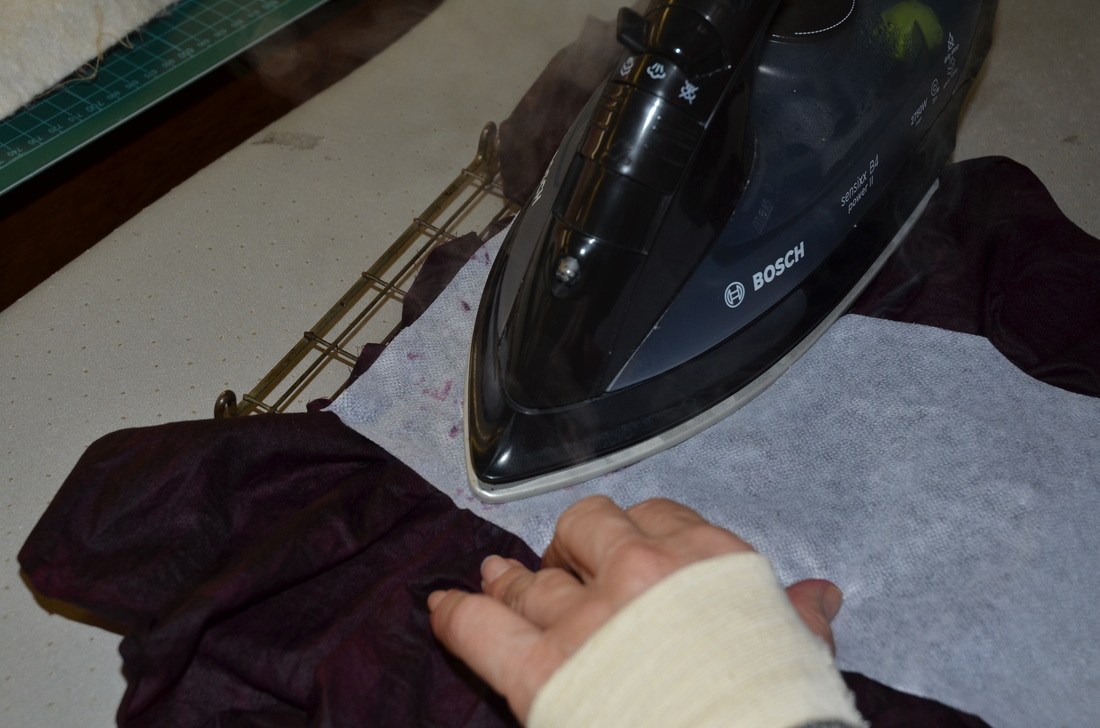
If you wish, you can decorate the puffed areas before removing the fabric from the grill. Turn the grill over. Pour some fabric paint into a tray and roll a foam roller in it until the roller is coated. Then gently glide the roller over the puffed areas. I used a metallic copper paint here. You can see how it's just picked up some of the puffed areas. 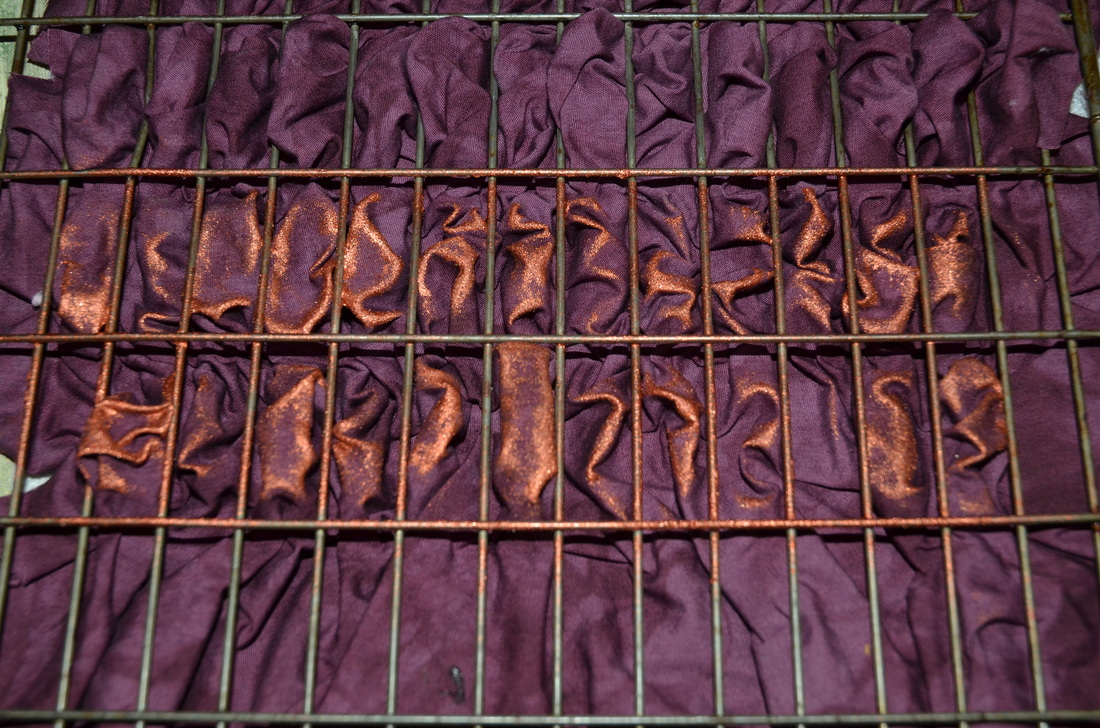
I then poured some deColourant into a tray and rolled another foam roller in that until it was coated. This photo shows rolling the deColourant on the fabric. deColourant is a discharge paste that will remove the dye from the fabric using heat and steam. 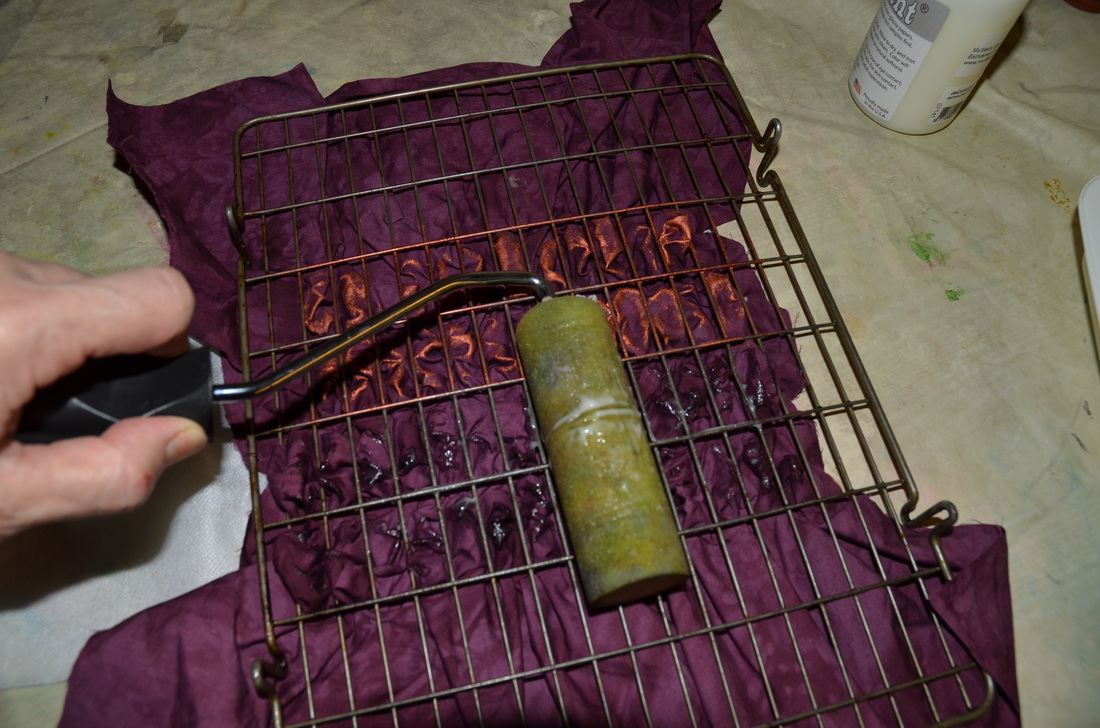
Below is a close-up showing how the deColourant looks before heating. I allowed the fabric paint and the deColourant to dry overnight, then gently pulled the puffed fabric off the grill - the puffs are held in place by the fusible interfacing. I hovered a hot steam iron over the area coated with the discharge paste, moving it around until the fabric had discharged and turned whitish, but not pressing down on the puffs. If you look at the top photo of this post, you can see the white discharged areas on the right side. 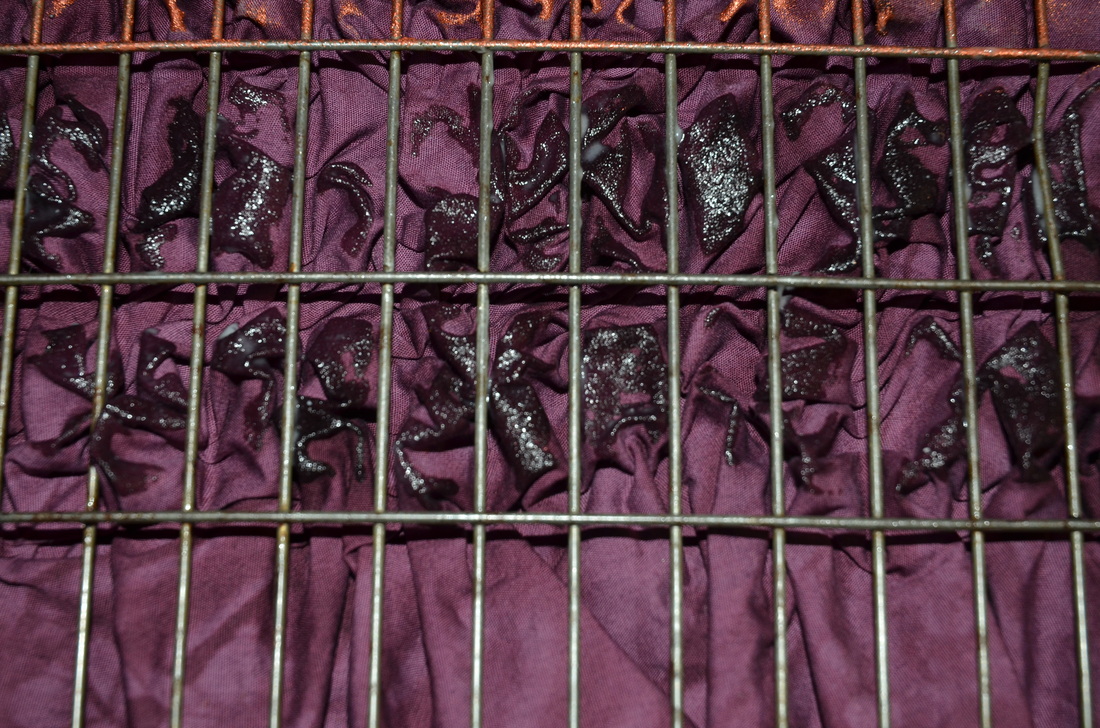
I could have left the fabric that way and used it for patchwork or applique, but I decided to pull off the fusible web and press the fabric flat to see what it looked like. Here's the result showing the discharged areas. 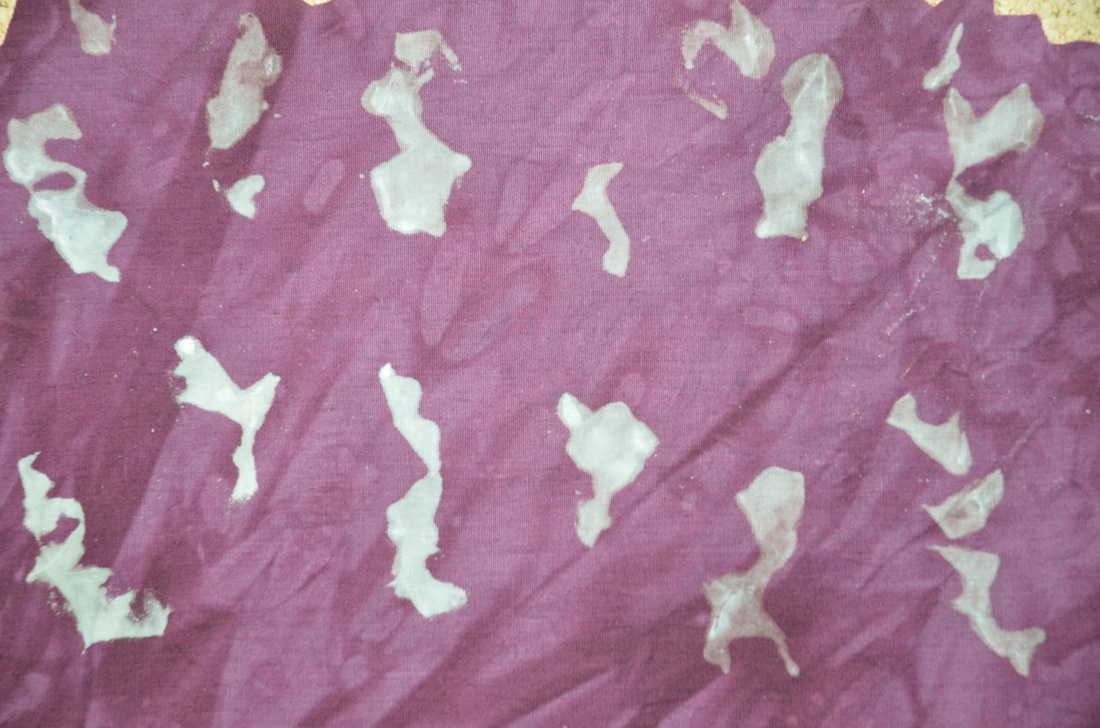
I quite like the squiggles and will have fun using this in a future project. You could also press the fabric flat without removing the interfacing for a flattened textured effect.
By the way, if you decide to work with the puff textured fabric in 3D (without flattening it as I did), use a sewing machine to stay-stitch just inside the area you are planning to cut so that you don't lose the puffiness; be sure to leave a 1/4"/6mm seam allowance for patchwork or if you are planning to turn the edges under for an applique. This week I have been texturing fabric so I can create "art references" for Tom (the artist of my book) to draw. It's also a great way to remind myself how to do the techniques so I can write the instructions more clearly. Here I am pleating some hand-dyed fabric using a purchased pleater. First press the fabric to remove all the wrinkles. Starting at the bottom edge, push the fabric into each pleat with your fingers as in the photo below. If you want to make larger pleats you can skip a few spaces, but I like the look of narrow pleats. 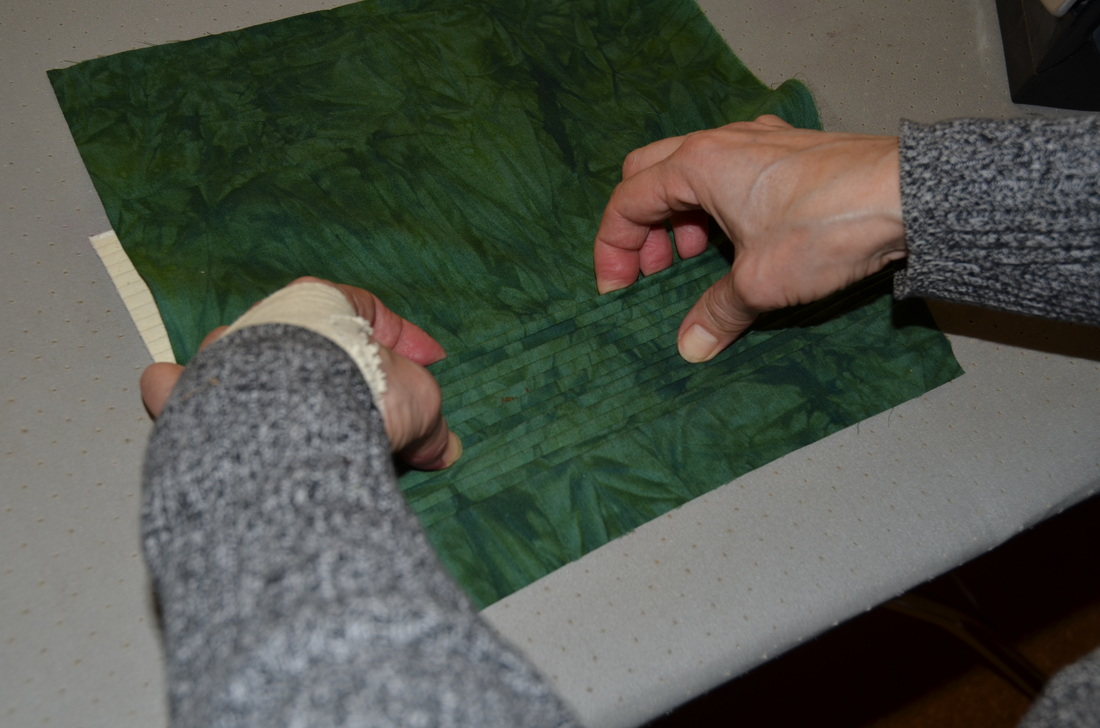
It's a good idea to press the pleats every couple of rows as you work, just to keep them in place. 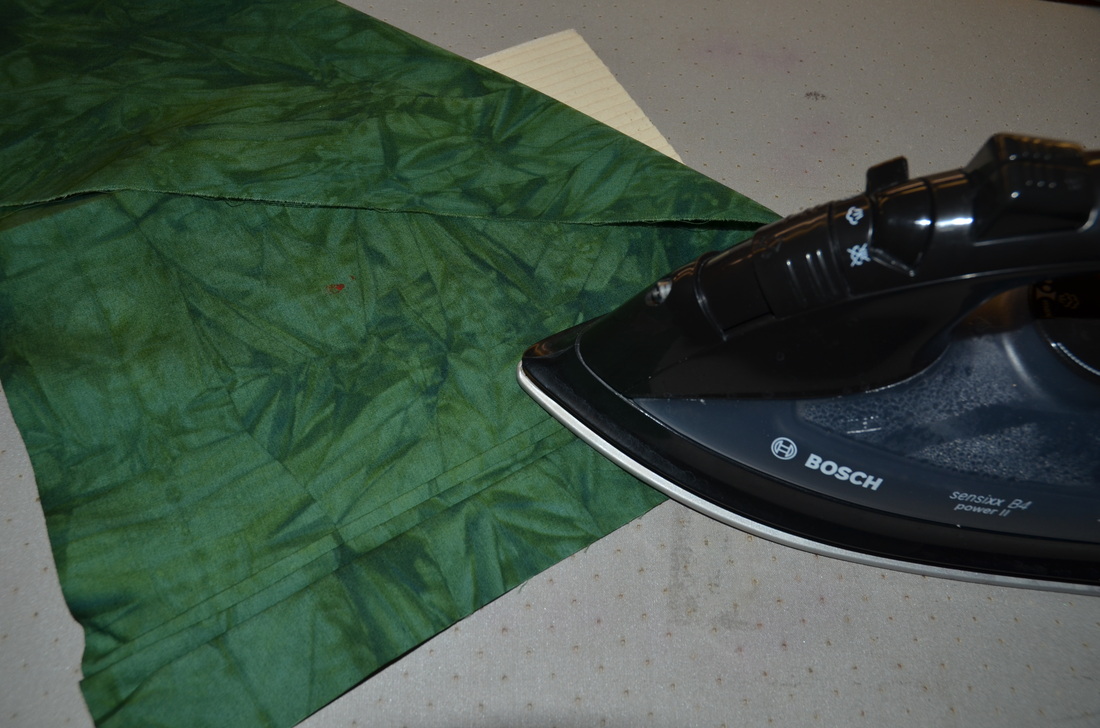
Once I had made enough pleats, I applied some discharge paste to the fabric with a sponge to see what would happen. 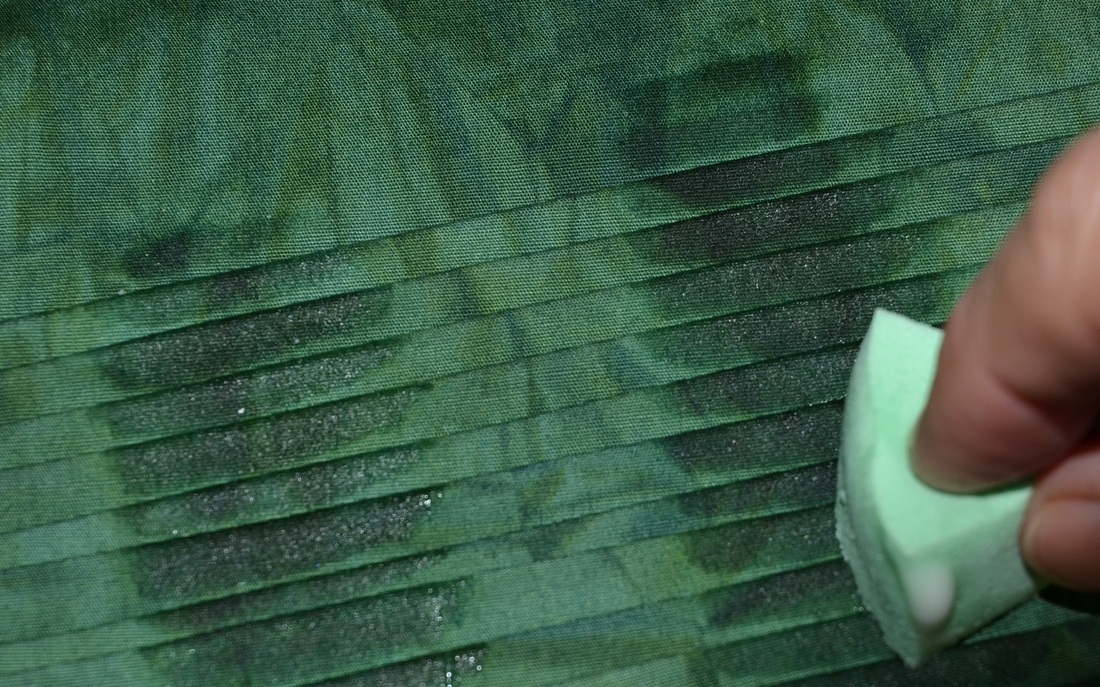
I drew some lines in the discharge paste with Markal paintstiks. I then applied metallic copper textile paint to the pleats using a brush (the X). I dipped my favourite Colouricious stamps in the paint and made a couple of stamps (snails on the right). 
When the paint and discharge paste were dry, I steam-pressed the fabric to discharge the colour. Then I removed the pleated fabric carefully from the pleater. You can see the grayish-white areas on the right where the fabric has discharged. 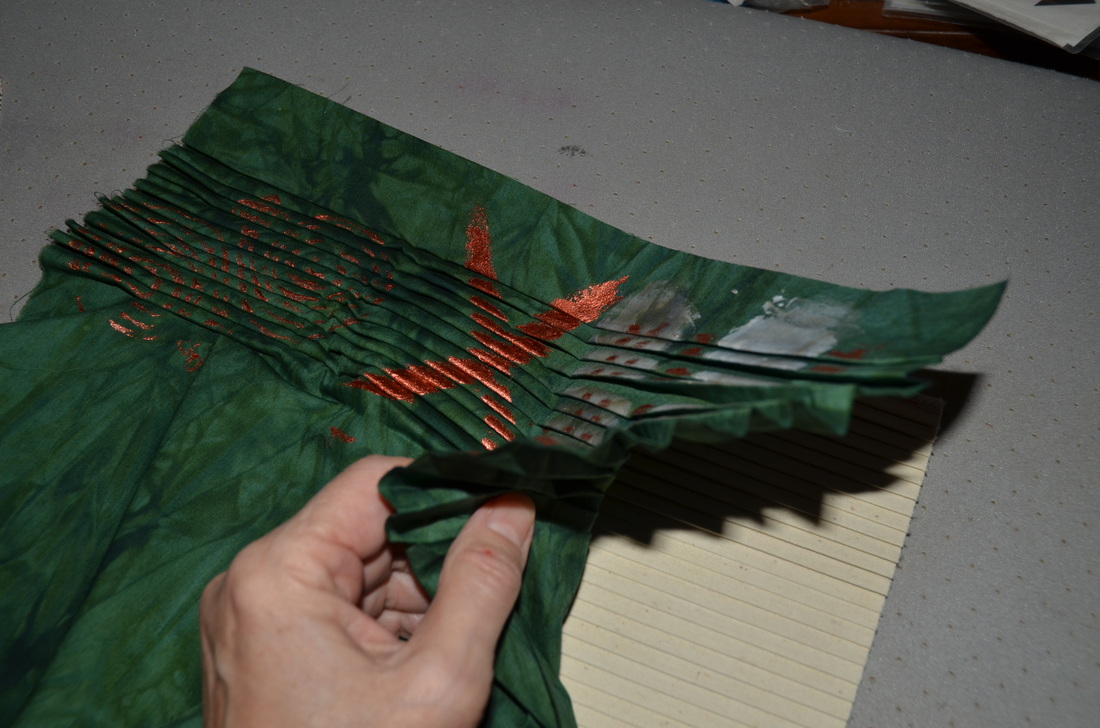
Here is the fabric unpleated and pressed. A bit dull, but quite fun the way the design has broken up. So, to liven things up, I decided to re-pleat the fabric but in the opposite direction. 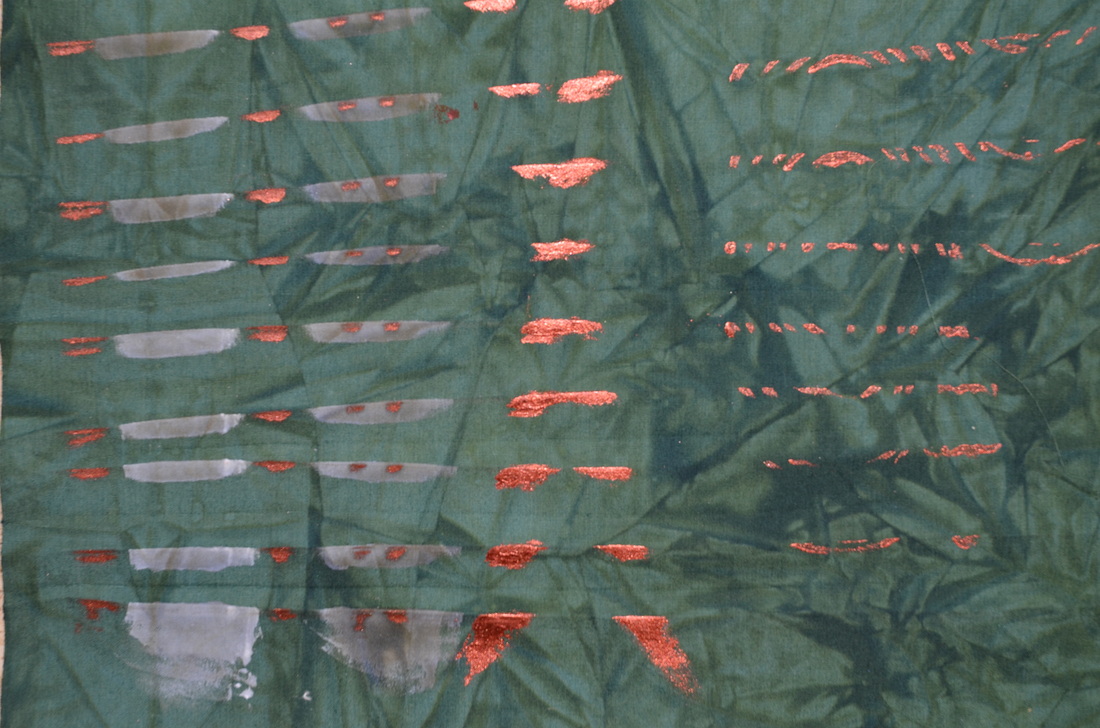
I used a foam roller to apply a layer of yellow DeColourant Plus to the fabric (this is a discharge paste with a textile colour added to it, so that when the fabric is discharged, the white area is replaced with that colour). 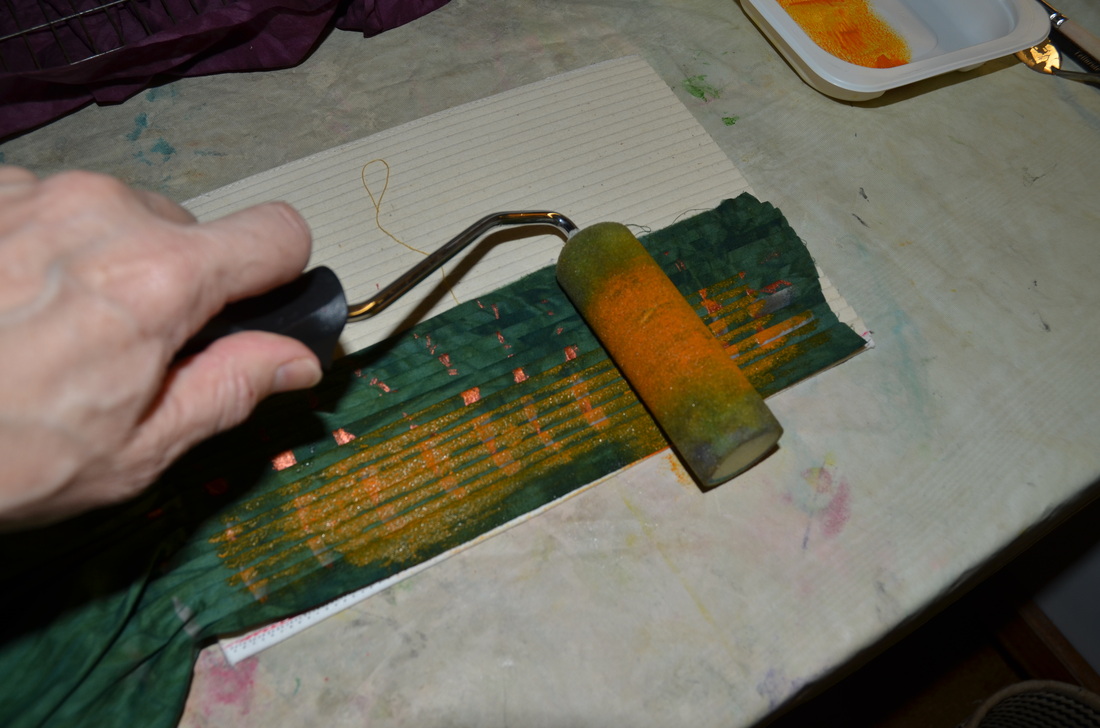
I also daubed on some dots with pale green textile paint and a brush. 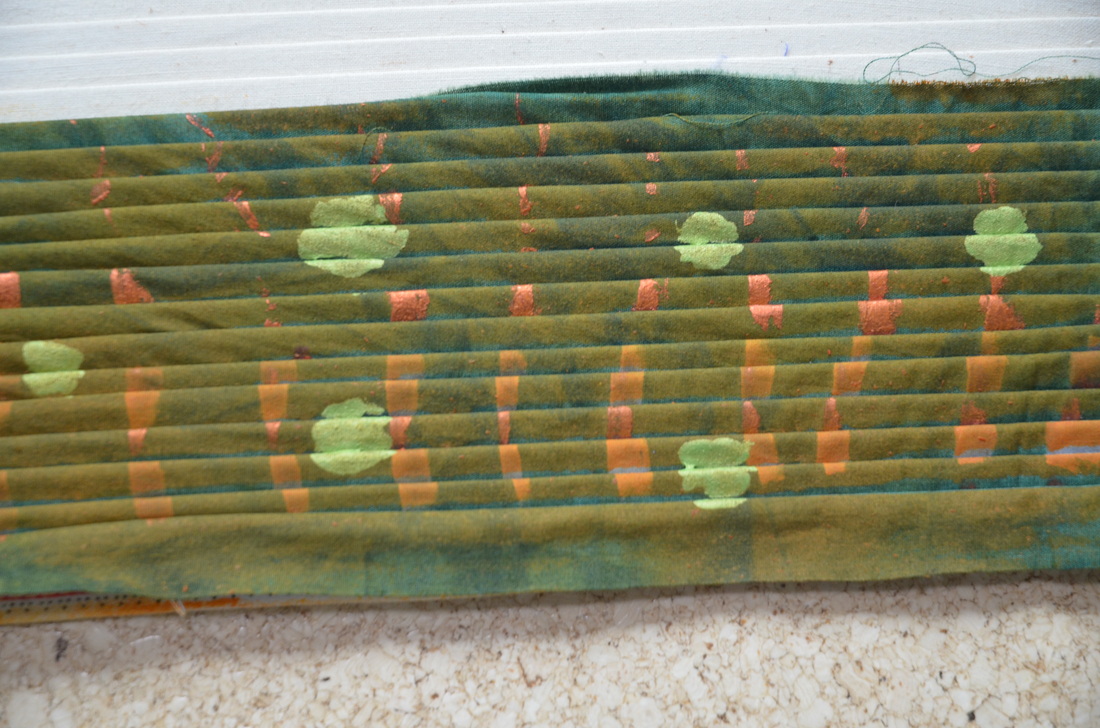
Here is the finished result, unpleated and pressed, making a very irregular plaid design. Not exactly a failed experiment, but it will look better when it's cut up for patchwork, I think! 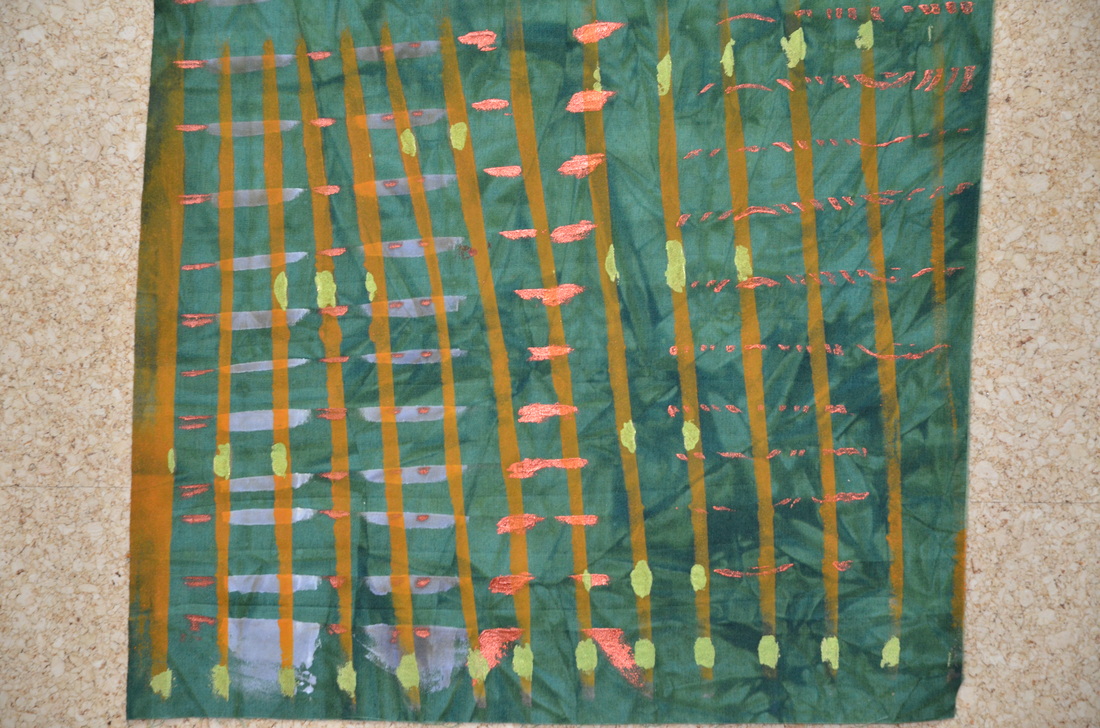
Next time, puff texturing!
 Stamping a monoprint is easy. I added textile paint to the glass printing plate shown here and brayered it smoothly. I then drew some lines in the paint with the end of a paintbrush - just some easy squiggles.  I carefully lifted up the printing plate and placed it face down on the fabric. I attached a little handle that has a suction cup on it for ease in lifting it later, and pressed the plate onto the fabric. 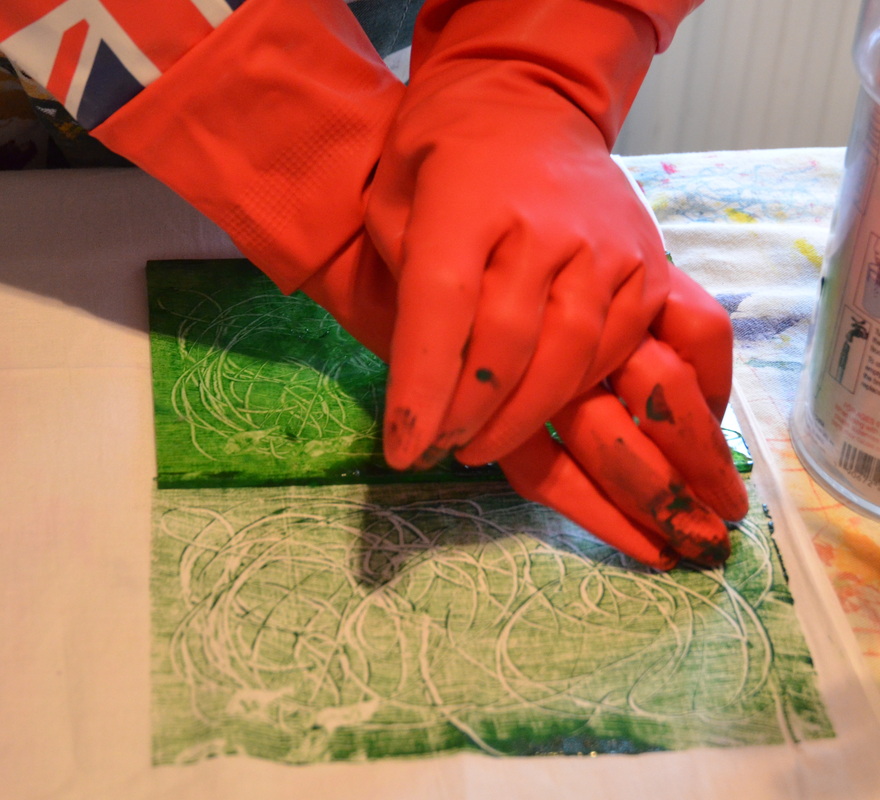 You can see the first monoprint here, especially my mistake! I left blobs of paint on the edge of the plate which has caused that dark splodge in the foreground. Well, that splodge can either be cut away, overprinted or painted with another colour to make it seem as if it was always meant to be there. You can't fail when doing surface design, keep that in mind! I picked up the printing plate by the handle and pressed it down again next to the first one, pressing very firmly to get all the textile paint onto the fabric. This second monoprint is called a ghost print because it is always much lighter than the first. 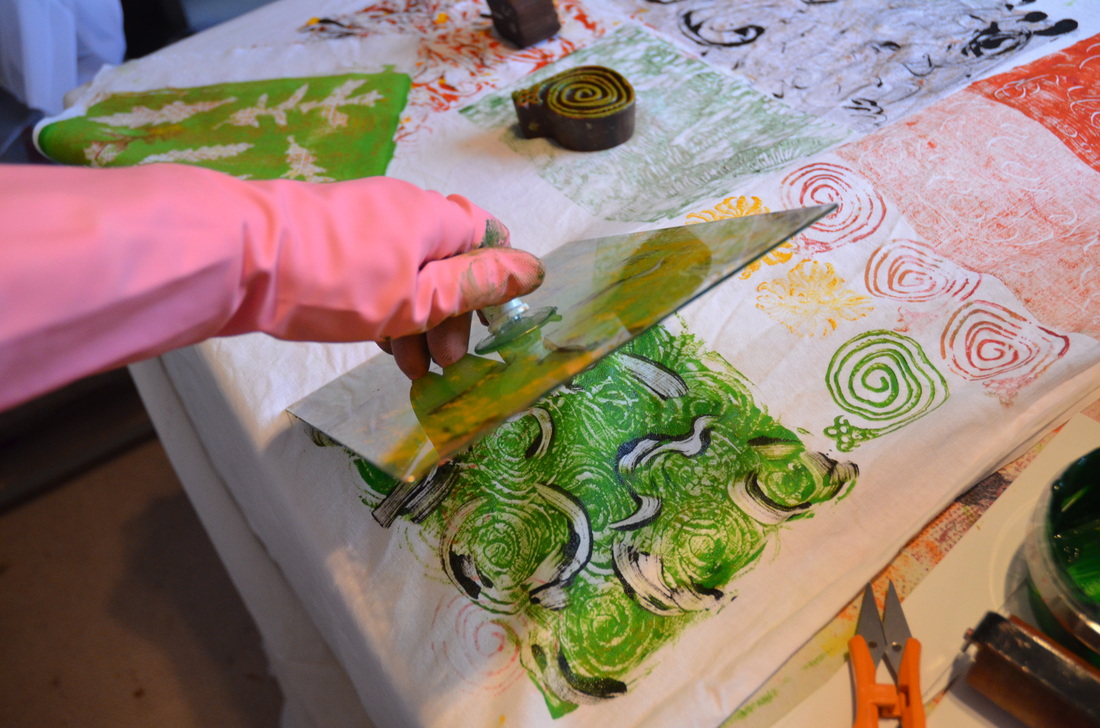 This photo shows lifting up the stamp after making a different monoprint. As you can see in the background, this was a day of experimentation and we were rapidly running out of room! That little wooden stamp you can see in the background made those gorgeous little snails to the right of the monoprint. I got the stamp from Colouricious who have an amazing selection: www.colouricious.com/ 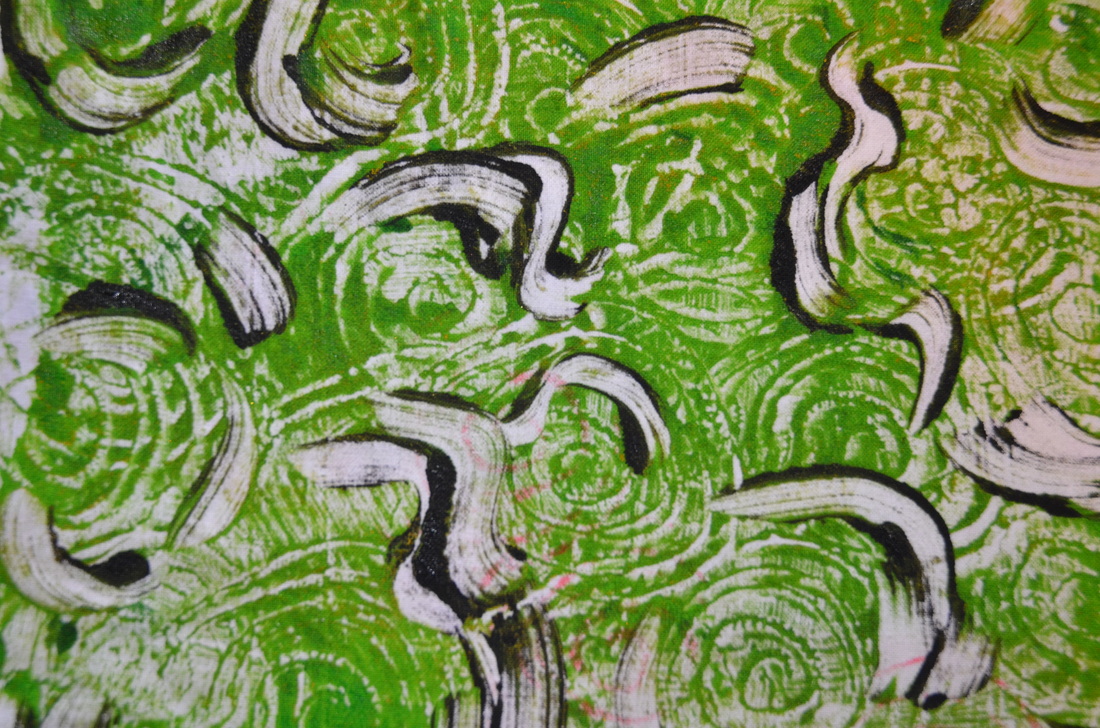 Here's a shot of the finished piece. I had stamped it over some pink "ghost print" snails which you can just make out in the middle. 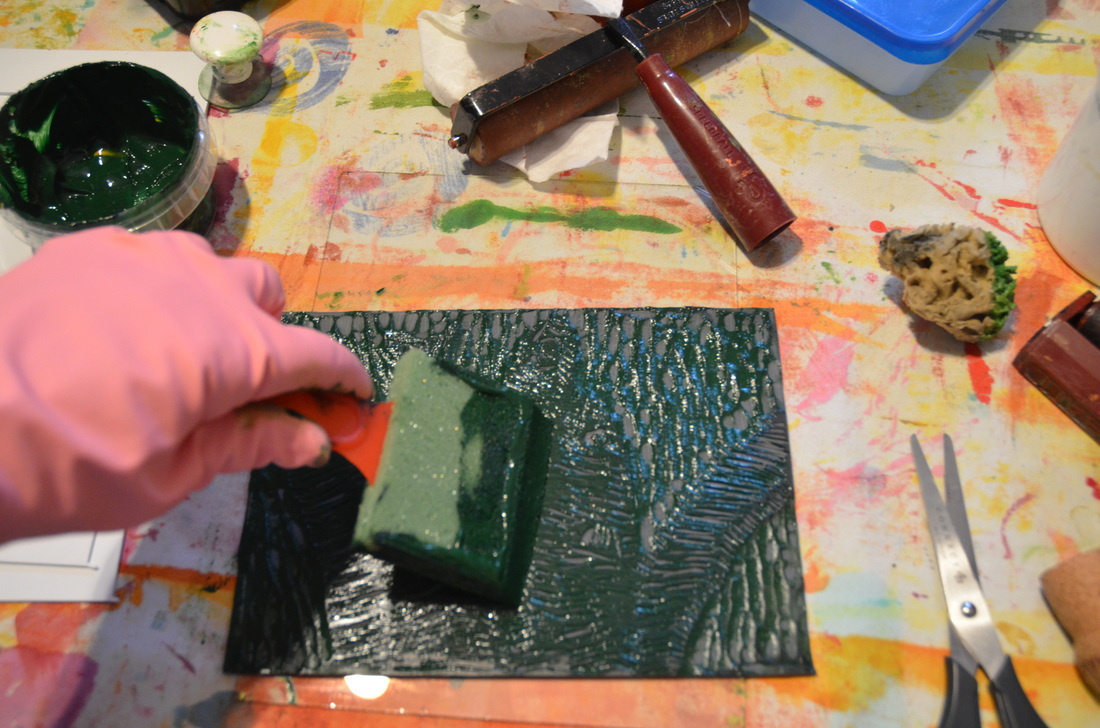 The final stamps of the day were made using a linocut that my son had done in school. I coated the surface with textile paint, being careful not to get too much in the grooves. 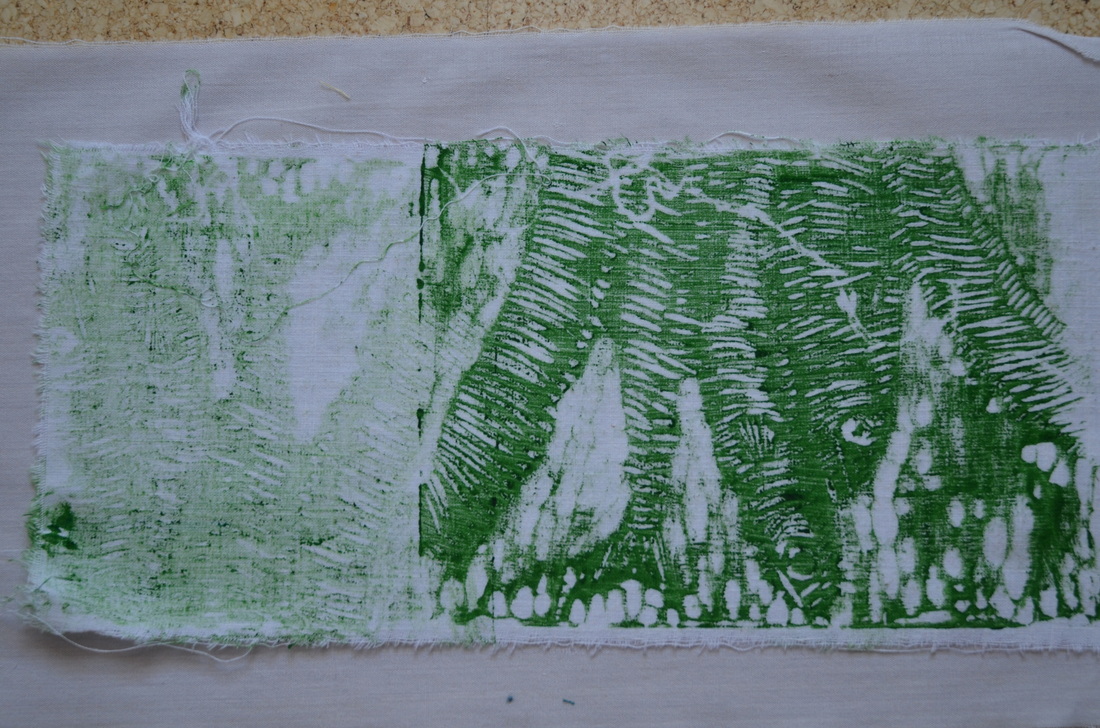 On the right you can see the first stamp which isn't great as there was too much paint on the surface of the lino. On the left is a partial ghost stamp which was done in reverse. 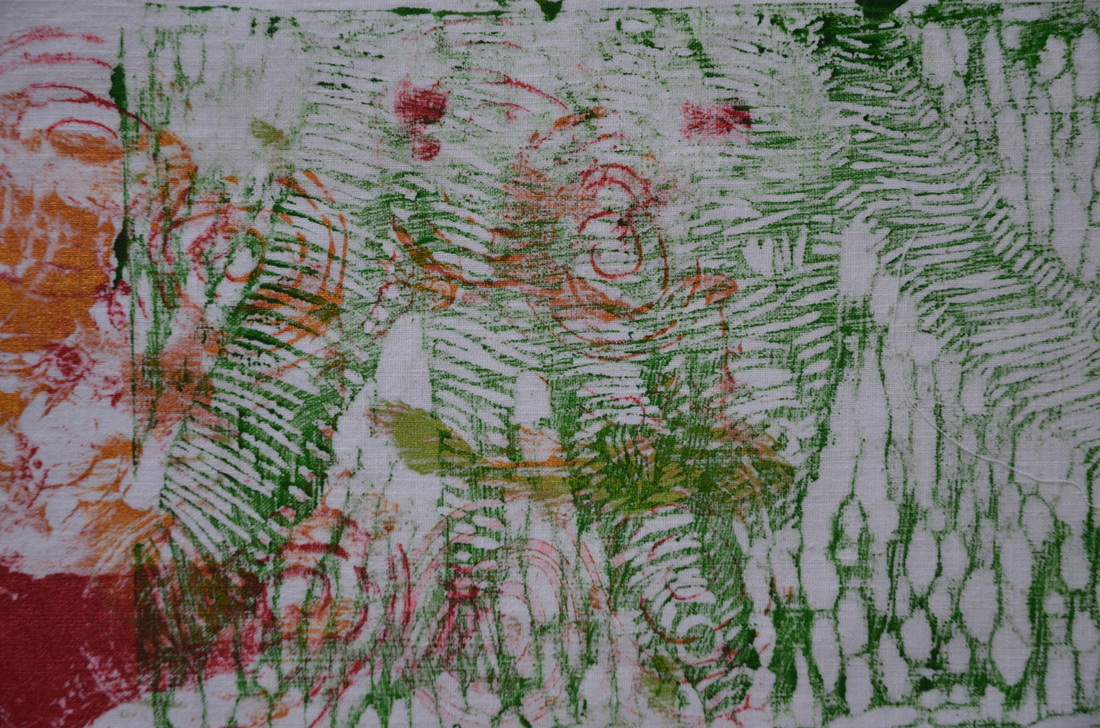 This monoprint would have been great if I hadn't just stamped it anywhere on top of some other splodges and snails. Oh well. I'm sure I'll find some use for it! Nothing goes to waste here.
I had wonderful morning monoprinting with my friend Marlene in her studio. After a lovely cup of coffee and some chat we got to work. Marlene graciously took these photos for me so I could use them as art references for the book I'm writing. First I put some colour (fabric paint) on a glass printing plate. Note the lovely design on the fabric covering Marlene's work area from previous experiments! 
Then I brayered the paint until it smoothly covered the whole plate. 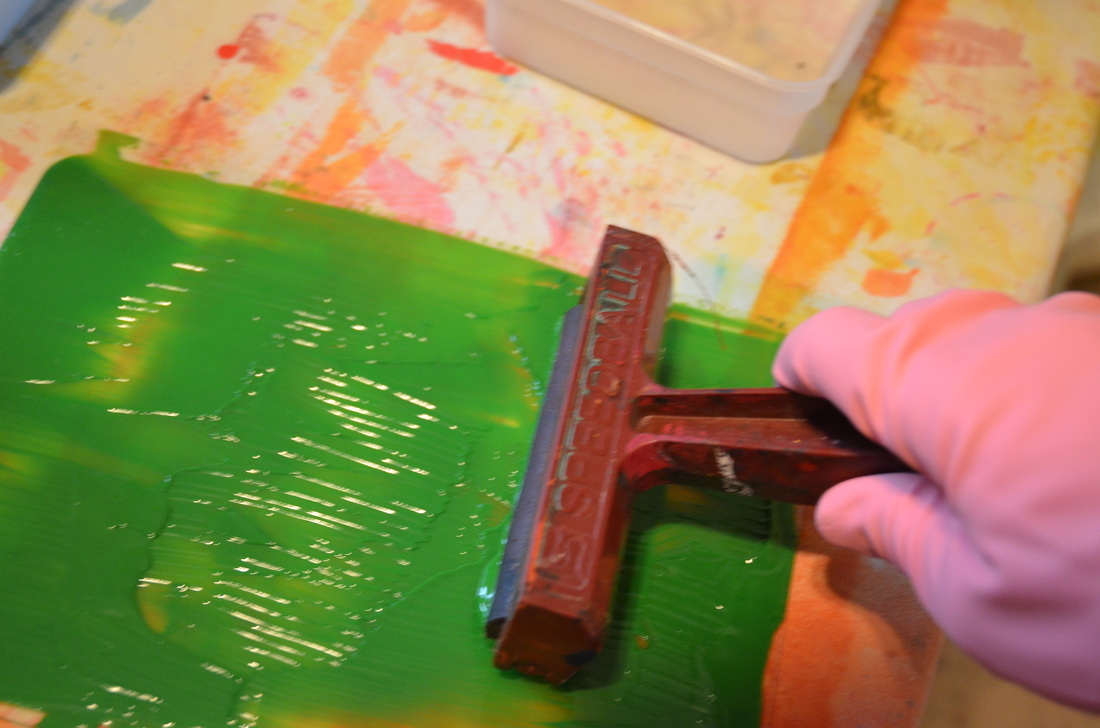
I had collected some interesting leaves the day before and laid them on the paint in a nice arrangement. 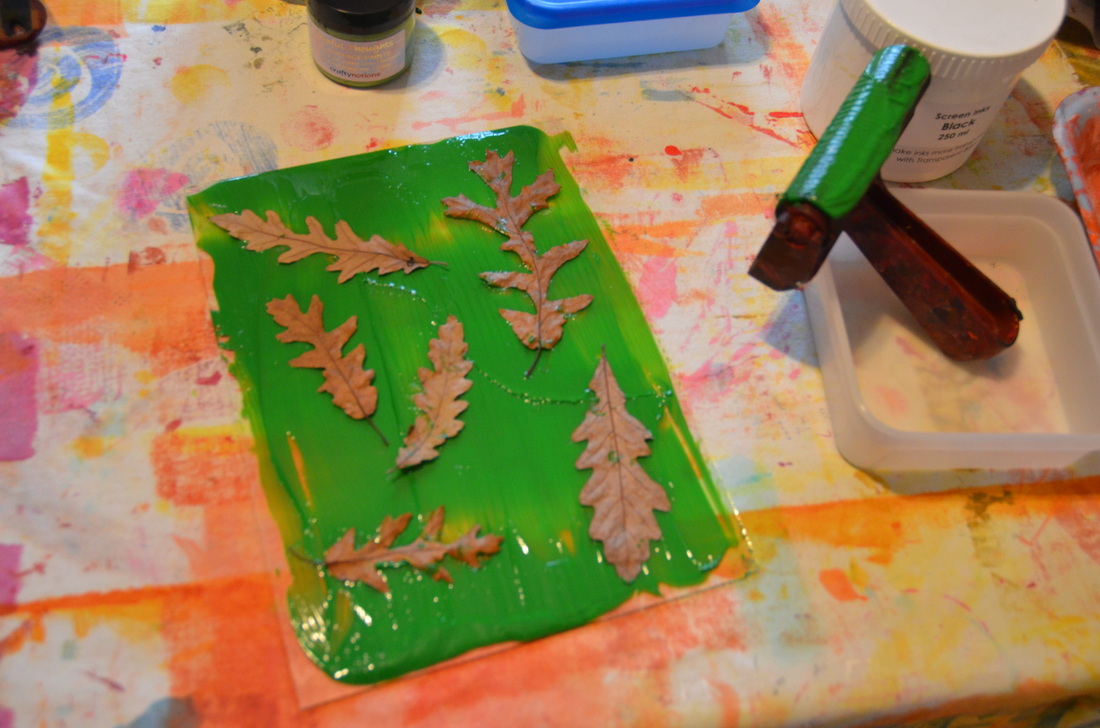
I carefully placed some 100% cotton prepared-for-dyeing fabric over the leaves and paint, 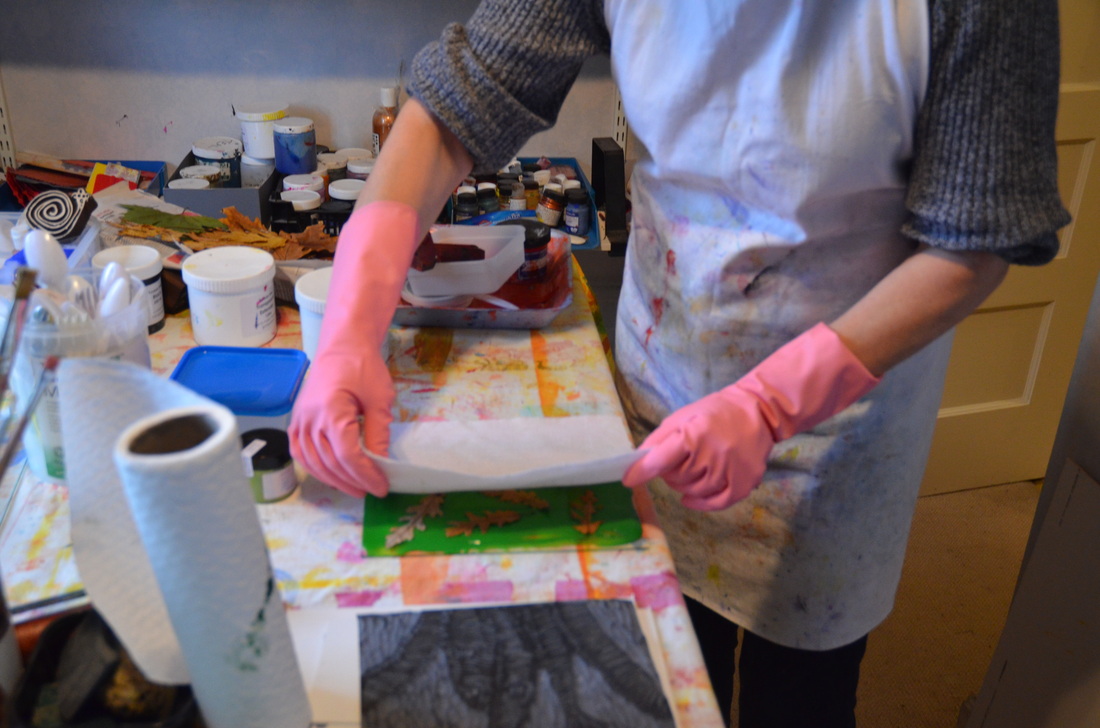
and gently smoothed the fabric on top with my hands. 
Then I used a brayer to make sure all the colour transferred to the fabric. You can see it coming through to the wrong side in this picture....... 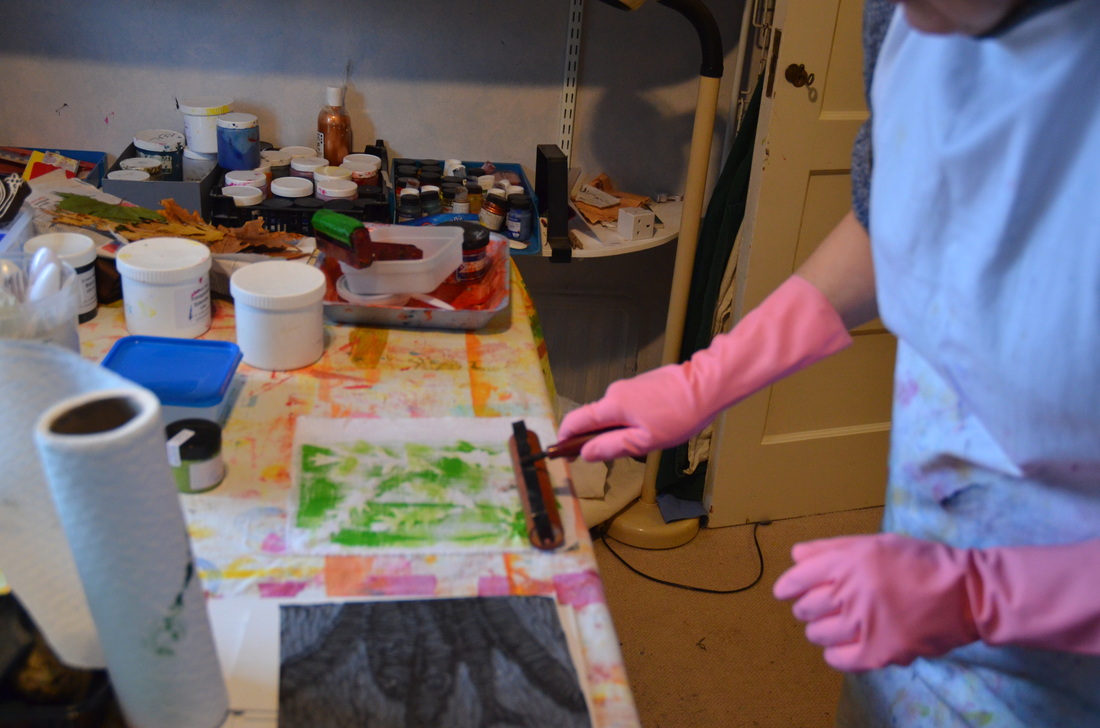
Finally the moment of truth! I picked up the two corners of the fabric and slowly lifted it off the printing plate to reveal.......... 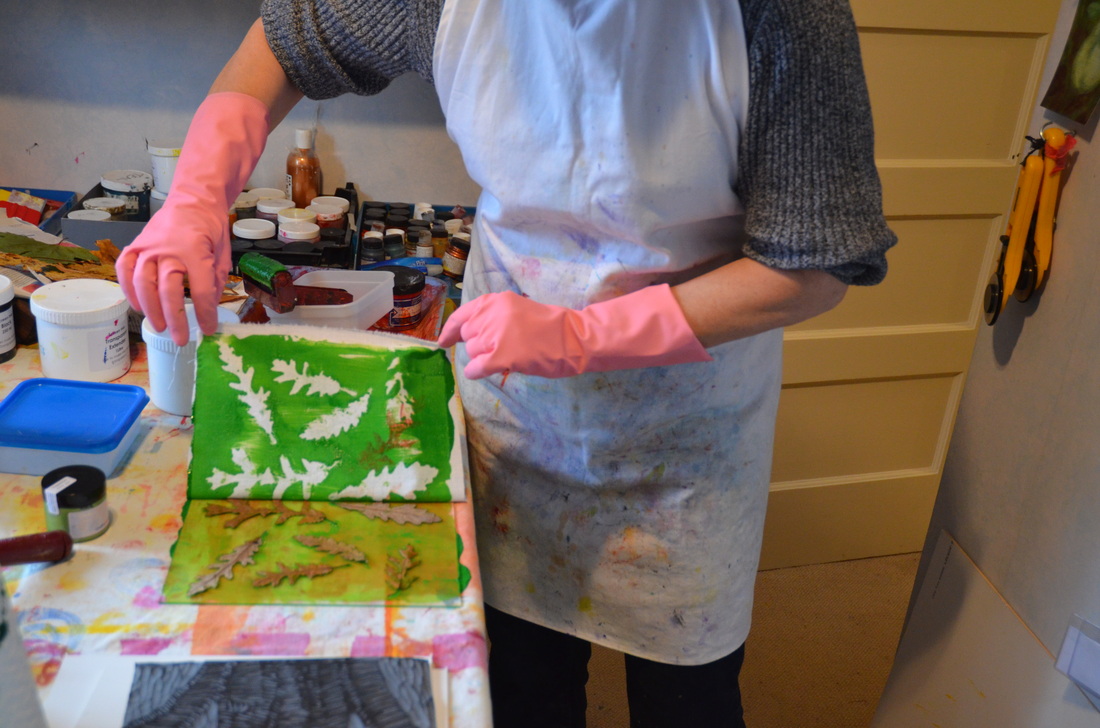
An excellent result! I didn't throw the leaves away, but picked them up with tweezers and placed them, painted side down, on another fabric. I brayered over them to transfer that paint to the fabric beneath. So I now have positive and negative images of those leaves! Next, I washed off the plate and brayered some new colour onto it. I used a chopstick to incise a design in the paint. 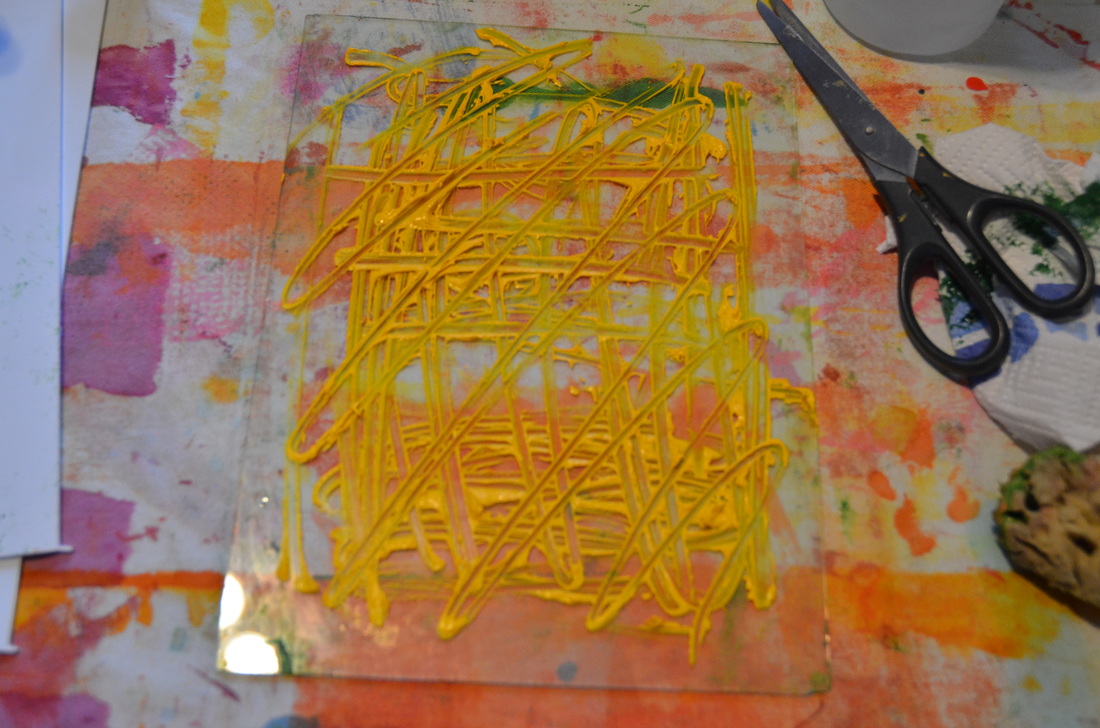
I added some red and black fabric paint as well and used my finger to move the colours around. Then I monoprinted a piece of fabric and this is the result: 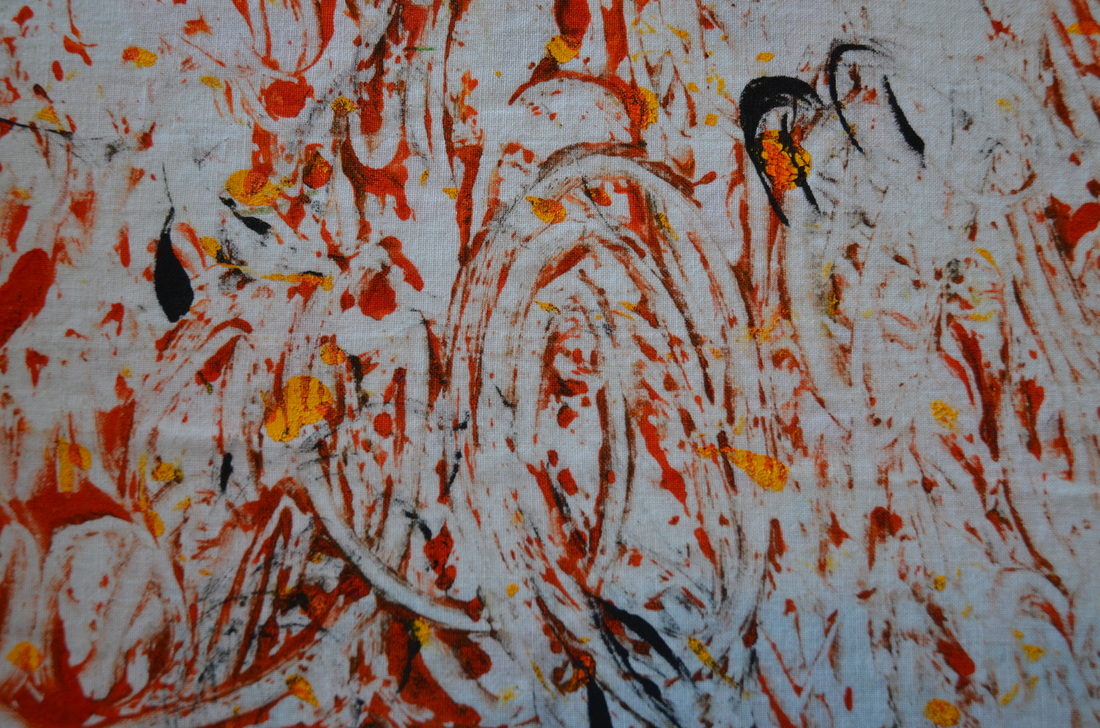
Next time I'll show you how I stamped a monoprint.
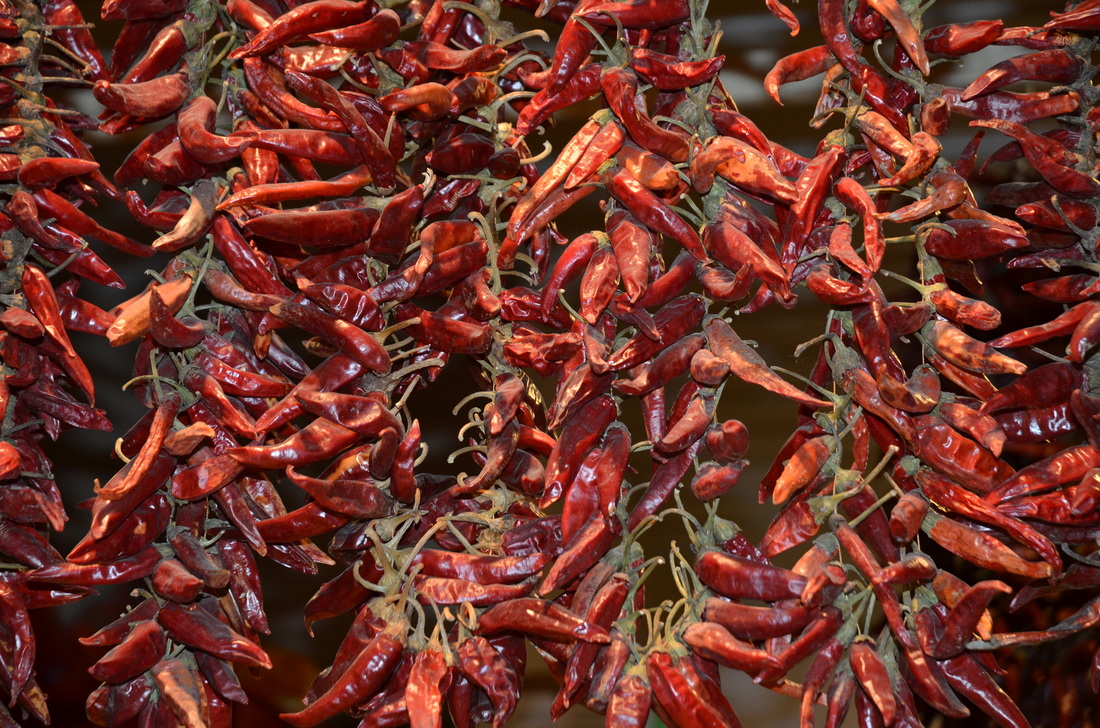
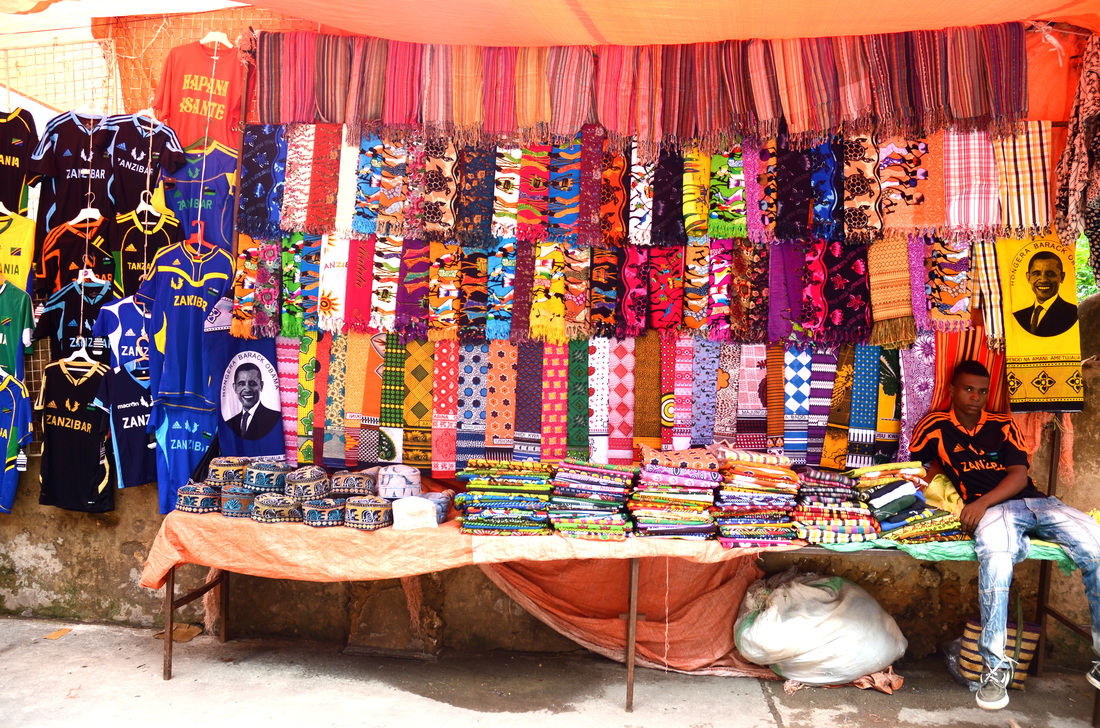 We went to Tanzania over the Christmas/New Year holidays - the first time we had ever gone somewhere hot at that time of year. It was great to see sunshine and all the birds and animals while on safari. Best of all was Zanzibar - the Spice Island - and a dream destination of mine for many years. Hot, noisy, crowded and smelling of exotic spices and other unmentionable things, Zanzibar is unforgettable. The fabrics in the markets were very tempting - I couldn't resist buying one of the Barack Obama pieces that will probably go on the back of a quilt someday. Many of the items for sale in the markets are going to provide inspiration for my quilt making. I love the surface design of these shells. 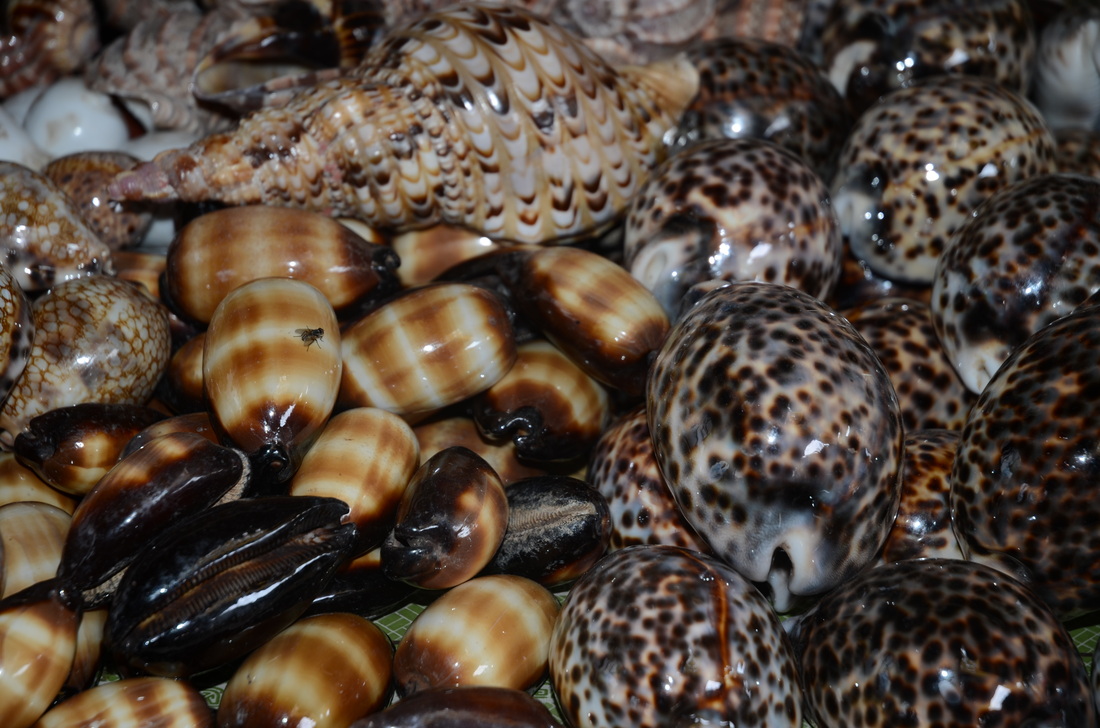 The colours of the chillis were very exciting 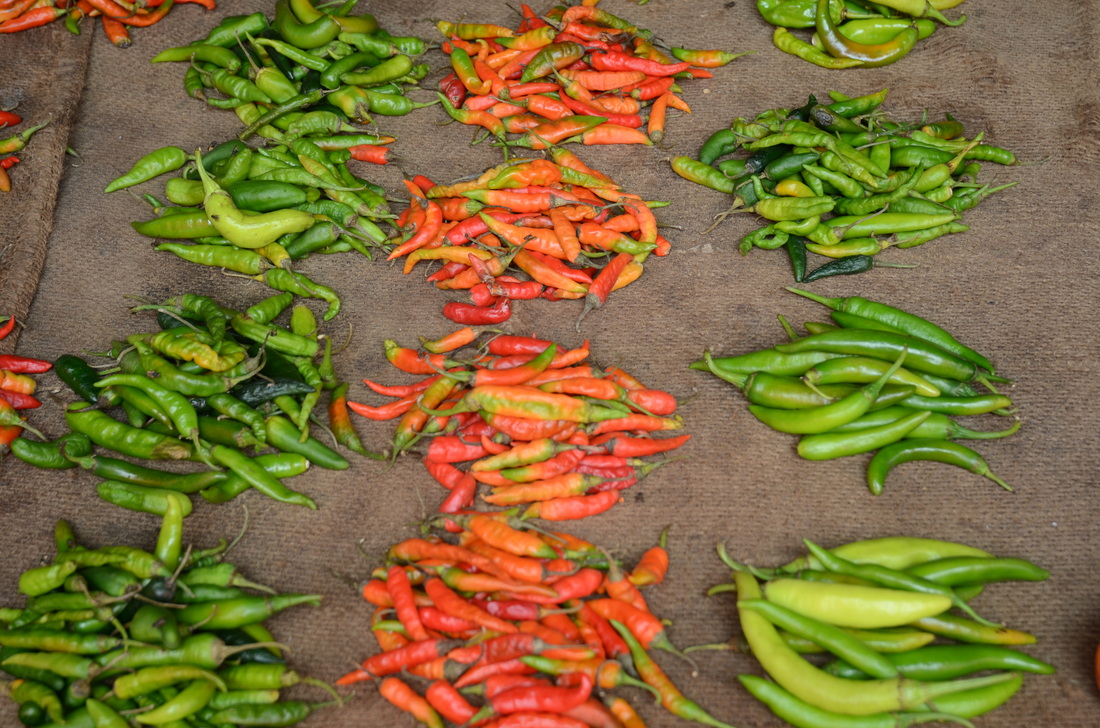 as were the textures - but let's not talk about how the fish market smelled in 38C/100F degree heat! 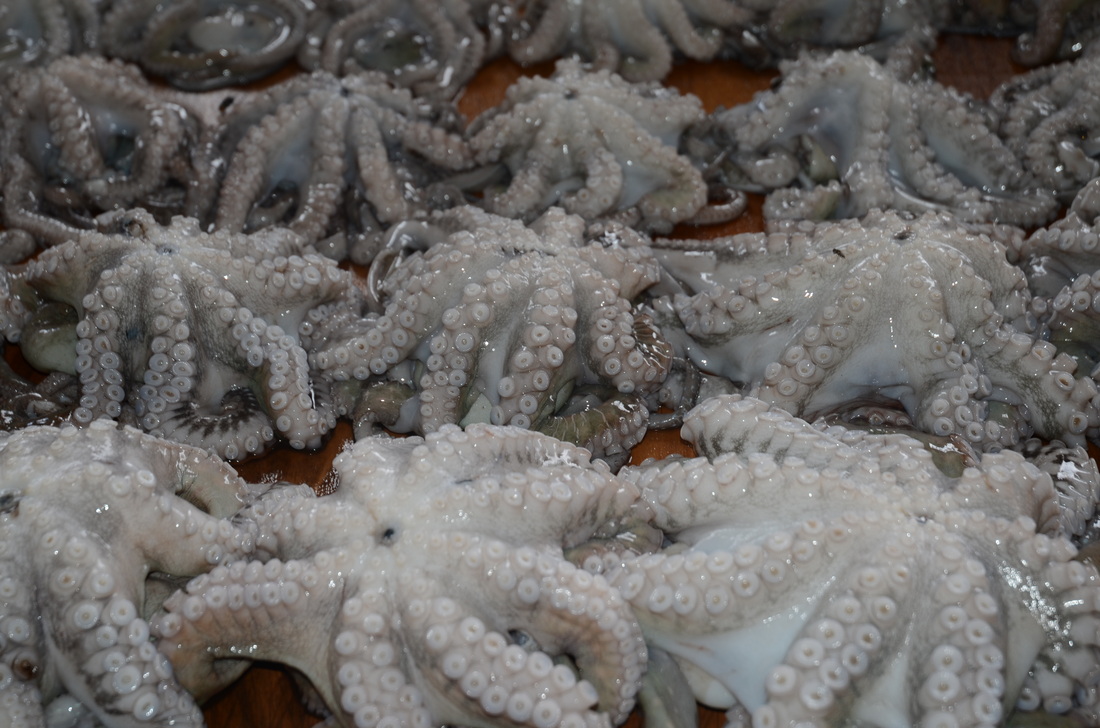 How about this for a quilting pattern? 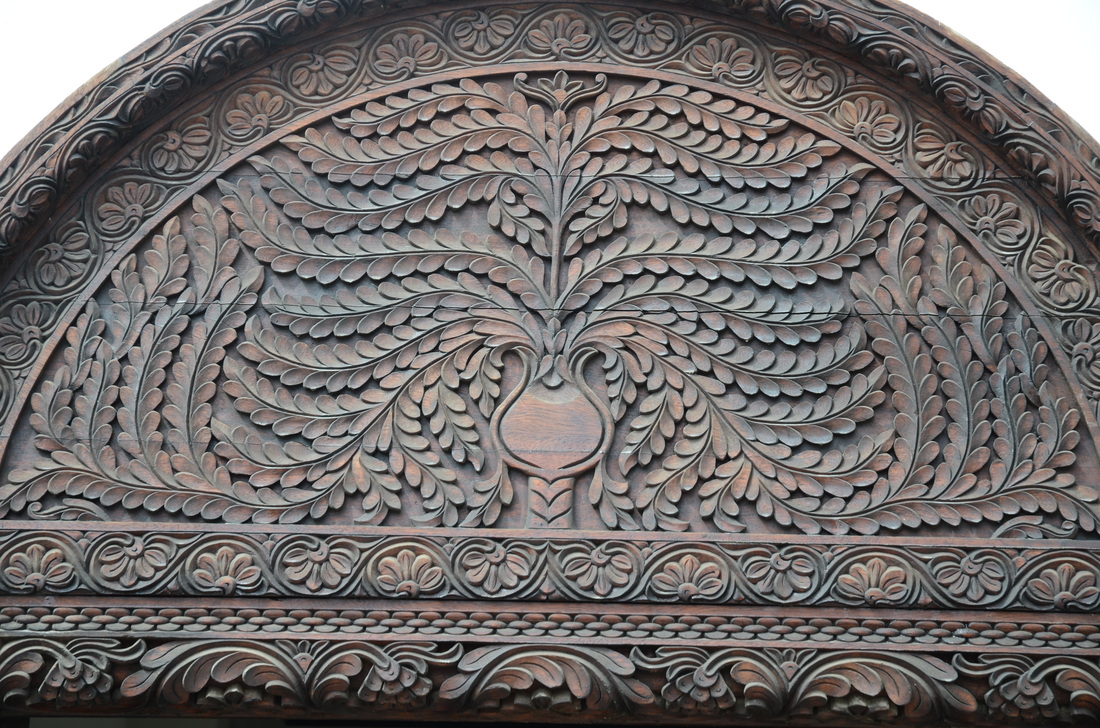 My favourite part of the trip was a visit to a restaurant called The Rock - check out the website: http://www.therockrestaurantzanzibar.com/ Here is the view from our table - I can just see this image reproduced with hand-dyed fabrics, ripped to provide depth and texture. 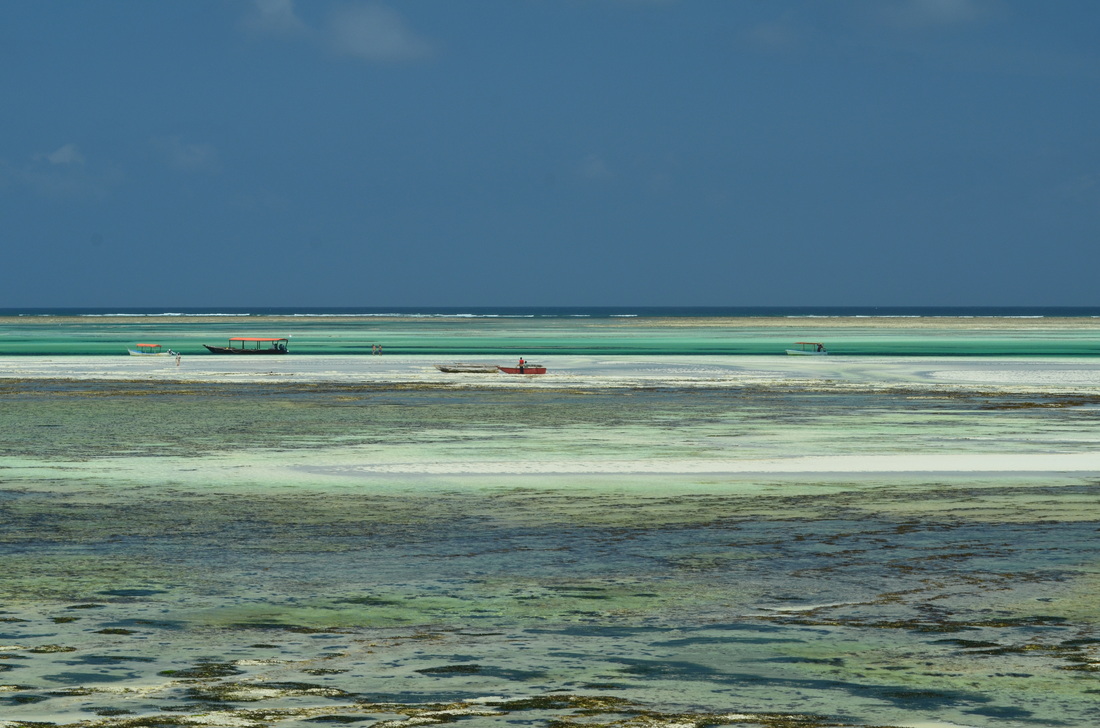 A final image of some of the amazing fabrics for sale in Stone Town: 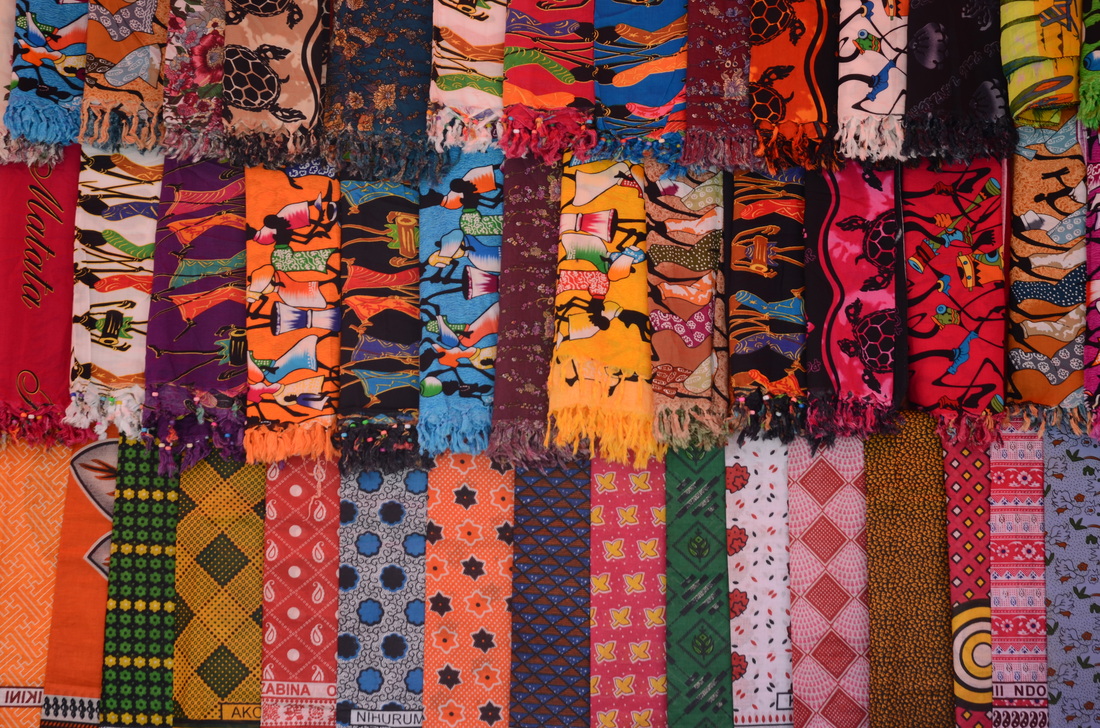 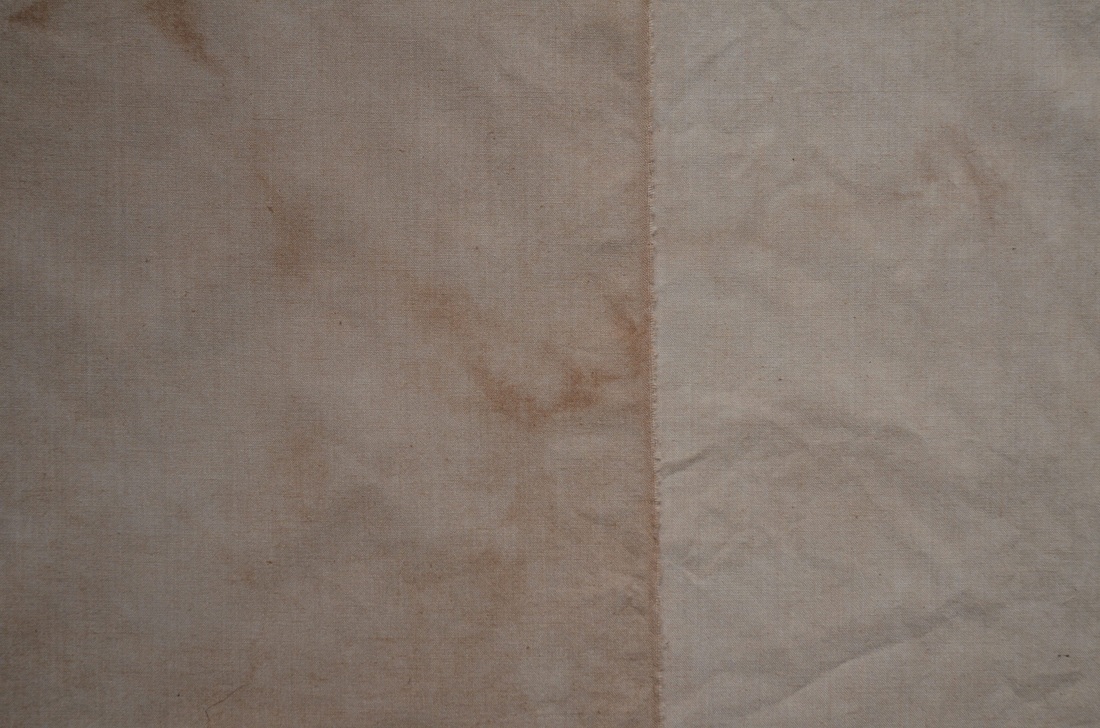
The results from my natural dyeing experiments are featured in today's post. I was a bit disappointed that the Japanese Maple leaves did not dye the fabric red, as the dye liquid was really quite a deep shade of scarlet. But I'm pleased anyway as the fabric has such a wonderful natural colour that would have been impossible to achieve with other types of dyes. The photo above shows the fabric dyed with salt on the left and without salt on the right - quite a difference! The salt gives a deeper colour to this and to the fabric dyed with Eucalyptus bark which is featured below. Again, salt was added to fabric on the left, no salt on the right. Remember, both of these were mordanted with alum acetate. 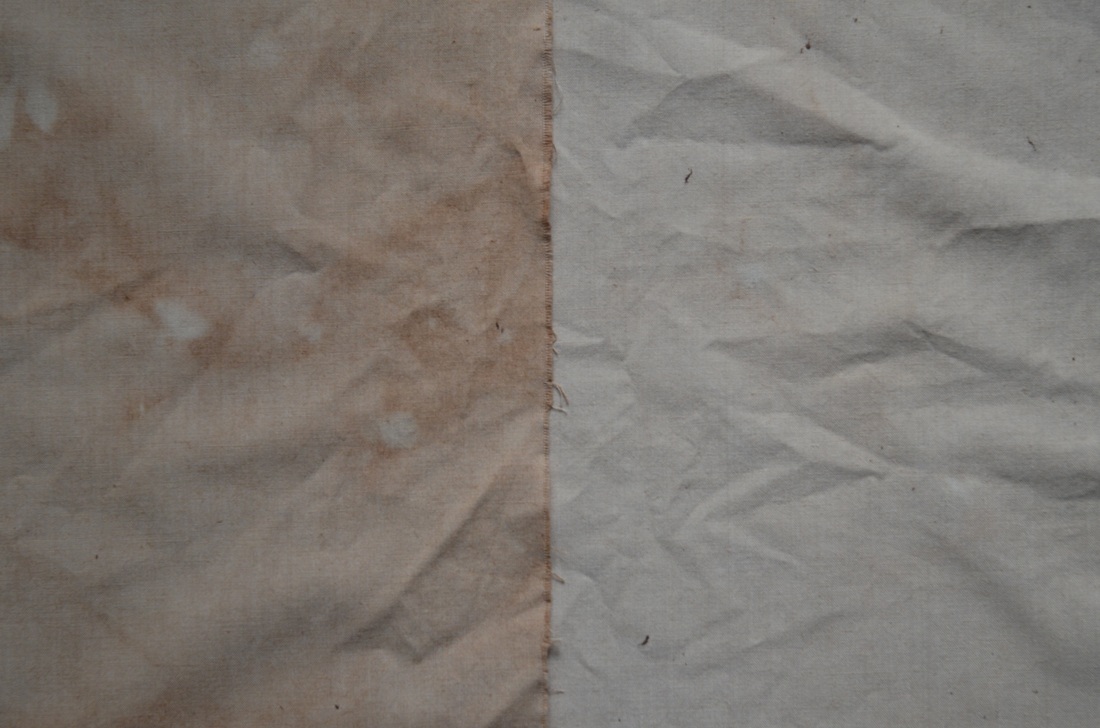
You might say these two sets of fabrics look very similar to one another and you wouldn't be wrong, but I do like the subtle differences and can't wait to use them! 
I also dyed some fabric with turmeric. The results are above - a really lovely shade of yellow. This picture doesn't do it justice.
So I'd say I had a successful time with my natural dyeing and will certainly do it again in the future. But the book beckons and I'm on to applying colour to fabric through painting and monoprinting. I'll post some of my results soon. 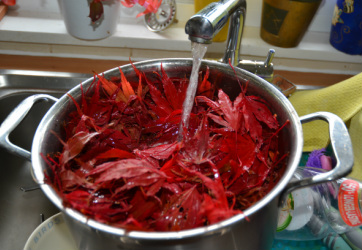
While I was photographing Jack, I decided that those Japanese maple leaves would be one of my first natural dyestuffs, so I collected a very large amount in a stainless steel pot. I covered the leaves with water and soaked them for about an hour. I then simmered the leaves for about 5 hours (covered) and left everything to cool overnight. The next day I strained out the leaves, (put them on the compost heap) and poured the reddish-brown broth into a plastic container. 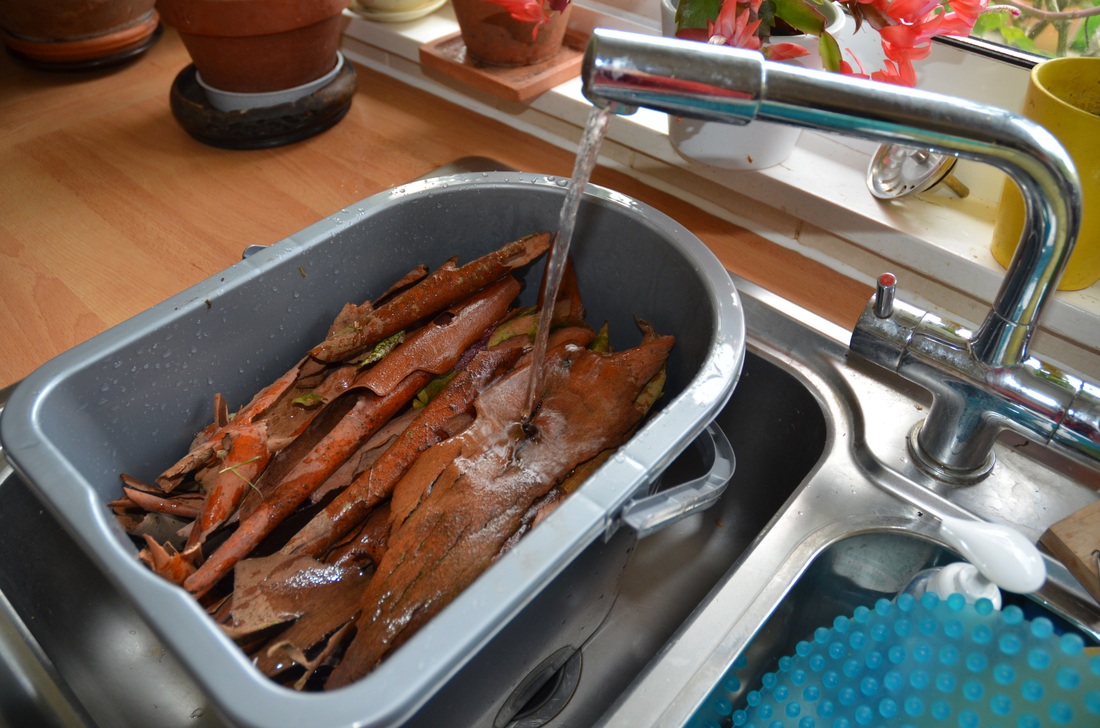
For another dyestuff, I gathered Eucalyptus bark that had dropped on the ground all around a tree in my garden (never remove bark from a living tree, it goes without saying). I soaked the bark in warm water overnight (some natural dyers soak bark for much longer but I was too impatient), then boiled it for about 8 hours the next day—a lovely aroma permeated the house. I let the bark soak in the water for a couple of days, then poured that dark brown solution into a separate plastic container. In the meantime, while the leaves and bark were cooking and soaking, I scoured several fat quarters of my 100% cotton fabric in a hot machine wash to prepare them for dyeing, and soaked them in Synthrapol for a few minutes before rinsing them in warm water. I then added a mordant to the fabrics by simmering them in an alum acetate solution for an hour, then leaving them in the solution overnight. A mordant is a chemical agent that adheres to both fibers and dye, binding them together; the term is derived from the Latin mordere, which means “to bite”. 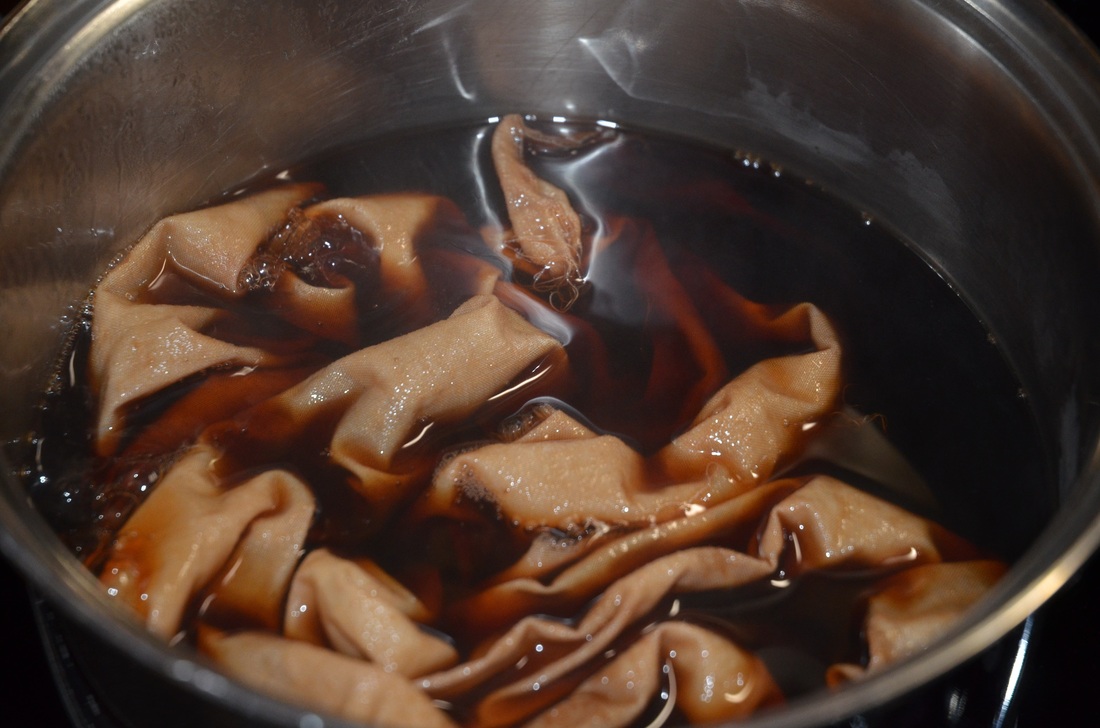
The next day I divided the Japanese maple leaf broth into 2 stainless steel pots (never again to be used for cooking!). I added a tablespoon of salt to one pot, and then immersed one fat quarter of the mordanted fabric into each pot. I simmered the fabrics for one hour, not letting the solutions come to a boil. 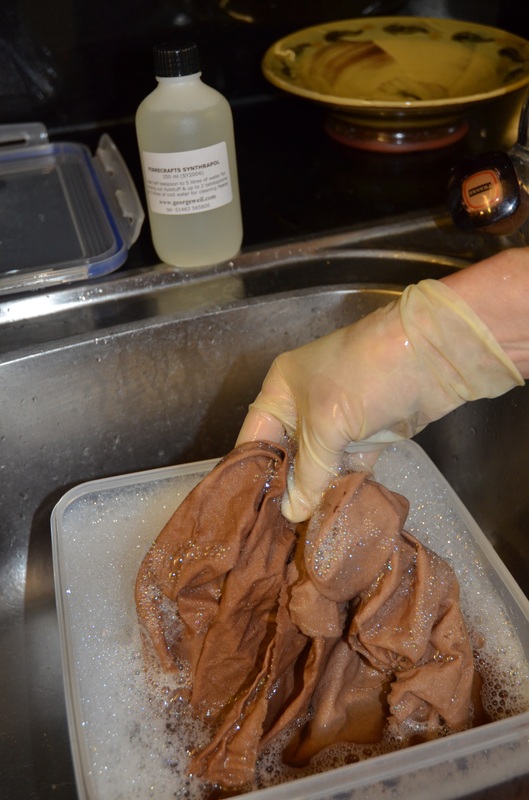
I removed the fabrics from the pots, rinsed them under running water and soaked them in Synthrapol. I repeated this process with the Eucalyptus solution. Next time I'll show you the dyed fabrics and how they were affected by the salt.
 Greetings! I have been reading some wonderful blogs and news postings over the past few years and wondered whether I should add one of these to my website, now that it is officially up and running. I talked it over with my website/book designer, Jane Glennie, and she thought it was an excellent way to keep this website current and to keep you up-do-date on how things are progressing on the new book that I'm writing. So I'm going to post some information from time to time about about what's going on "behind-the-scenes" while researching material and techniques for this book. It will hopefully keep you entertained, and is definitely a great way to procrastinate from what I should actually be doing, which is writing the book itself! Anyway, at this point the book is probably about half finished. I am currently working on the Surface Design chapter, specifically on Natural Dyeing. I can't tell you how exciting it is to research all the different topics for this book, and how wonderful it is to be able to "play" while learning about each subject in depth. Natural Dyeing has opened my eyes not only to the wonderful substances that can be used to create beautifully coloured fabric, but it's also encouraged me to really observe the gorgeous colours all around me at the moment--colours that echo what can be achieved with natural dyeing. I think this is the most spectacular autumn I can remember since moving to England in 1984. 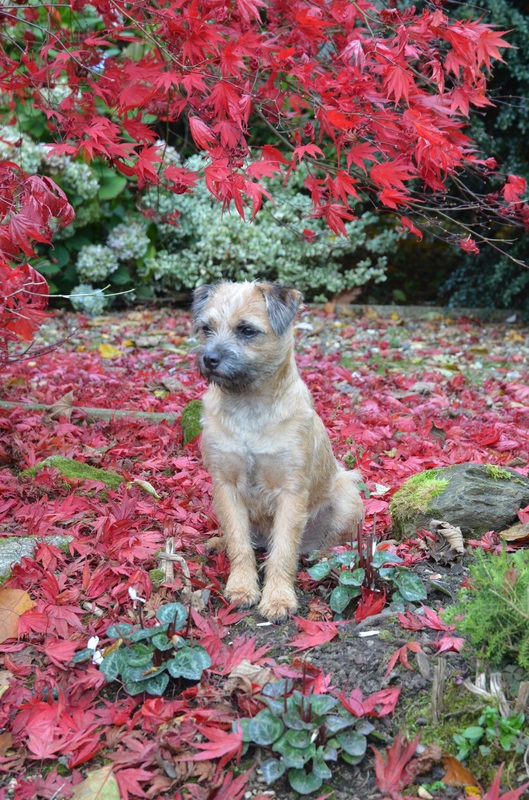 When I took this picture of my Border Terrier, Jack, I decided that I had to try dyeing with Japanese maple leaves. So I've gathered up a huge amount of bright red leaves. Next time I'll show you the results!
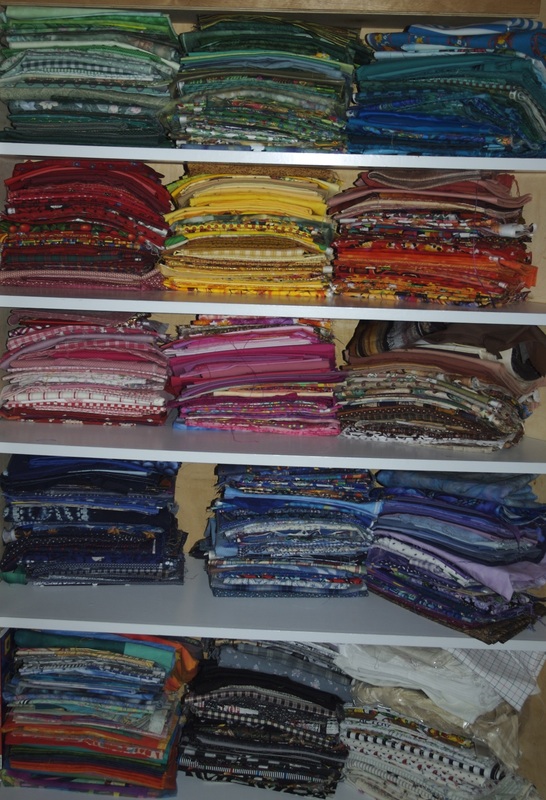
PS. The photo at the top of this post shows a small selection of fabrics from my stash. Jane told me to put a photo at the top of each post to make it look more interesting and I always listen to her! |
Archives
March 2023
Categories
All
|
 RSS Feed