|
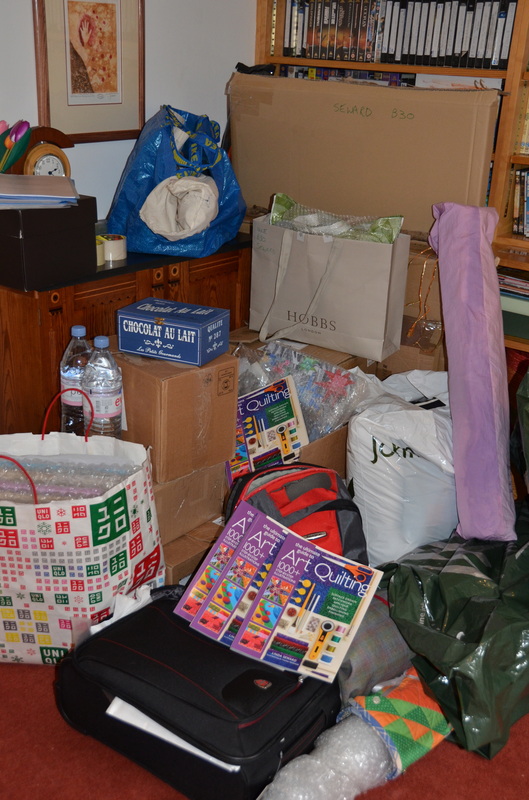
It was with much trepidation and anticipation that I drove to the Birmingham NEC last Wednesday morning with a car stuffed full of quilts, books, cards, my son and other paraphernalia for setting up a gallery. Can a son be considered paraphernalia? 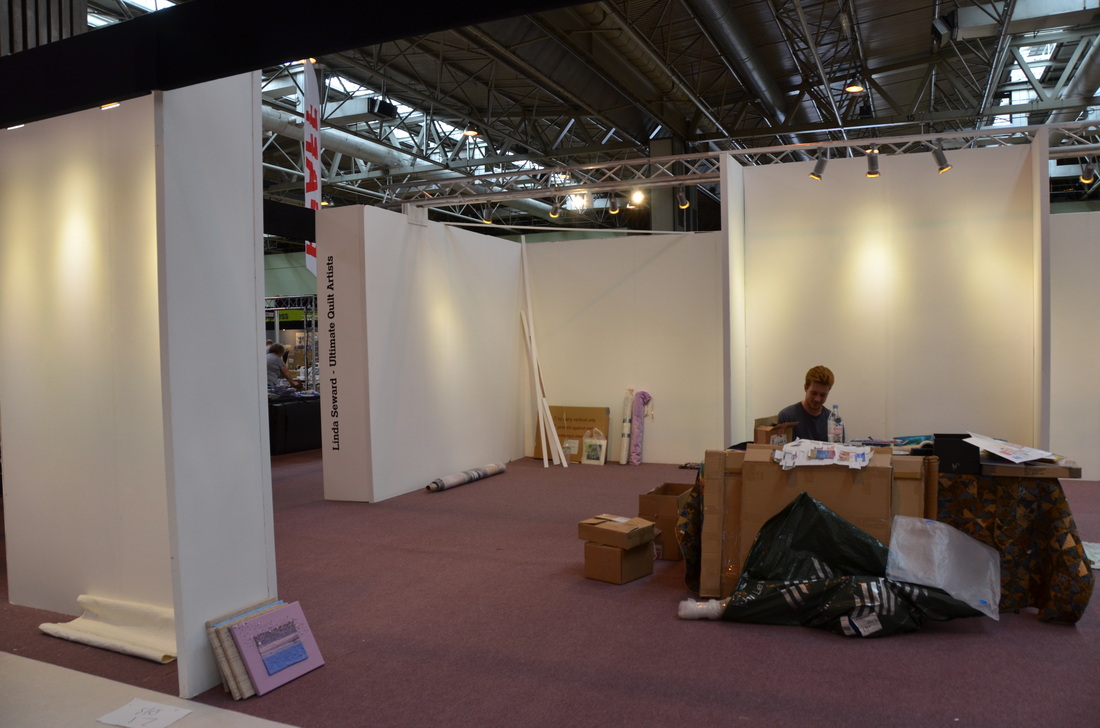 The large white space was quite daunting when we arrived, but I had already made a full-color floor plan of where each quilt should hang, so it was just a question of sorting out the quilts and putting them in the right place. 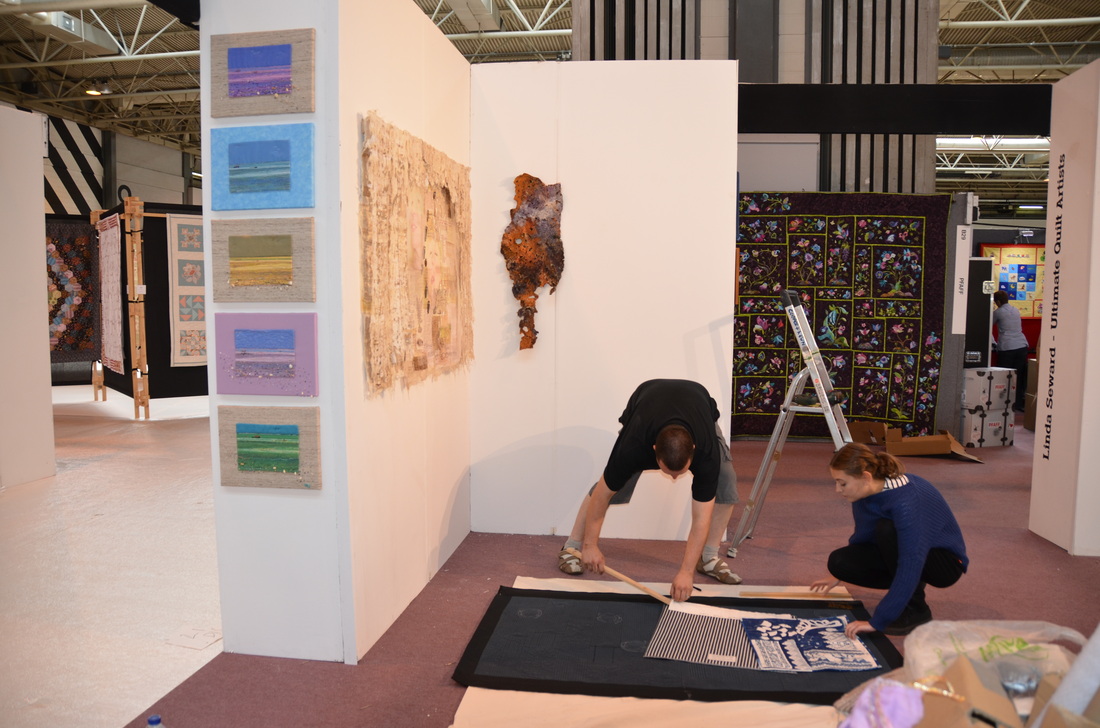 Pieces also began to arrive from quilters who had their own galleries at Festival, and by noon we were ready for the hanging team who arrived with ladders, saws, drills, screws, battens and measuring tapes.  I also had assistance from quilt artists Kate Crossley and Kate Findlay. Below you can see the two Kate's set up a table at the back with all the greeting cards I had printed for the show. You can also see the quilts in place on the floor, waiting to be hung. There is a pile of my new books in the foreground, left. 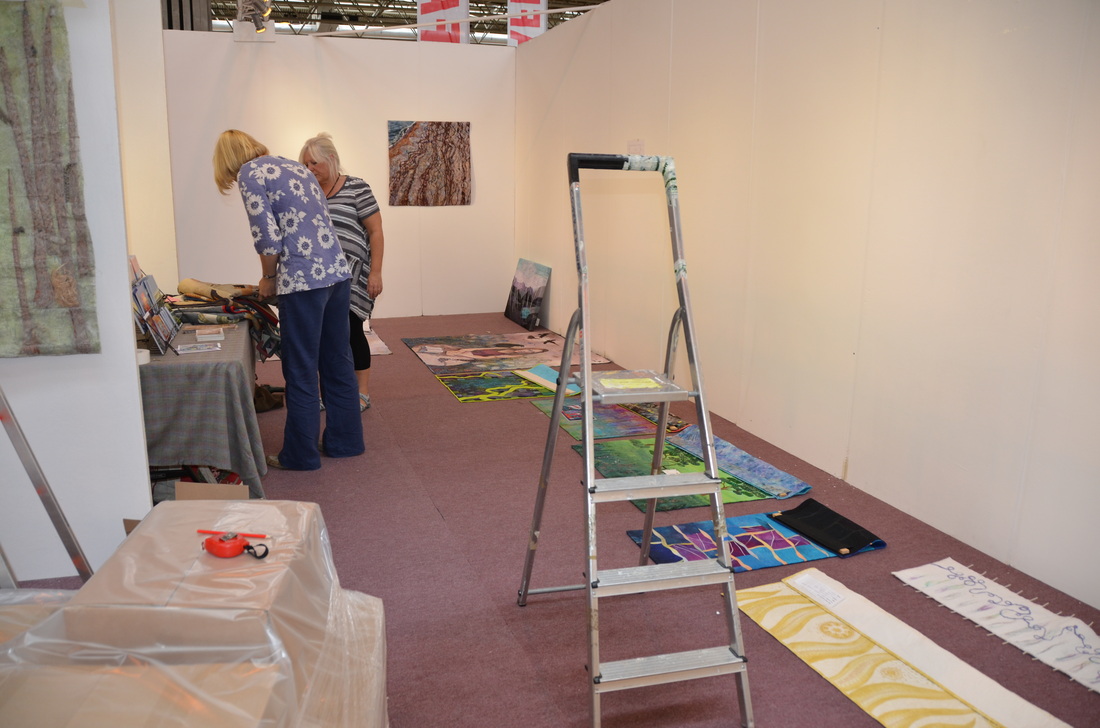 Liz Cooper was hugely helpful in so many ways. Here she is (below) setting up Barbara Weeks' cushion on a plinth, with the two Kate's offering some advice. 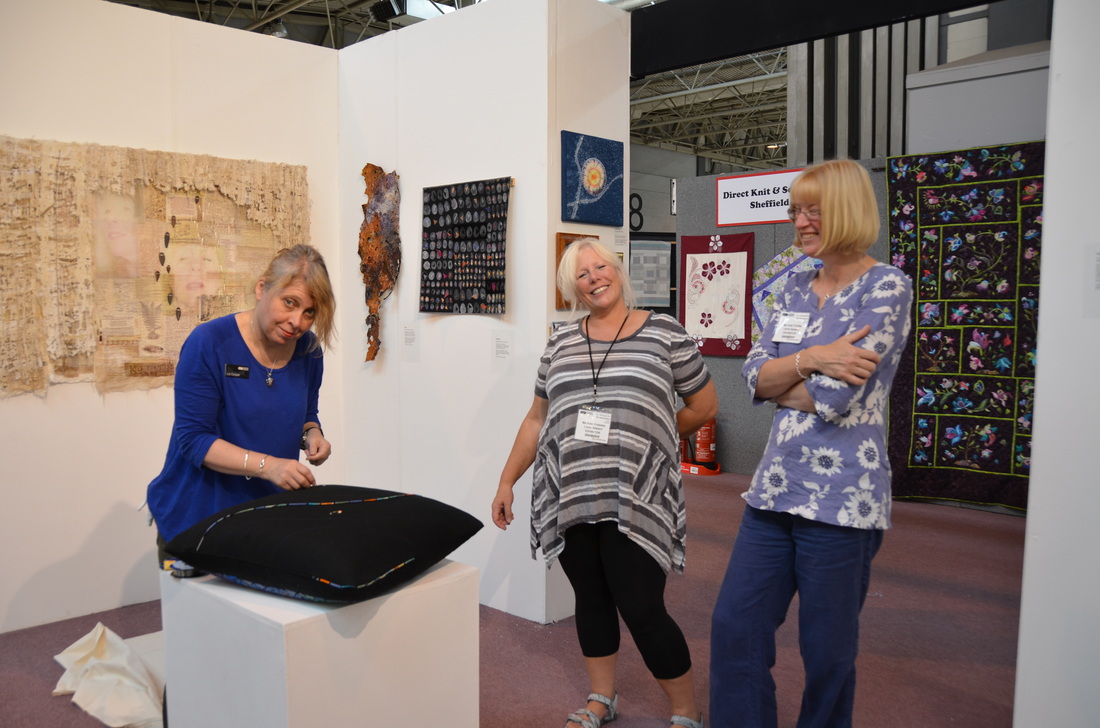 I can't tell you how efficient the hanging team were! They measured and cut battens with the speed of light, and the drills started whirring, screwing quilt battens to the walls. 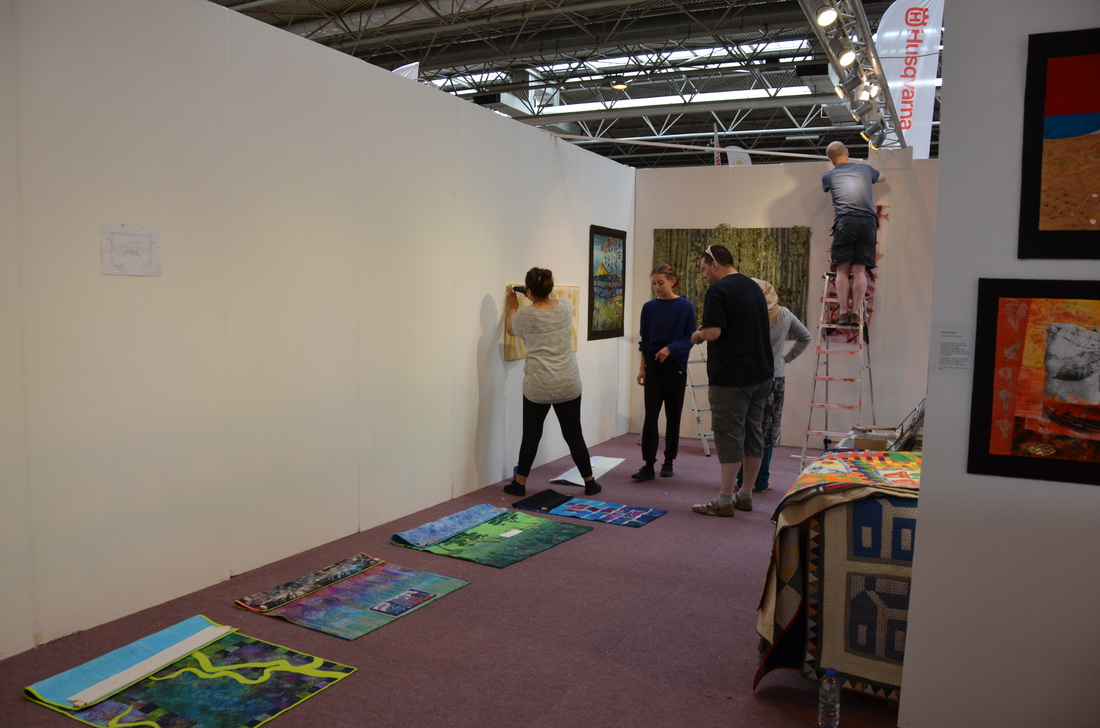 Finally everything was hung and in place and I just walked around, marvelling at how wonderful it all looked. Thanks so much to the hanging team, Liz, the two Kate's and Keith! 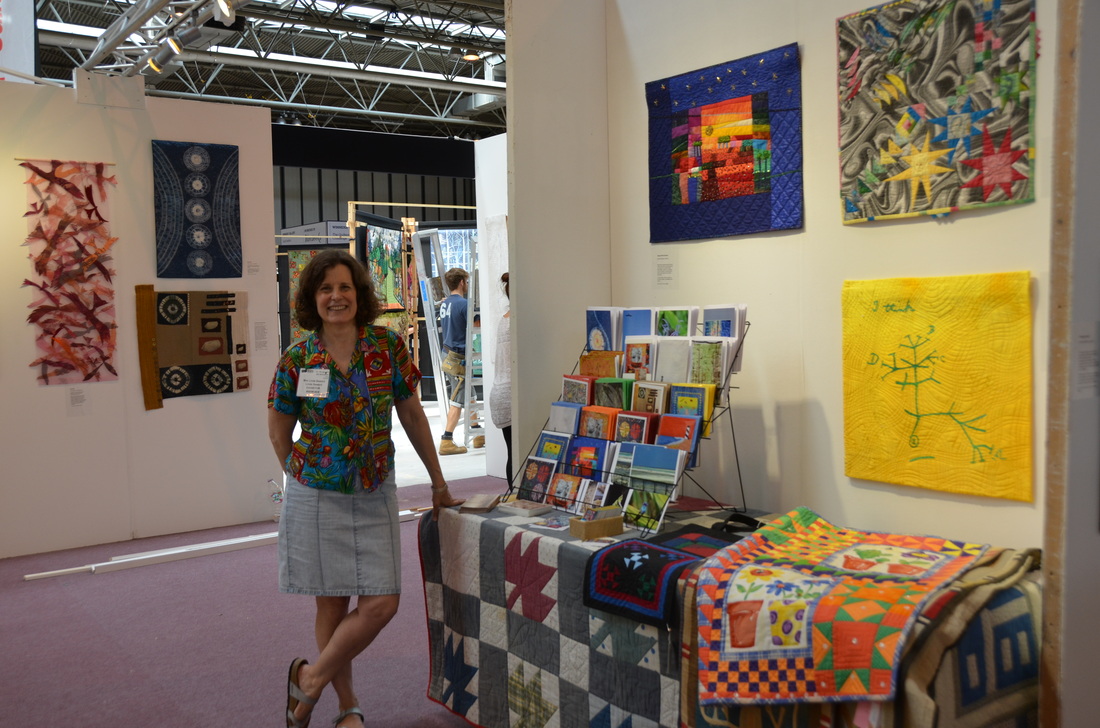 Here is Kate Crossley, standing in front of her piece, "Kate's Book of Un-common Prayer." 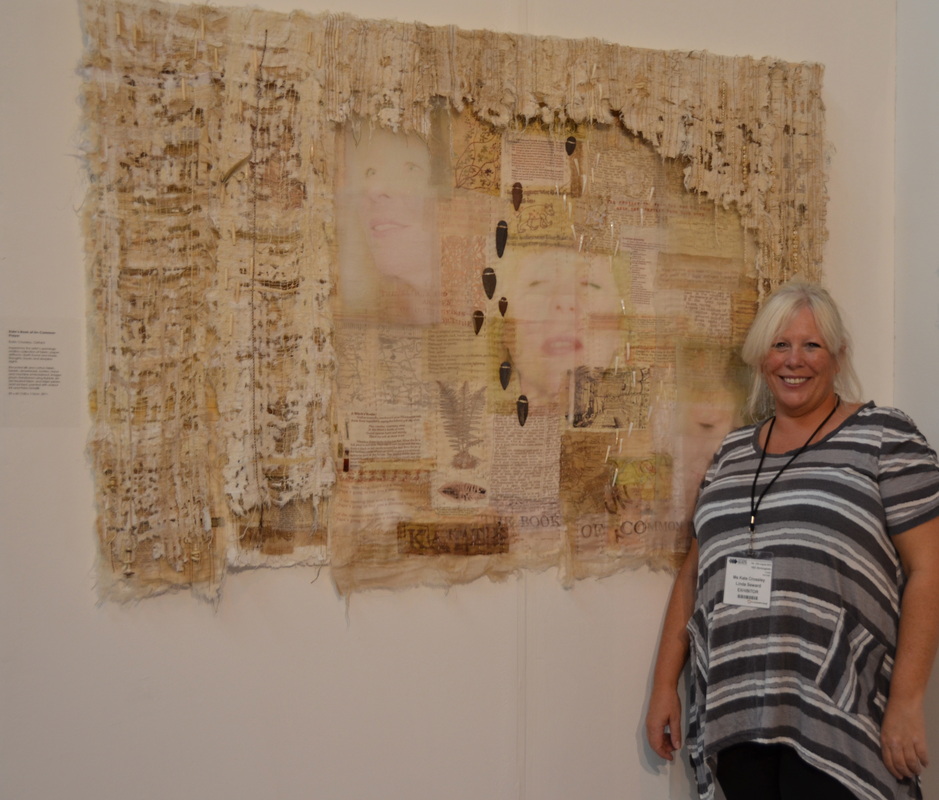 Here is Kate Findlay, standing in front of her piece, "Pink Dawn."Margaret Ramsay's quilt, Tideline: After the Storm is beneath. 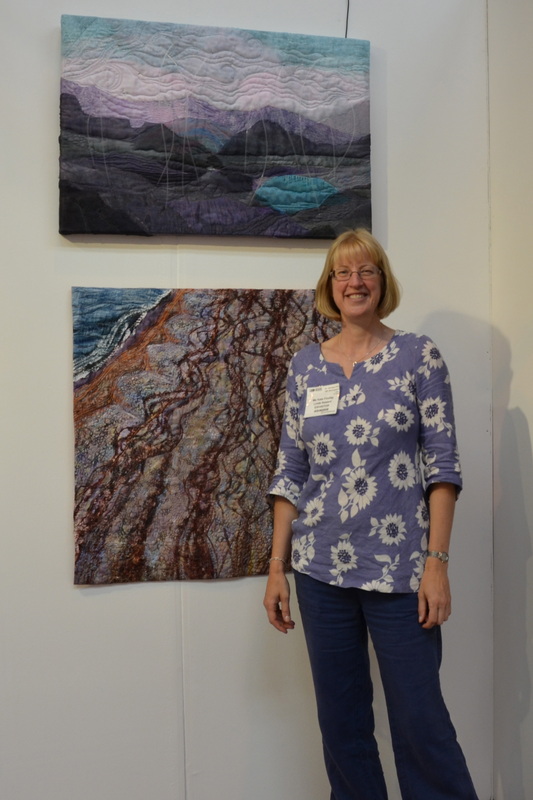
2 Comments
After all these months of preparation, can it really be true that tomorrow I'll be setting up my gallery at the Festival of Quilts in the Birmingham NEC? I had absolutely no idea how much is involved in getting ready for an exhibition of this kind. I am featuring the work of 27 quilt artists as well as my own, and the logistics of getting all those pieces to the right place at the right time has been quite mind boggling. I hope it all works out tomorrow! 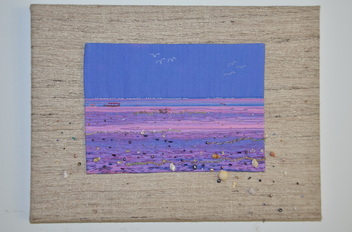
I've been making some little framed pieces to sell at the Festival, all based on a photo I took of a beach in Zanzibar in early 2013. I used that photo to test various colourways when printing on fabric, so I have purple, blue, lavender, yellow and turquoise beaches framed on top of cotton or silk fabrics. 
I had so much fun free-motion machine quilting those pieces and then embellishing them with beads and seashells. I really like working small! 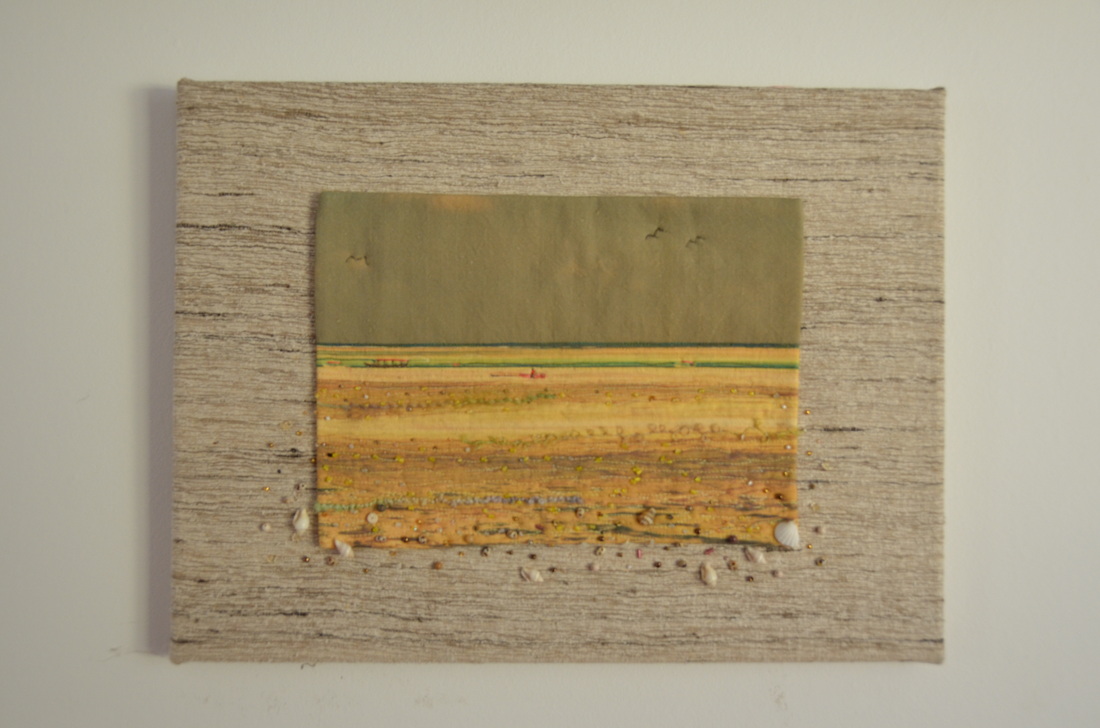
The only trouble with making pieces like this is that I never know when to stop. Shall I add just one more bead or seashell? Often the decision is taken out of my hands when the thread runs out. I have so much trouble threading beading needles! 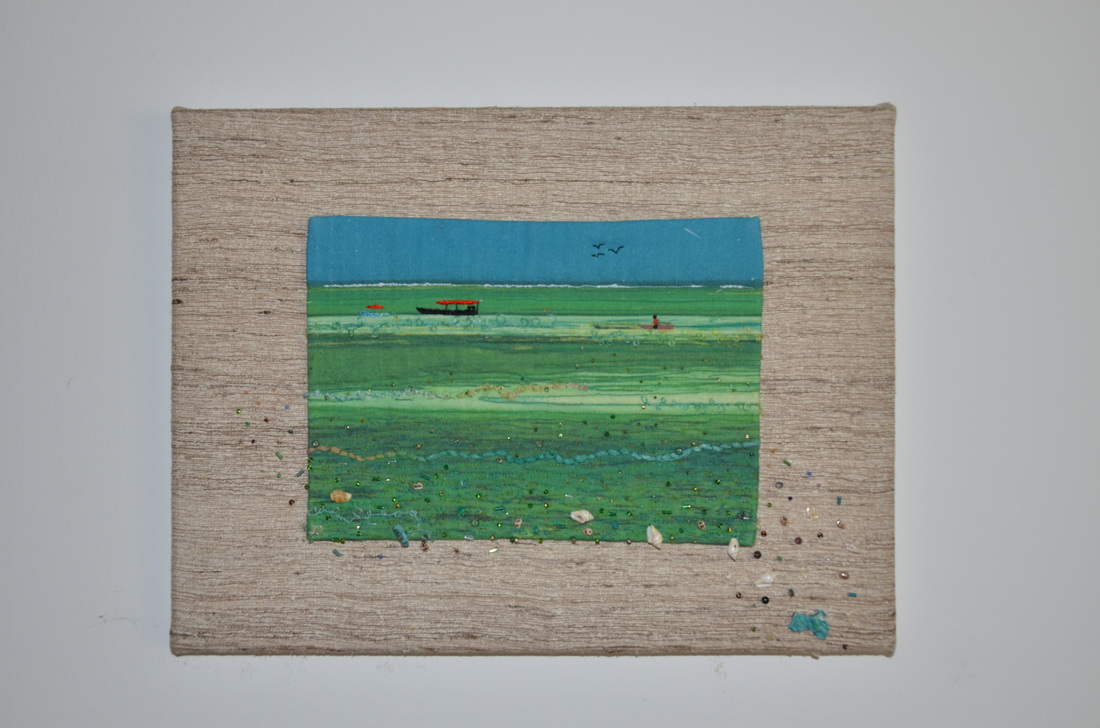
I also had fun couching various nobbly threads on the surface and embroidering the boats, ocean waves and flying birds. 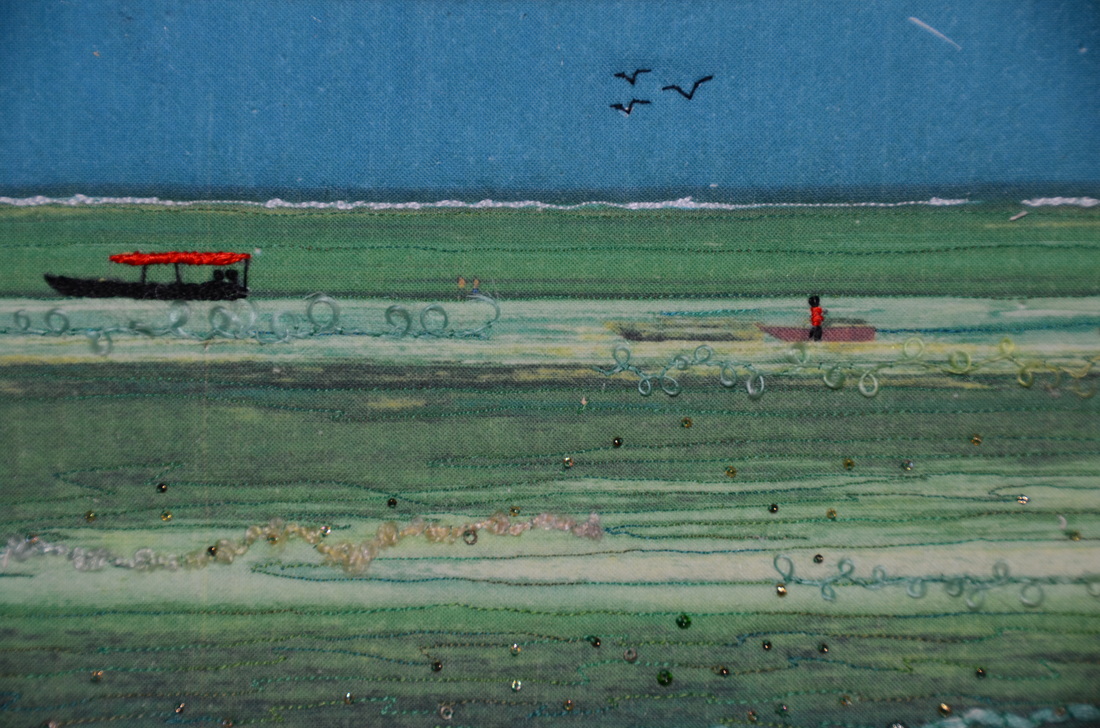
Some of the scallop shells have a secret pearl hidden underneath. I have been collecting tiny beads and shells for a long time, so it was a real pleasure to be able to use them for these mini quilts. See you at Festival! 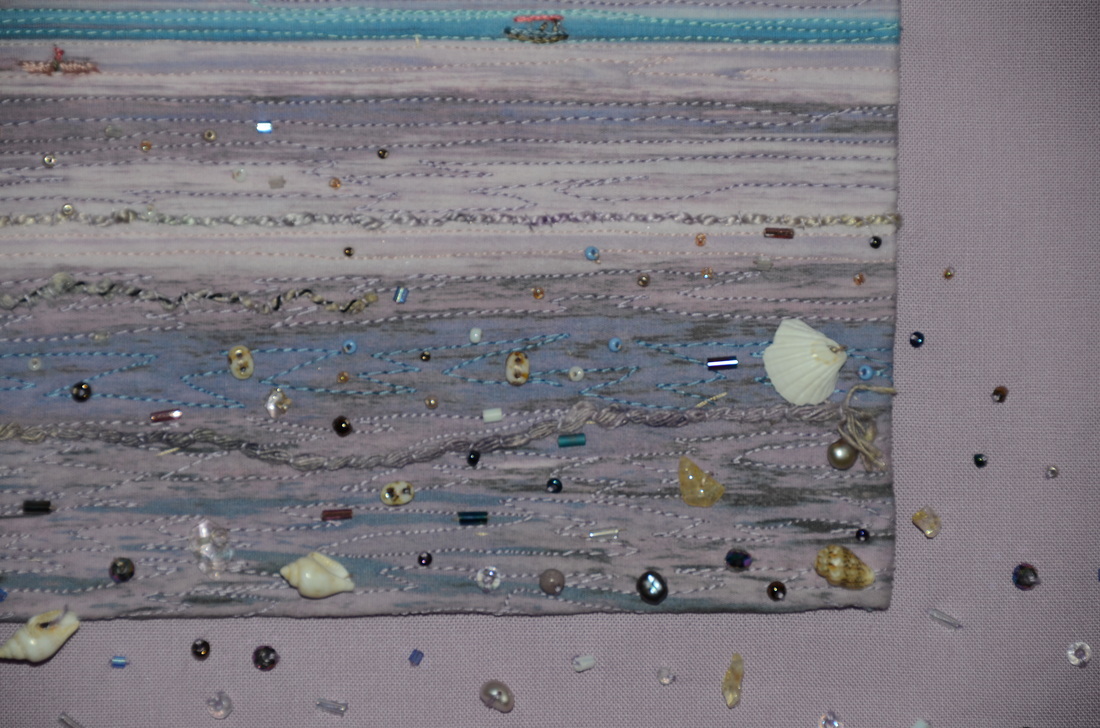
Copies of my new book have now been sent out to all the quilters who have work featured in it. I was so surprised and pleased by the reactions that the book has received in Brazil. There seems to be a thriving quilting community there. I have recently joined Facebook, so I have seen postings by all three of the Brazilian quilters. They all have lots of "friends" who "like" their posts (I'm really new to Facebook!) So I asked these quilters if I could show their work on my website and they have all generously agreed to let me do so. In alphabetical order, here are the Brazilian quilters who are featured in my new book, The Ultimate Guide to Art Quilting. 
This is Maria Lucia Azara of Petrópolis, Rio de Janeiro, Brazil. She made the following quilt, entitled Sementes do Brasil: Cupuaçu. The photo is by Érica Marci Photo Studio. Maria's piece is part of a series celebrating the diversity and richness of Brazilian fruits; the title means “Seeds of Brazil.” Cupuaçu is a popular fruit found in the Amazon forest that is used for making juice and desserts. 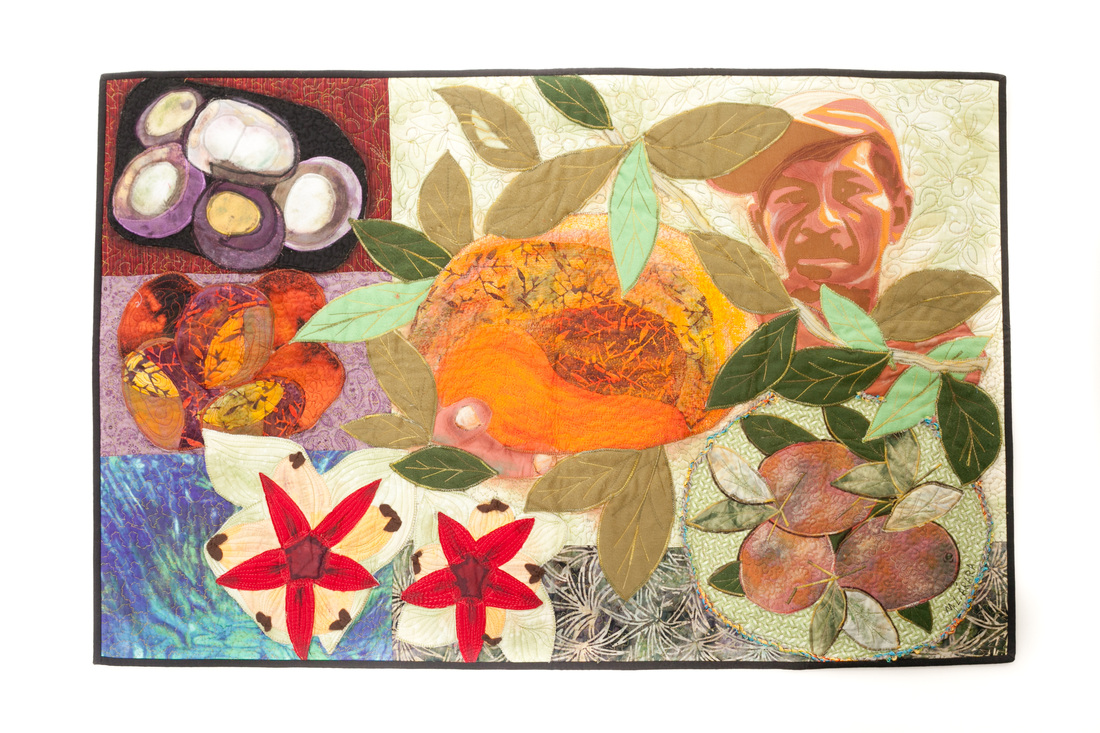
This is Vivian Wilm Pinto of Petrópolis, Brazil.Vivian made the following quilt entitled Favela – Espaço Aleatóri. The photo is by Marcelo Pinto. Vivian was inspired by the landscape she saw on arrival in Rio de Janeiro: the Sugar Loaf, the Corcovado, and the massive presence of the slums--favela. While the random and unplanned growth of the houses is depicted, the artist also shows the favela as a place where children fly kites and clothes hang on a line—life following its natural course. 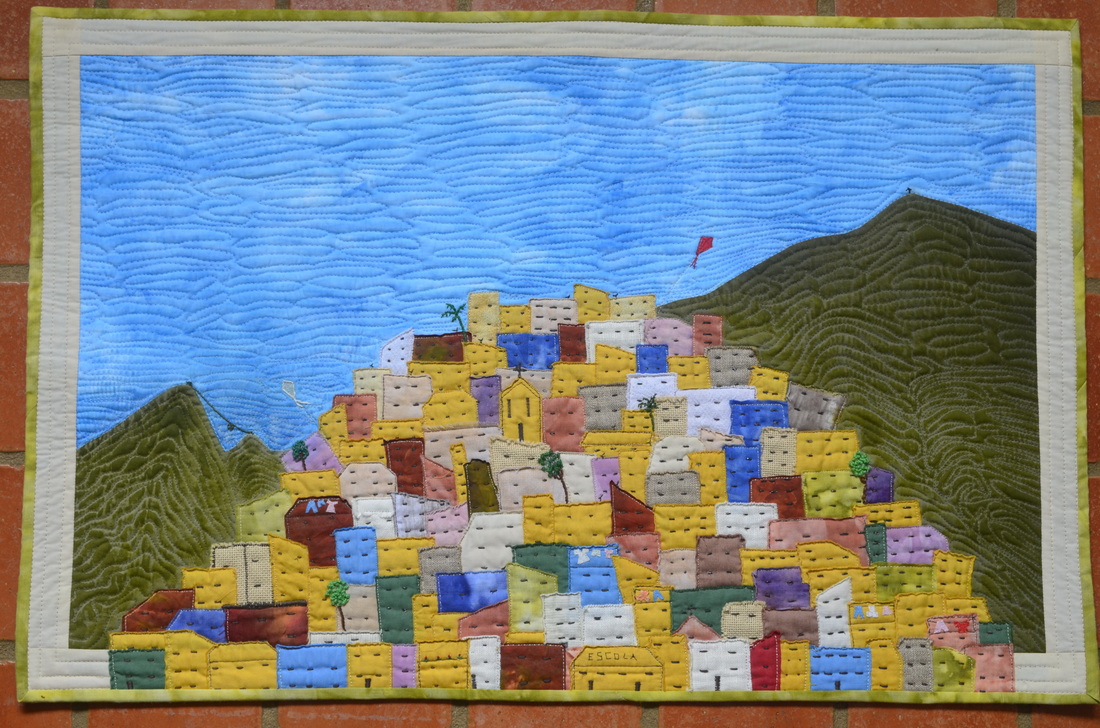
Here is Rute Sato of São Paulo, Brazil. Her quilt, featured below, is called Fragments of Reality. Rute was inspired by Brazil's skies at different times of day and in different parts of the country: city, forest, back country and beaches. The openings in the quilt show fragments of reality by drawing the viewer’s eye through and beyond the quilt’s surface. 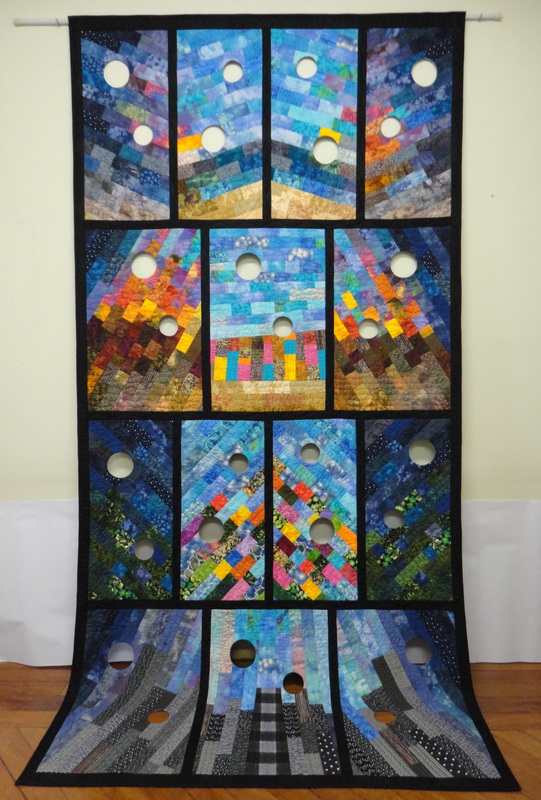
I am delighted to be able to share the work of these talented Brazilian quilters on my website, and I thank them for letting me do so. I hope you enjoy it!  This wall hanging, entitled Orange Leaves, is going to be exhibited in my gallery at the Festival of Quilts at the Birmingham NEC. The show is on from August 7-10, and I have been given a large gallery there (B30). Entitled "Ultimate Quilt Artists," the gallery will show the work of 27 British quilters who were featured in the book, as well as my own work. Please do stop by and say hello if you are visiting the Festival this year! 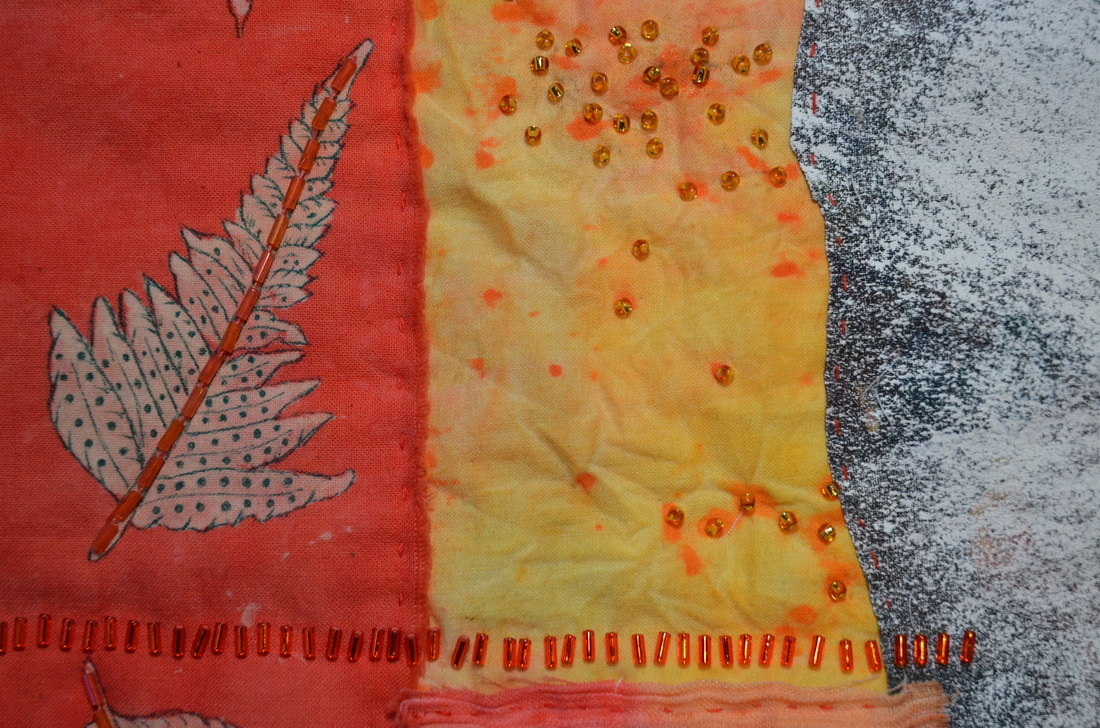 Here is a detail of Orange Leaves, showing discharging, fabric painting and beading. I used deColourant to discharge (or take away) the dye from the orange fabric on the left using a carved wooden fern block. I then used a fine fabric marker to delineate each leaf and add the spores. Those are orange bugle beads sewn up the central stem. 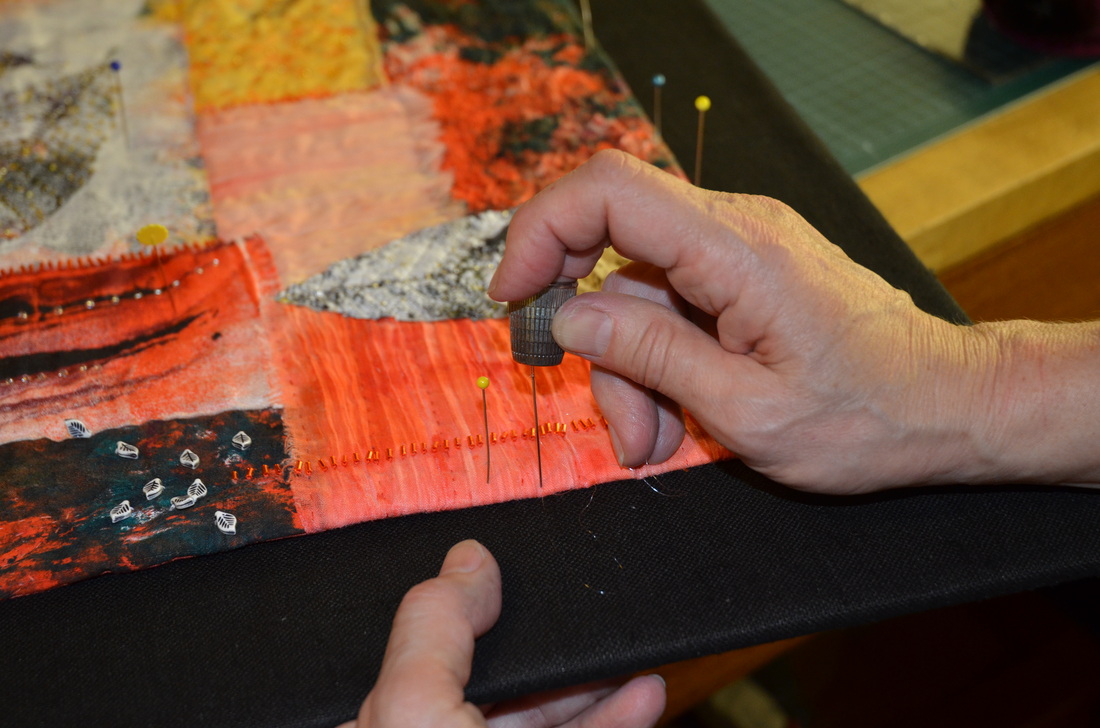 The photo above shows how I attached the quilt to the foam board backing on which it is mounted. I finished off all the edges of the quilt, and cut the foam board so it was 3"/8cm larger all around. I then glued a lovely, slubby black linen fabric over the foam board using a spray fabric adhesive. I wrapped the fabric edges over the board and glued them to the back. Then I carefully centered the quilt on the front of the foam board, pinning it to the board as shown here. Using a sturdy needle, invisible thread and a thimble, I sewed the quilt to the foam board invisibly. This took quite some time, but I'm pleased with the result.
It's been an exciting week for me because copies of my new book have finally been sent out to many of the quilt artists who are featured it and to reviewers, such as magazines. I've had some lovely reviews so far. Check out Gillian Cooper's review here: http://gilliancooper.blogspot.co.uk/2014/06/inspiration-ultimate-guide-to-art.html Janice Gunner also talked about the book on her blog: http://janicegunner.blogspot.co.uk/ 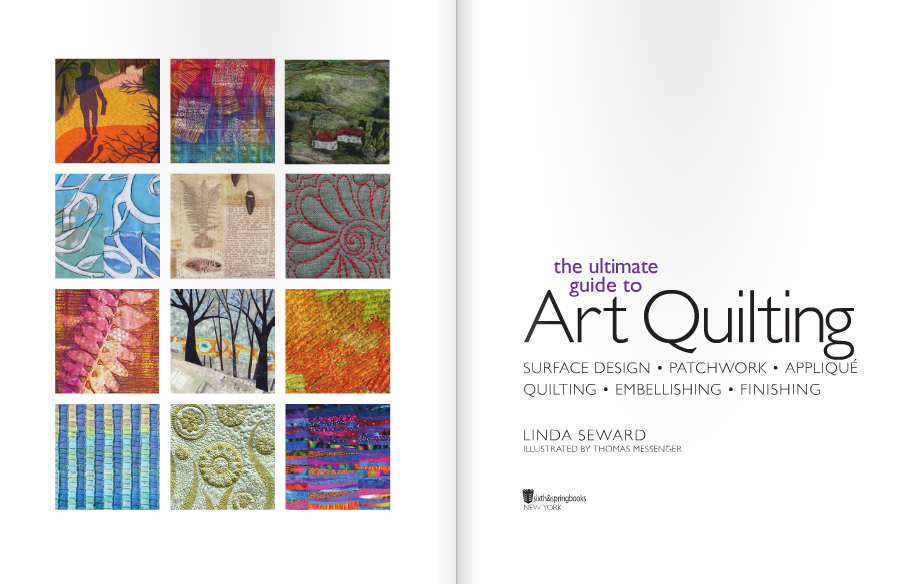
This is the title page of the book. The art director of Sixth&Spring put together the images on the left hand page, so those artists haven't been credited for this particular page in the book. I'd like to rectify that right now, and hope to do this when the book is reprinted.
Top row: Cindy Friedman, Hilary Gooding, Anne Jolly. Second row: Margaret Applin, Bornemisza Eszter, Tracey Pereira. Third row: Margaret Applin, Linda Beach, Karina Thompson. Bottom row: Inge Hueber, Sheena Norquay, Ann Brauer. Thank you to them and to all the quilt artists who so graciously agreed to allow me to feature their work in the book. 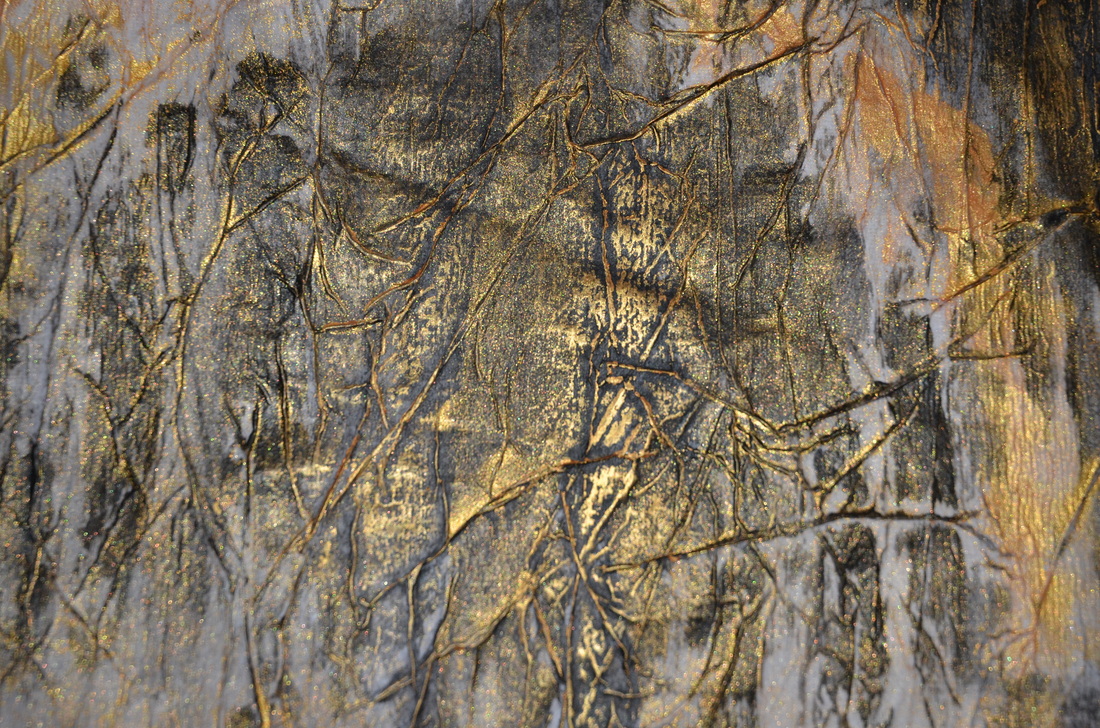 I can't believe it's already June 2014! I had very good intentions of writing regular postings on this website, but life, as usual, got in the way. We went on a wonderful trip to Myanmar (Burma) over the holidays, and when we got back, I spent January clearing up my computer, cleaning my study, filing papers and starting work on the lectures that will accompany the new book. I went to Colorado in March to visit my son and an old quilting friend -- I will write about that next time, and I promise to write more regularly from now on! Anyway, as part of chapter 2 in the book, I gave instructions for creating paper "fabric" -- seen in the photo above. To do this, place a plastic tablecloth on a large flat work surface. Thin fabric glue to a creamy consistency and roll it on the tablecloth, then smooth some plain cotton fabric on top of the glue. Roll a thin layer of glue on top of the fabric. 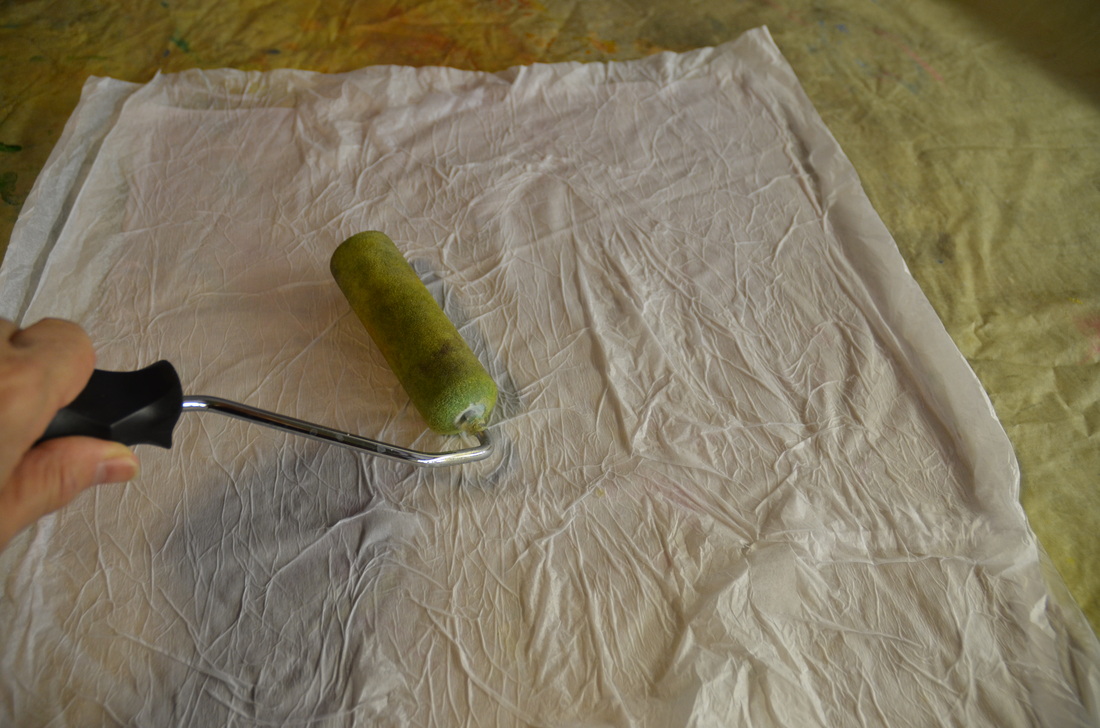 Crumple craft tissue paper, then open it up and smooth it onto the glued fabric with a foam roller as shown above. Add a few more layers, rolling the surface with a thin layer of glue after each addition, and overlapping the layers to get the desired size. If you wish, add some decorative scraps of colored paper, fabric, glitter or dried flowers to the glued surface or in between the layers of tissue paper. 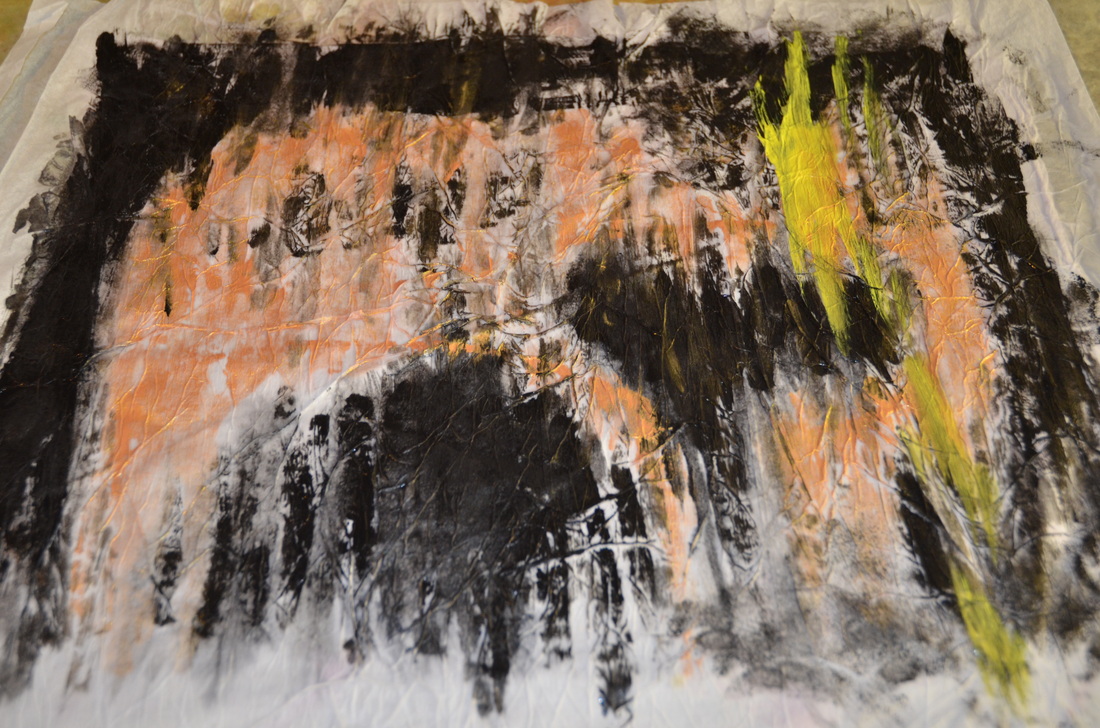 The surface will have a wonderful texture. When the glue is nearly dry, you can apply paint or dye to the surface, manipulating the colors to emphasize the textured areas as seen above. When the paint or dye is dry, rub the raised areas with metallic wax or paintstiks to highlight the texture.  Leave the work to dry undisturbed for a day, then gently peel it off the plastic tablecloth. You can cut, sew, embroider, quilt and embellish your paper fabric.
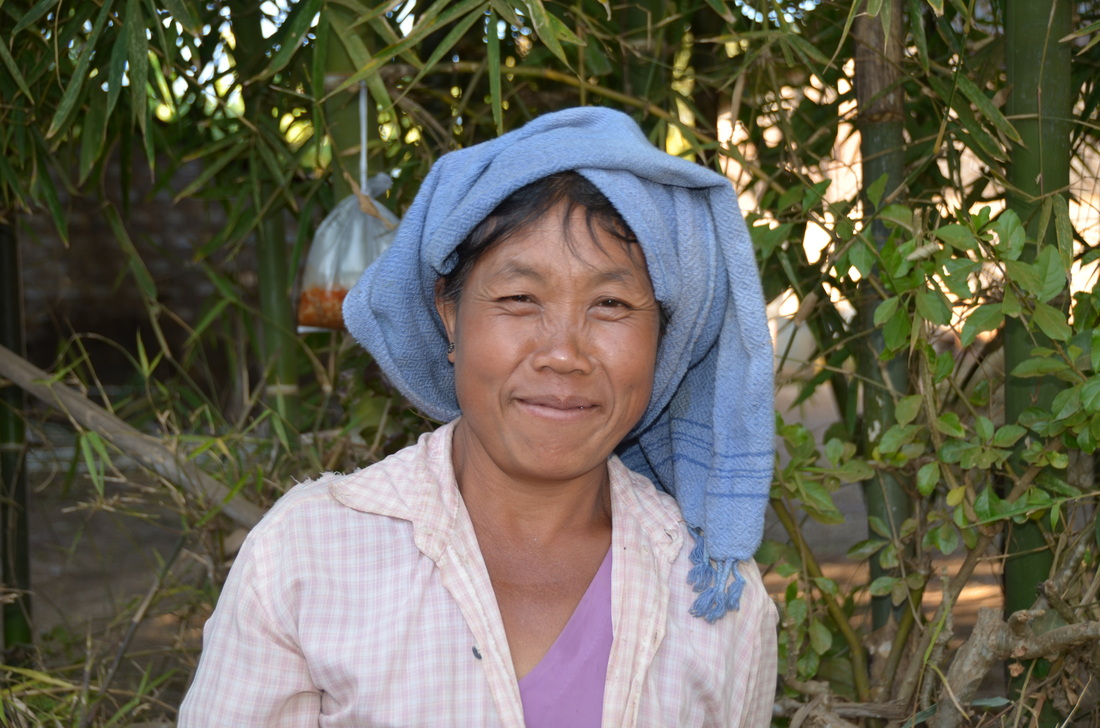 We went to Myanmar (Burma) in December/January. The country is beautiful, and the people are welcoming and friendly. If you smile at them, they will invariably smile back at you. 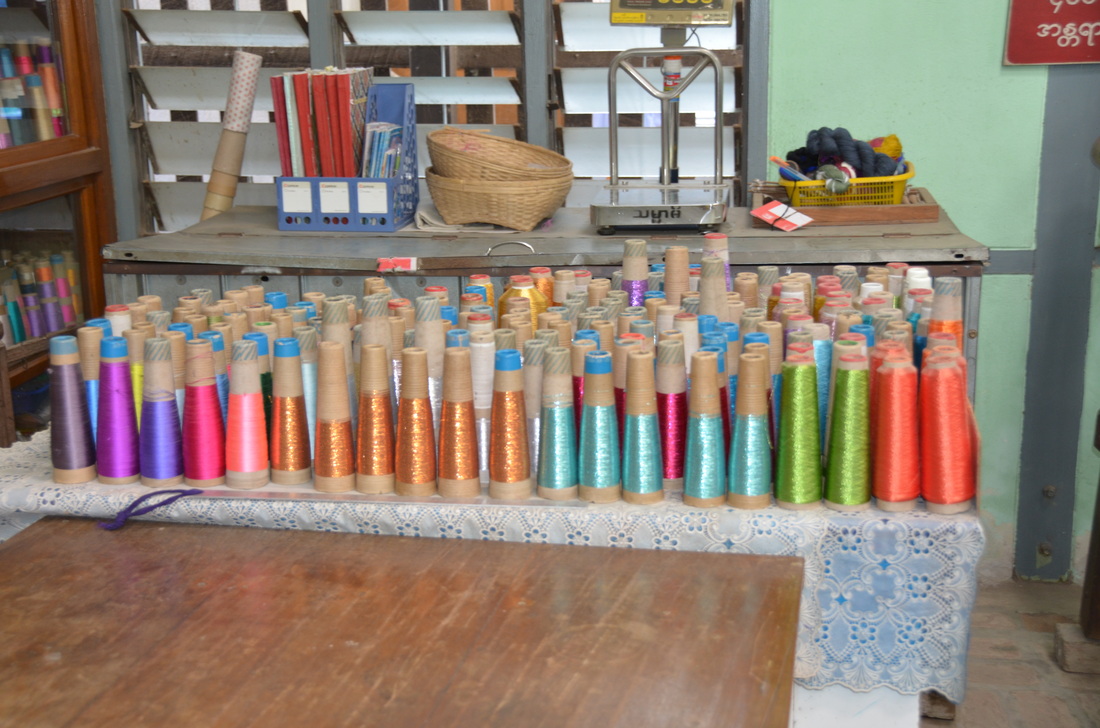 We went to a silk weaving factory in Amarapura (near Mandalay), and saw women working on the looms. 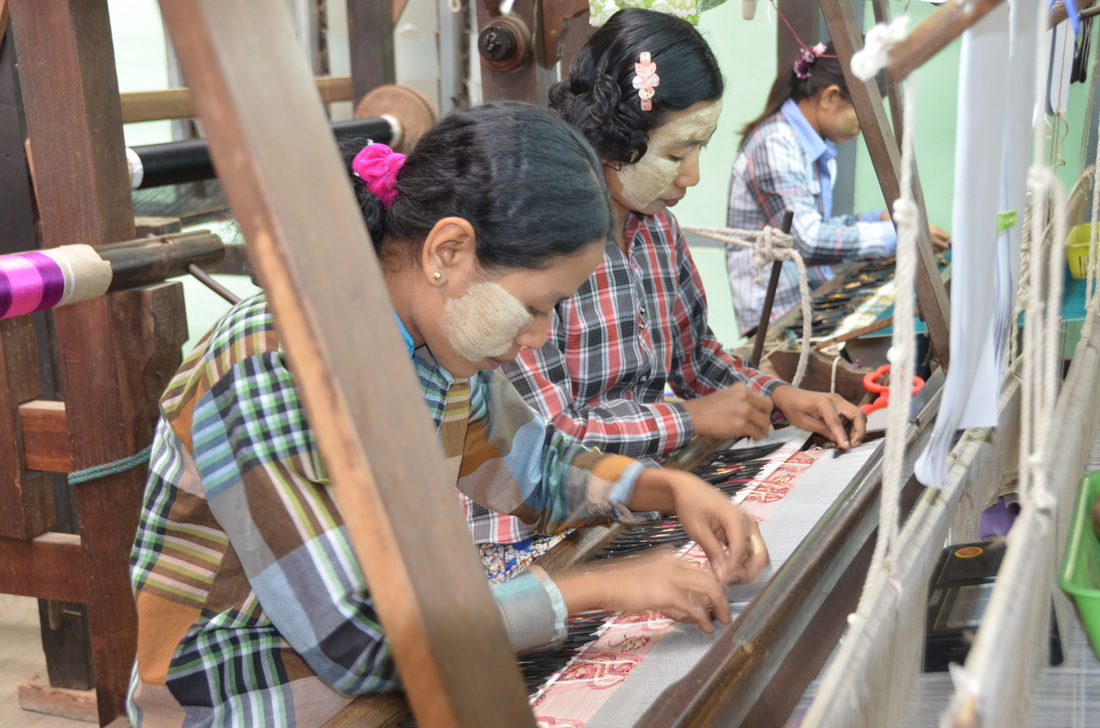 They were doing incredibly intricate work, following a graph-paper guide placed above the weaving area. You can see the guide on the right in the photo above, and in the picture below. 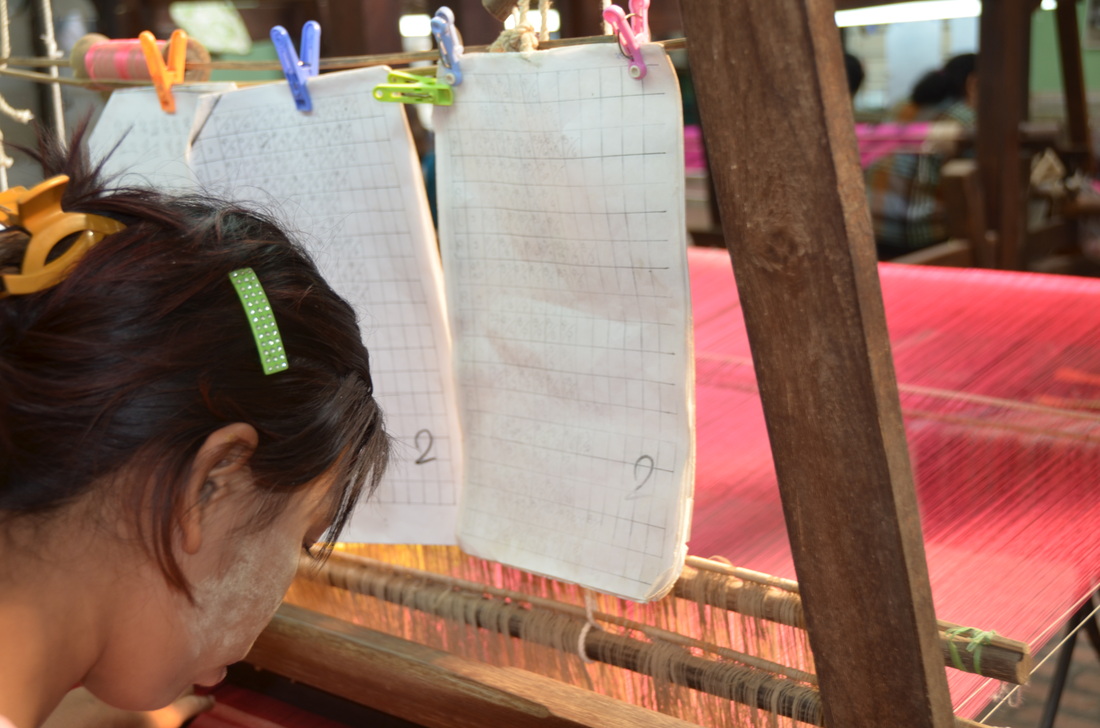 They were counting constantly, lifting up a single strand of the warp with a bobbin to create the incredibly detailed design. 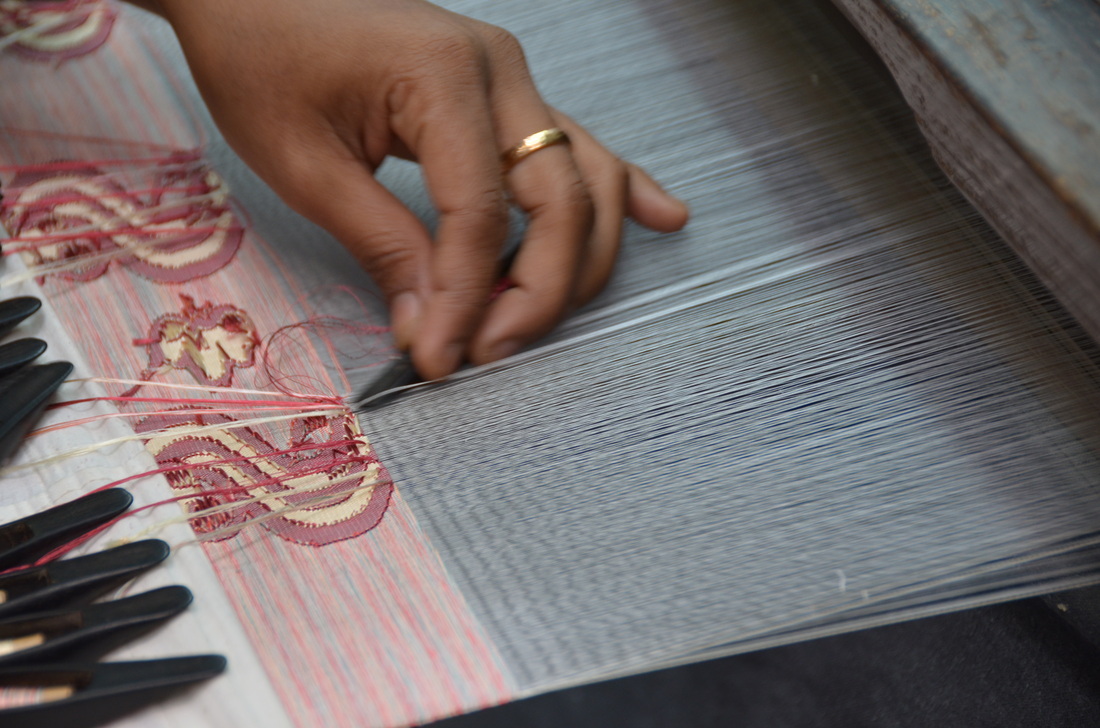 They were weaving in reverse - what you see in the photo above is the wrong side. The only way to see the right side was by using a mirror (below). 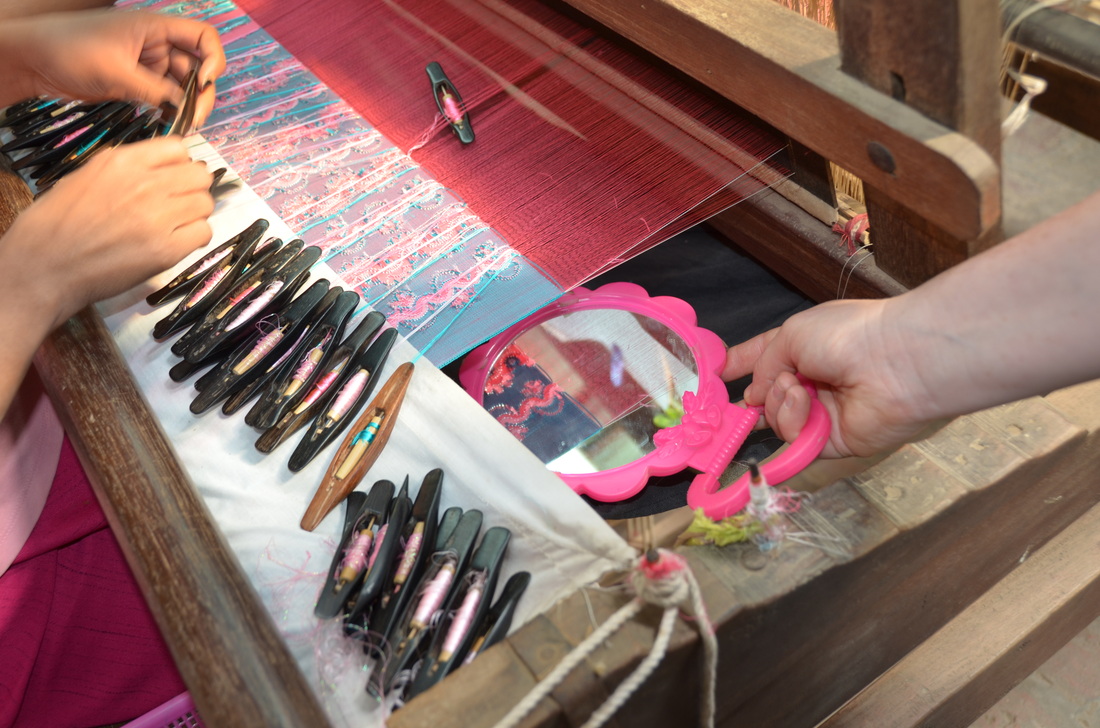 Check out all those bobbins. These women were master weavers! There were usually two women working on each loom to make one piece of fabric. 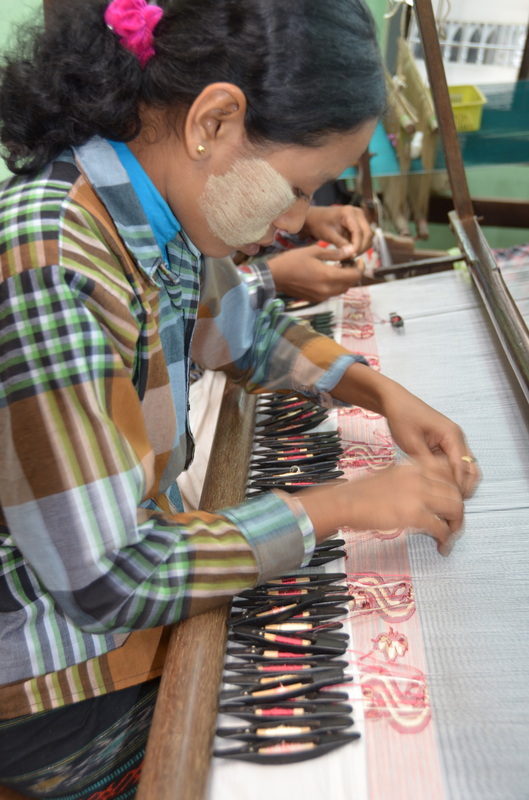 The weaver is wearing thanaka on her face; this skin protection is typical of most women and children in Myanmar. They believe it protects against sunburn and wrinkles. It consists of ground wood from a tree of the same name; there are various qualities of thanaka and also different stones for grinding it.
Art quilters often compare their fabrics to an artist’s palette of paints. The same can be said for those who have discovered thread painting, although in this case, the threads are like crayons or colored pencils, and the fabric is the paper. Thread painting is a method of densely covering fabric with machine stitches—either on a home sewing machine or a longarm machine. It is similar to free-motion quilting, in that you drop the feed dogs and move the fabric around freely as you work. An alternative is thread sketching, which simply highlights certain areas of a design with free-motion stitches, a less time-consuming prospect as the stitching is not so dense. Both are thoroughly enjoyable and mesmerizing, justifiably making a quilter feel like an artist. I started out by tracing my design onto cotton fabric, then stabilized the fabric with two layers of iron-on interfacing. 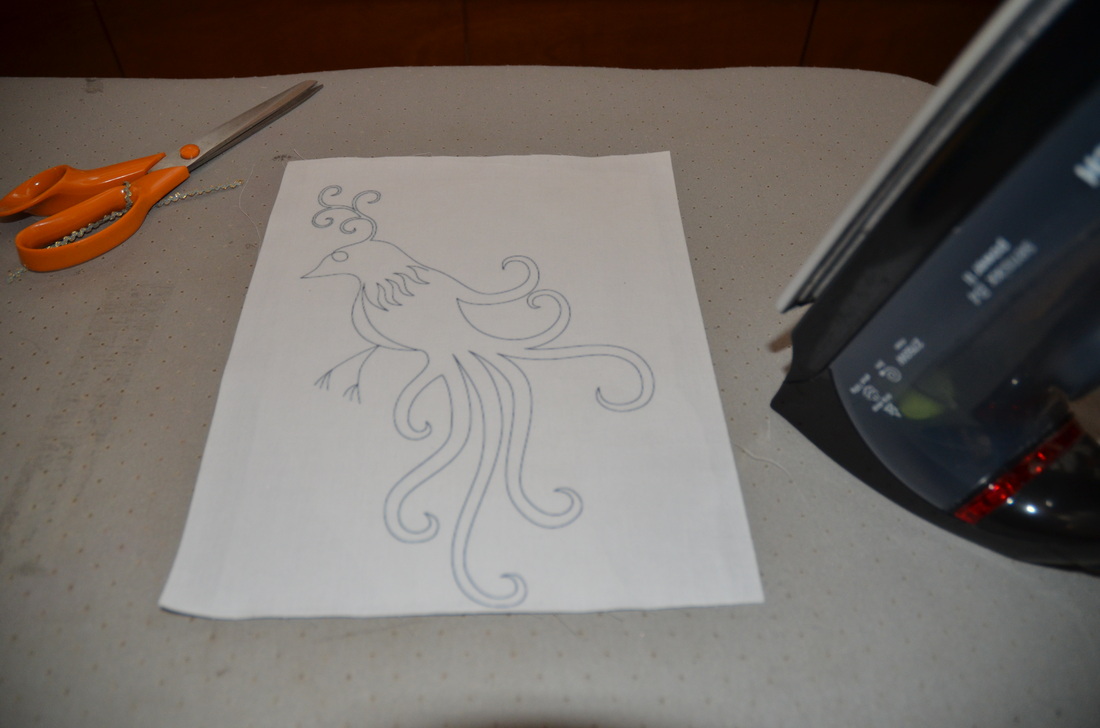 I inserted the first area I wanted to stitch into a clip frame. I dropped the feed dogs on my sewing machine, threaded the machine with black thread, and drew up the bobbin thread before beginning, as shown here. I made a couple of stitches, then trimmed off the threads so they wouldn't be in the way. 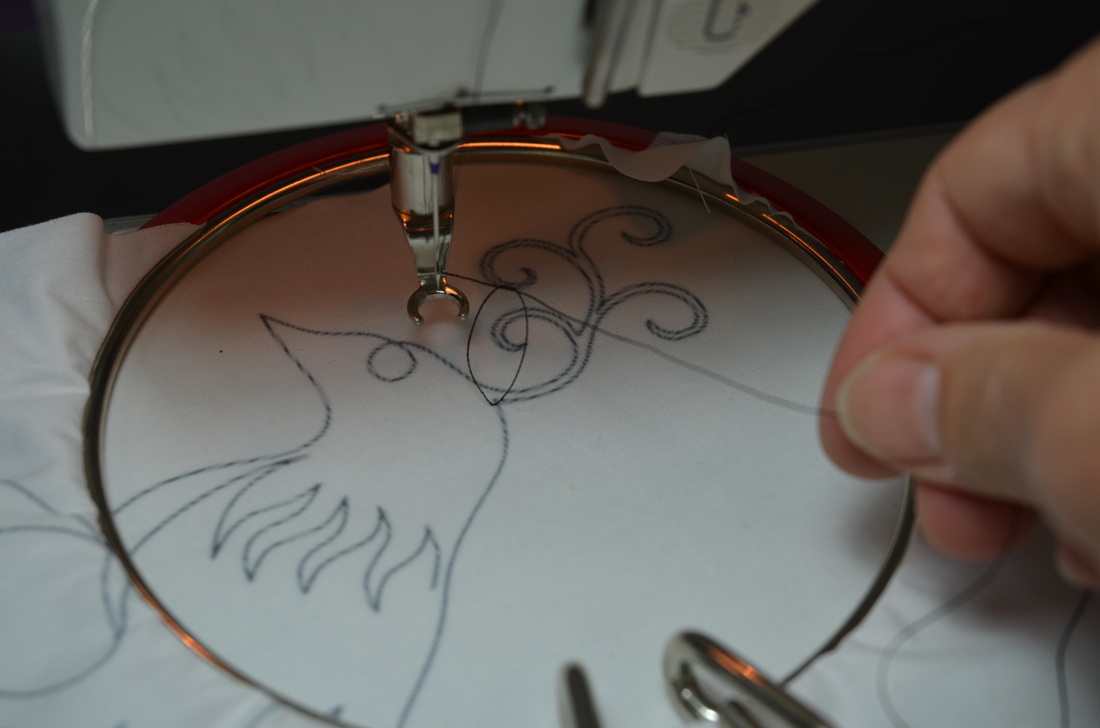 I set the stitch length to zero and the stitch to zigzag. First, I outlined the bird with zigzag stitch, working slowly, with the stitching line of the design always in a horizontal position. (I usually have two hands on the hoop, but my right hand was holding the camera and taking the photo!) I moved the work from side to side as I stitched, turning the work continually in the curved areas. It helps if you can program the needle to stop in the down position so that the work doesn't shift out of place when you stop stitching to take a break.  Once the whole bird was outlined in black, I threaded the machine with a variegated blue/green, and changed to straight stitch. I made a series of stitches across the design, to imprecisely cover the area to be filled in - making a padded background of straight lines. These stitches do not have to be perfect as they form a base that will be hidden by the later stitches. 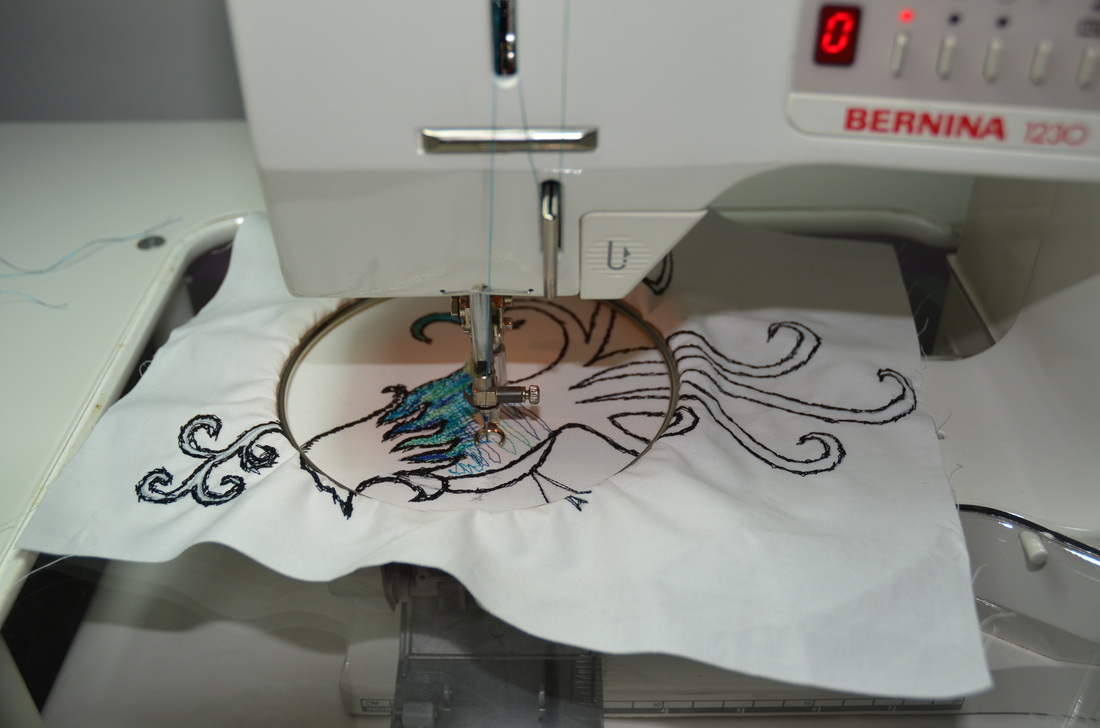 I changed back to zigzag stitch to fill in the design, following the natural direction and curves of the design. It's important to stitch carefully, thoroughly filling in any gaps that form. The needle may begin to make a knocking sound as it stitches through thick threads; this is normal. 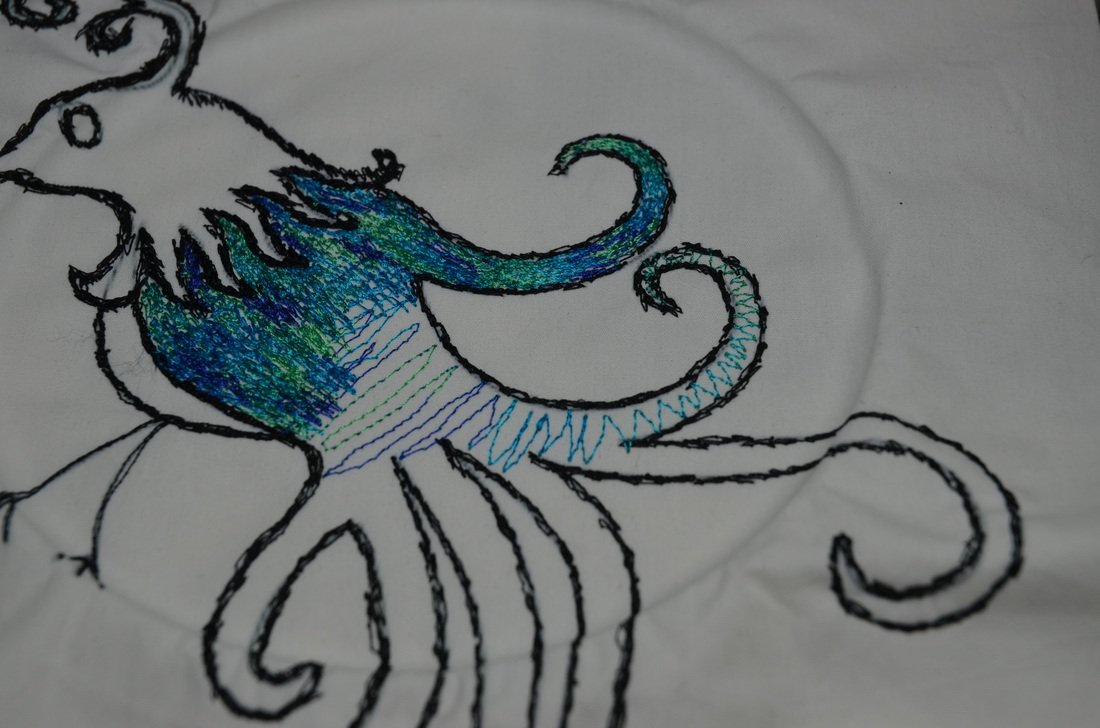 The previous image shows some of the straight "padding" stitches, as well as the zigzag filler stitches on top. You can add highlights with different color threads if you wish. Try to vary the length and position of all the stitches to create a natural, random appearance. If your design is larger than the hoop, re-hoop as required.
I haven't finished thread painting the bird yet, but will post an image of it when I'm done. It has been a long time since I posted anything, mostly because I've been working flat out on the book. Well, the book is almost done. All the text has been written, the artwork is nearly completed, and Jane has just about finished laying out all the pages. It's hard to believe, but within a week or so, this book will be out of my hands, and not a moment too soon! 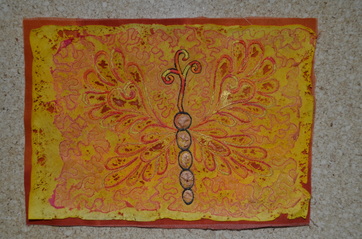
This butterfly was done for the section on synthetic materials. First, I painted a sheet of medium weight Lutradur yellow, and let it dry. Then I treated it with Bubble Jet Set solution and hung it to dry. 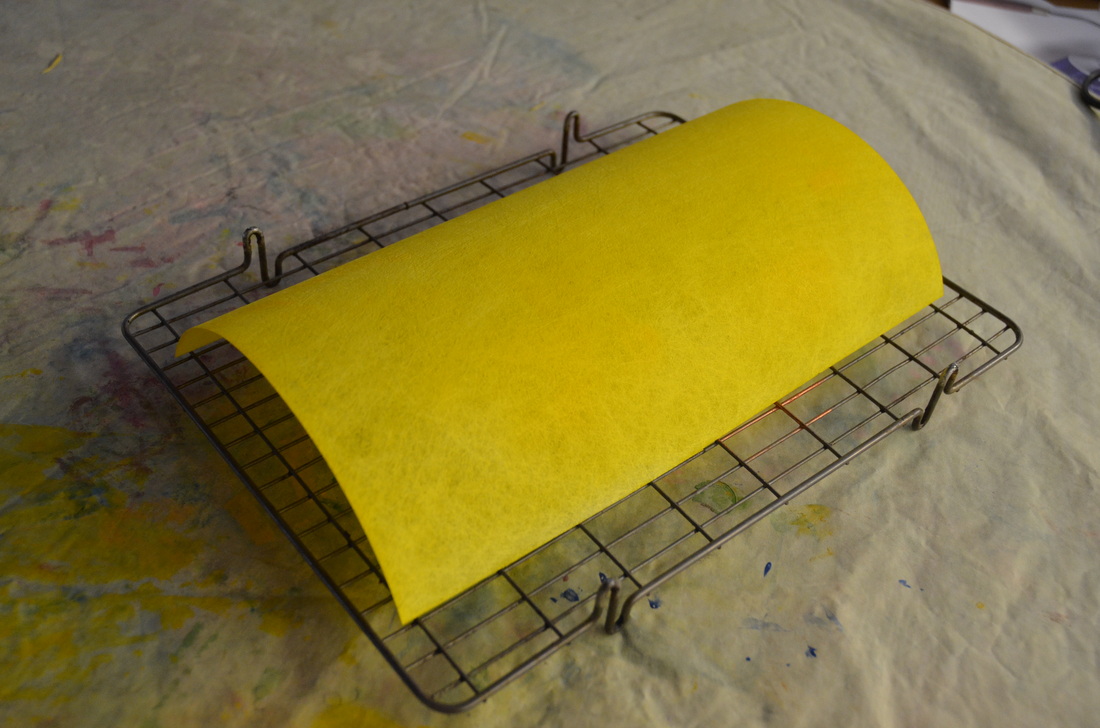
When that was fully dry, I ran the sheet of Lutradur through my computer so that a butterfly design printed straight onto it (in this photo, I have printed my dog Jack's image, but the butterfly was done the same way). Because of the stiffness of Lutradur, I didn't have to secure it to freezer paper before printing, it just went through the printer beautifully. 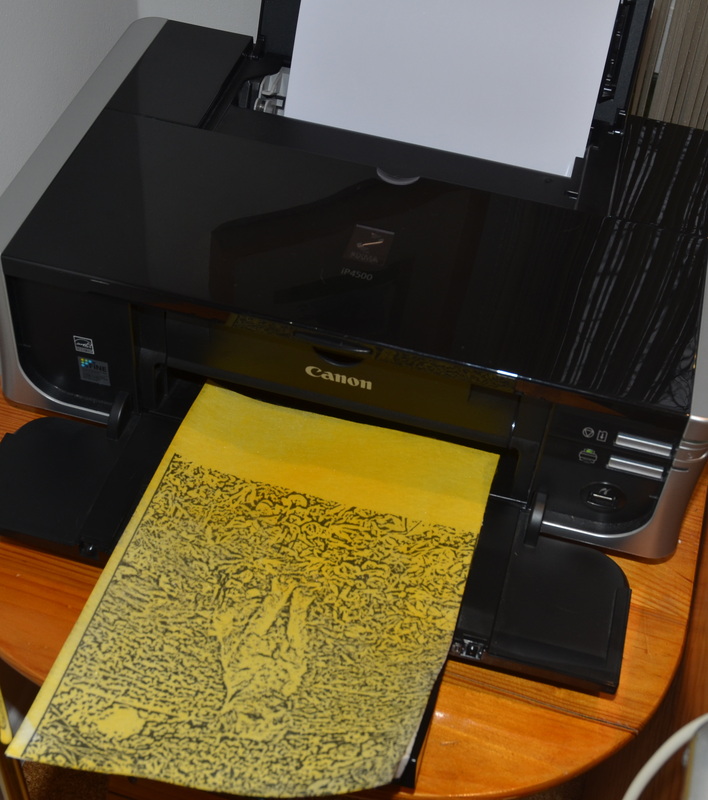
Next I layered an orange synthetic organza over the top of the butterfly (I could see the printed design through it). I put a thick orange furnishing fabric underneath. After pinning the layers together, I thread painted the butterfly using a variegated orange/yellow/red thread (more on thread painting in my next post). 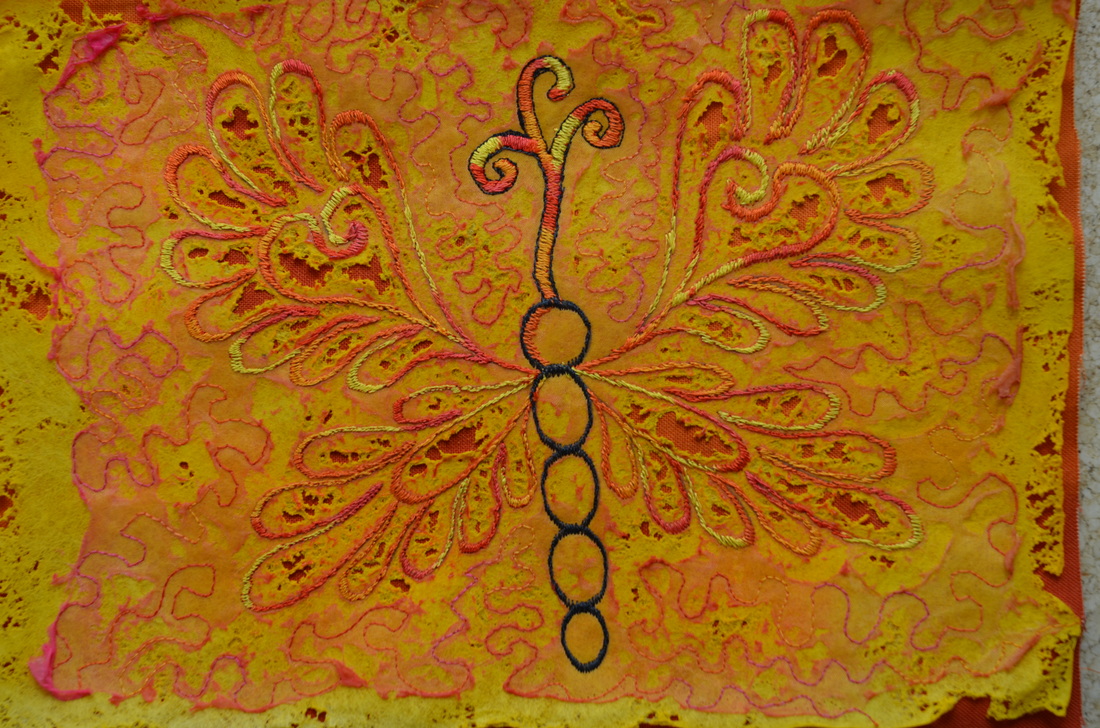
After the butterfly was thread painted I used a heat gun to distress the organza and Lutradur. You can see the areas within the wings and along the edges that are melted. I will probably mount this on fabric covered foam board so it can be hung.
I had a wonderful private workshop with Kate Crossley last week http://www.katecrossley.com/ She taught me how to do acid etching. We started with a piece of cotton fabric that she had already machine embroidered and corded with polyester threads (which are not affected by the acid).  We then layered the embroidered fabric with lots of other fabrics, placing the strips perpendicular to the embroidery on the base. We used cellulose, protein and synthetic fibers. When satisfied with the placement, we pinned the layers together. 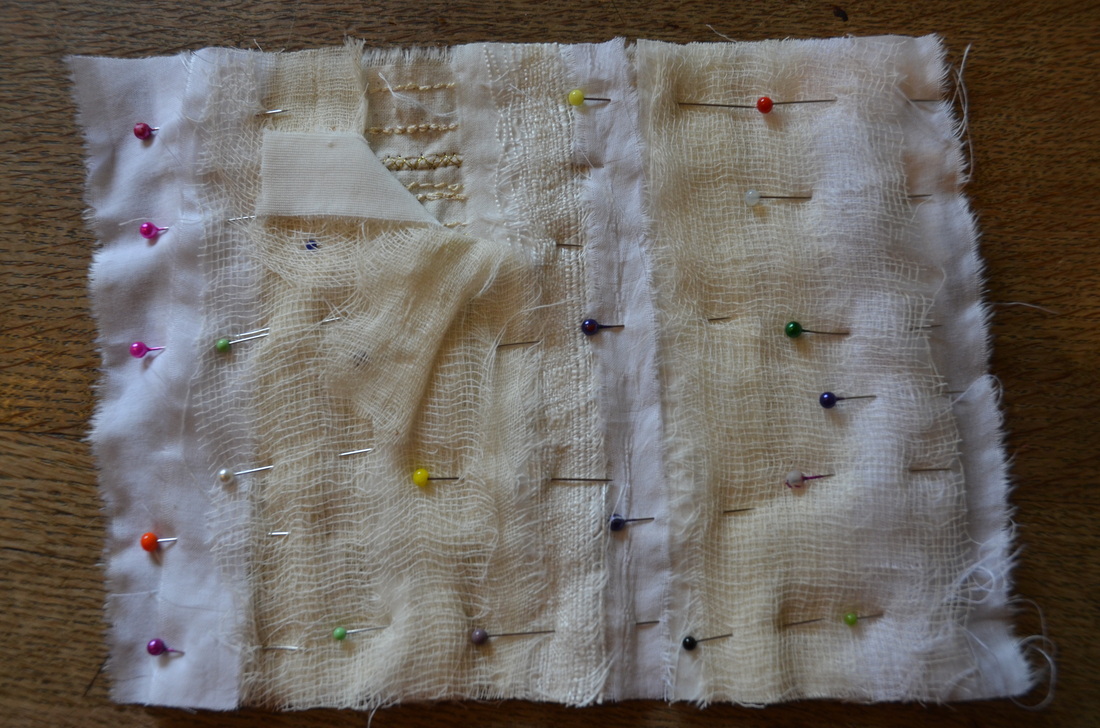 We then machine embroidered the pieces so the stitches were perpendicular to the first set of stitches using polyester thread.  We applied a product called Fiber Etch at random on the layered, embroidered fabric, rubbing the gel into the fibers with the nozzle. Fiber Etch contains sodium bisulphate which eats away cellulose fibers (cotton, linen, rayon), but does not affect synthetics or protein fibers such as silk and wool; this is why polyester thread was used for the stitching. 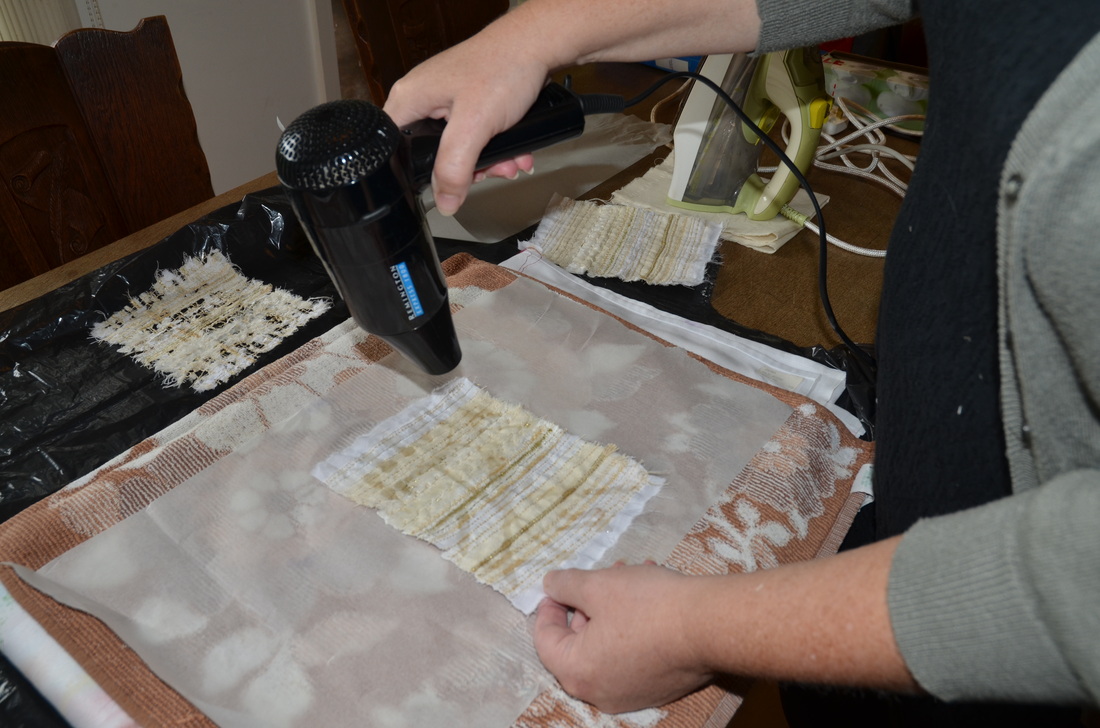 We dried the Fiber Etch gel with a hair dryer (windows open, wearing a mask!), then the piece was placed between two layers of baking parchment and pressed thoroughly, with the iron on a wool setting. The etched areas turned a coffee brown color. We rinsed the fabric under running water, scraping away the etched fibers. 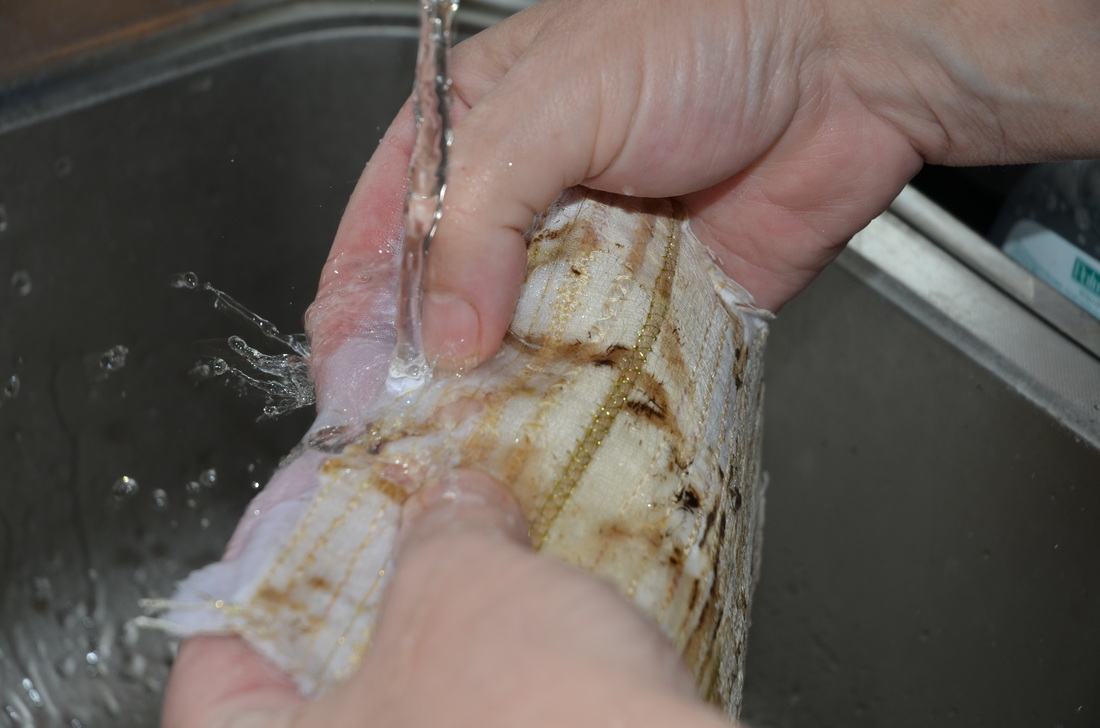 This is the result. It looks almost ethereal to me. Acid etching is a really fun technique with unpredictable results. Take a look at Kate's acid etched pieces on her website. She is available to teach workshops on this technique to groups. 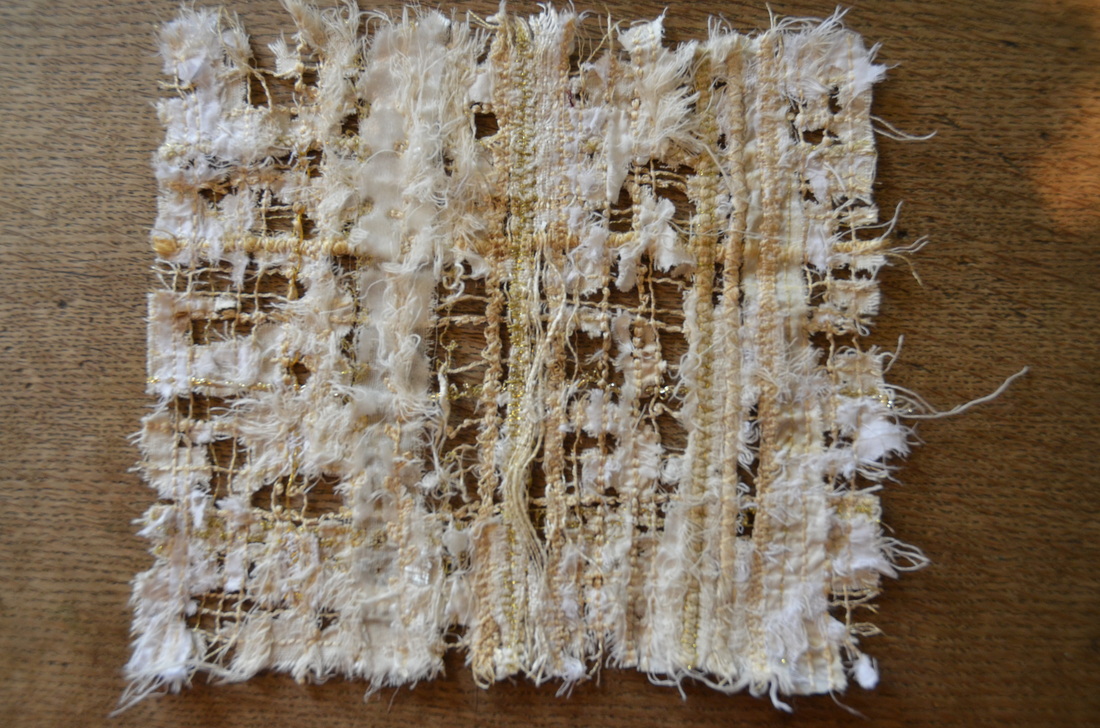 |
Archives
March 2023
Categories
All
|
 RSS Feed